反向代理原理
-
Nginx不仅能作为Web服务器,还具有反向代理、负载均衡和缓存的功能
-
Nginx通过proxy模块实现将客户端的请求代理至上游服务器,此时nginx与上游服务器的连接是通过http协议进行的
-
Nginx在实现反向代理功能时的最重要指令为 proxy_pass,它能够并能够根据URI、客户端参数或其它的处理逻辑将用户请求调度至上游服务器
配置Nginx实现动静分离
本案例根据企业需要,将配置Nginx实现动静分离,对 php页面的请求转发给LAMP处理,而静态页面交给Nginx处理,以实现动静分离。
架构如图所示:

配置步骤
-
架设并调试后端LAMP环境
-
安装配置Nginx处理静态页面请求,在server {};段加入

准备两台服务器:
7-2 LAMP 192.168.17.151
7-4 Nginx 192.168.17.130
首先,7-2 我们先来搭建LAMP
#安装Apache并开启服务
[root@LAMP ~]# yum install -y httpd
[root@LAMP ~]# systemctl start httpd.service
#防火墙的配置,直接关闭防火墙也可以
firewall-cmd --permanent --zone=public --add-service=http
success

firewall-cmd --permanent --zone=public --add-service=https
success

firewall-cmd --reload
success
或
[root@LAMP ~]# systemctl stop firewalld.service
[root@LAMP ~]# setenforce 0
#这里我们不安装mysql,安装mariadb并开启
[root@LAMP ~]# yum install mariadb mariadb-server mariadb-libs mariadb-devel -y

[root@LAMP ~]# systemctl start mariadb
#开启mysql一键式设定
[root@LAMP ~]# mysql_secure_installation
Enter current password for root (enter for none):                 //直接回车
Set root password? [Y/n] 										//Y,设置密码
Remove anonymous users? [Y/n] 									//n
Disallow root login remotely? [Y/n] 							//n
Remove test database and access to it? [Y/n] 					//n
Reload privilege tables now? [Y/n] 								//y,重载
#安装php
[root@LAMP ~]# yum -y install php
#建立php和mysql关联
[root@LAMP ~]# yum install php-mysql -y
#安装php插件
[root@LAMP ~]# yum install -y php-gd php-ldap php-odbc php-pear php-xml php-xmlrpc php-mbstring php-snmp php-soap curl curl-devel php-bcmath
#建立php站点首页
[root@LAMP ~]# cd /var/www/html
[root@LAMP html]# vim index. php
<?php
phpinfo() ;
?>
#服务全部启动,访问网页
[root@LAMP html]# systemctl restart httpd.service
[root@LAMP html]# systemctl restart mariadb.service

7-4服务器编译安装Nginx
#挂载并解压Nginx安装包
[root@nginx ~]# mkdir /abc
[root@nginx ~]# mount.cifs //192.168.17.1/LNMP /abc
Password for root@//192.168.17.1/LNMP:
[root@nginx ~]# cd /abc
[root@nginx abc]# ls
Discuz_X3.4_SC_UTF8.zip    php-5.6.11.tar.bz2
error.png                  php-7.1.10.tar.bz2
mysql-boost-5.7.20.tar.gz  php-7.1.20.tar.bz2
ncurses-5.6.tar.gz         php-7.1.20.tar.gz
nginx-1.12.2.tar.gz        zend-loader-php5.6-linux-x86_64_update1.tar.gz
nz.jpg
[root@nginx abc]# tar zxvf nginx-1.12.2.tar.gz -C /opt
#安装语言环境依赖包
[root@nginx abc]# yum install -y gcc gcc-c++ make pcre* zlib-devel
#创建程序用户
[root@nginx abc]# useradd -M -s /sbin/nologin nginx
#配置编译并安装
[root@nginx nginx-1.12.2]# ./configure --prefix=/usr/local/nginx --user=nginx --group=nginx --with-http_stub_status_module
#优化路径,便于系统识别命令
[root@nginx nginx-1.12.2]# ln -s /usr/local/nginx/sbin/* /usr/local/sbin/
#制作管理脚本,便于service管理
[root@nginx nginx-1.12.2]# vim /etc/init.d/nginx
#!/bin/bash
# chkconfig: - 99 20
# description: Nginx Service Control Script
PROG="/usr/local/nginx/sbin/nginx"
PIDF="/usr/local/nginx/logs/nginx.pid"
case "$1" in
     start)
	$PROG
	;;
    stop)
	kill -s QUIT $(cat $PIDF)
	;;
    restart)
	$0 stop
	$0 start
	;;
    reload)
	kill -s HUP $(cat $PIDF)
	;;
    *)
	echo "Usage: $0 {start |stoplrestart |reload}"
	exit 1
esac
exit 0

[root@nginx nginx-1.12.2]# chmod +x /etc/init.d/nginx             //添加执行权限
[root@nginx nginx-1.12.2]# chkconfig --add nginx                 //添加系统识别命令
[root@nginx nginx-1.12.2]# chkconfig --level 35 nginx on         //开机自启
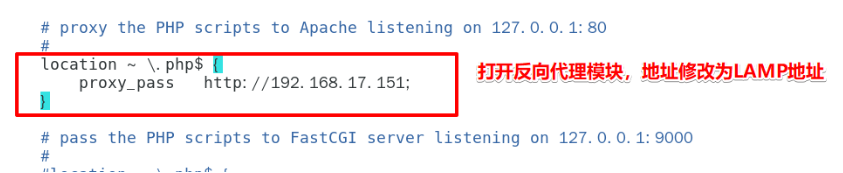
#修改nginx配置文件,打开反向代理模块,修改地址为Apahce地址, 意思是动态请求重定向指到LAMP地址
vim /usr/local/nginx/conf/nginx.conf
#重启服务后访问网站


可以看到访问的ip都是192.168.17.130,静态页面由Nginx自己处理,动态页面由Nginx转交给Apache处理
