Nginx+Apache其实就是Nginx做前端,Apache做后端。
Nginx高并发,Proxy功能强效率高,占用系统资源少;Apache的功能模块比较多,Apache在高并发时对队列的处理比FastCGI(Nginx需要通过fastcgi等方式运行php)更好,并且在处理动态php页面时,mod_php也比php-cgi更稳定更高效。
这里工作模式大致可以分为两种
第一种
由Nginx来接收客户端的请求,如果是动态页面请求,就交给Apache(LAMP、tomcat)处理,然后经由Nginx再返回给客户端,其余的请求,则由Nginx自己处理,然后把结果返回给客户端。
第二种
Nginx只做Proxy功能,所有的请求都交给Apache,Tomcat等处理。
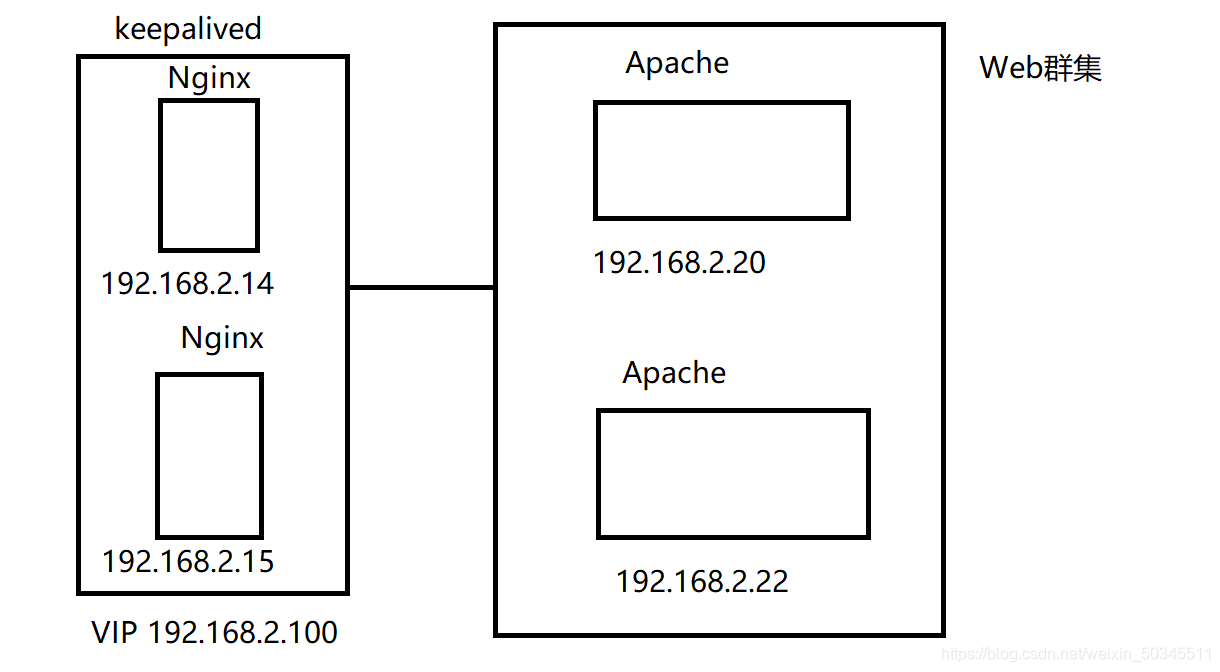
web群集部署apache
1.xftp上传文件

2.环境设置
可以使用yum安装gcc gcc-c++ make pcre-devel expat-devel perl
80号端口没有被占用
netstat -anpt | grep 80
4台设备在同一网段(可以相互通信;ping测试)
关闭防火墙
systemctl stop firewalld
setenforce 0
3.脚本安装apache
#!/bin/bash
#apache的编译安装和配置
tar xf apr-1.6.2.tar.gz
tar xf apr-util-1.6.0.tar.gz
tar xf httpd-2.4.29.tar.bz2
mv apr-1.6.2 httpd-2.4.29/srclib/apr
mv apr-util-1.6.0 httpd-2.4.29/srclib/apr-util
yum -y install gcc gcc-c++ make pcre-devel expat-devel perl
cd httpd-2.4.29/
 ./configure --prefix=/usr/local/httpd --enable-so --enable-rewrite --enable-charset-lite --enable-cgi
make && make install
cd
cp /usr/local/httpd/bin/apachectl /etc/init.d/httpd
sed -i -e '2i#chkconfig: 35 85 21' /etc/init.d/httpd
sed -i -e '3i#description: Apache HTTP Server' /etc/init.d/httpd
chkconfig --add httpd
ln -s /usr/local/httpd/bin/* /usr/bin/
ln -s /usr/local/httpd/conf/httpd.conf /etc/
4.执行脚本,测试
systemctl start httpd
curl http://localhost


Nginx部署
1.xftp上传文件

2.nginx编译安装脚本
#!/bin/bash
#nginx编译安装

yum -y install gcc gcc-c++ make pcre pcre-devel zlib zlib-devel
useradd -M -s /sbin/nologin nginx
tar xf nginx-1.12.2.tar.gz
cd nginx-1.12.2/
 ./configure \
--prefix=/usr/local/nginx \
--user=nginx \
--group=nginx \
--with-http_stub_status_module
make && make install
ln -s /usr/local/nginx/sbin/nginx /usr/local/sbin/
ln -s /usr/local/nginx/conf/nginx.conf /etc/
nginx -t
出现下面两行,说明安装成功

3.安装keepalived
tar xf keepalived-2.0.13.tar.gz
yum -y install gcc gcc-c++ make popt-devel kernel-devel openssl-devel
编译安装
cd keepalived-2.0.13
./configure --prefix=/
make && make install
加入系统管理服务
cp keepalived/etc/init.d/keepalived /etc/init.d/
systemctl enable keepalived.service
编辑配置文件
1.nginx.conf
vi /etc/nginx.conf
添加服务器池,当服务器池不能处理时,转到本机
    upstream httpd_server {
        server 192.168.2.20:80 weight=1;
        server 192.168.2.22:80 weight=1;
        server 127.0.0.1 backup;
    }
注释原本的

添加新的location
        location / {
            proxy_pass http://httpd_server;
            proxy_set_header Host $http_host;
        }
如果后端真是的服务器设置有类似防盗链或者根据http请求头中的host字段来进行路由或判断功能的话,如果反向代理层的nginx不重写请求头中的host字段,将会导致请求失败,报400错误,所以需要添加host头,将头信息返回服务器
proxy_set_header Host $http_host;
2.keepalived配置
vi /etc/keepalived/keepalived.conf
global_defs {
router_id Nginx_01
}
vrrp_instance VI_1 {
state MASTER
interface ens33
virtual_router_id 51
priority 150
advert_int 1
authentication {
auth_type PASS
auth_pass 1111
}
track_script {
chk_http_port
}
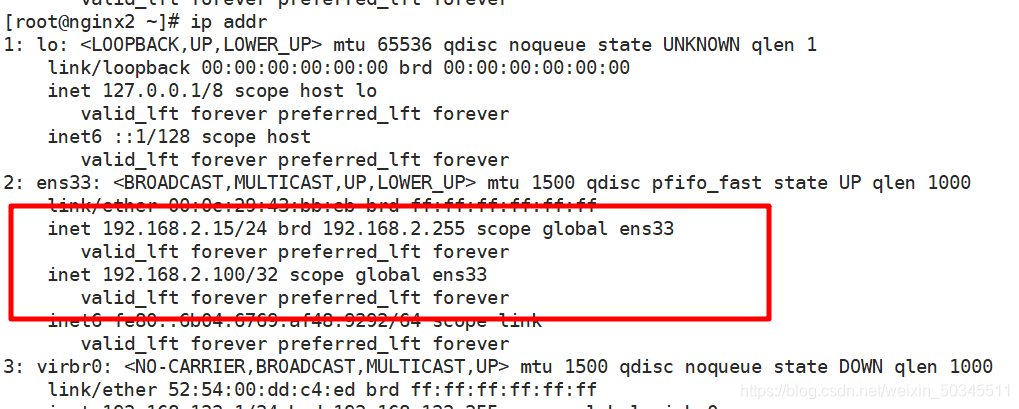
virtual_ipaddress {
192.168.2.100
}
}
备用nginx配置
! Configuration File for keepalived

global_defs {
   router_id Nginx_02
   }

vrrp_instance VI_1 {
    state BACKUP
    interface ens33
    virtual_router_id 51
    priority 145
    advert_int 1
    authentication {
        auth_type PASS
        auth_pass 1111
    }

    virtual_ipaddress {
        192.168.2.100
    }
}
3.测试
重启测试
开启nginx:nginx
重启nginx:killall -1 nginx
重启keepalived:systemctl restart keepalived


关闭主nginx上的keepalived
systemctl stop keepalived.service
查看备用nginx