最近由于业务需求,需要用到富文本编辑器,找寻了好久,起初想使用百度的ueditor,但在使用的过程中实在是遇到了太多的坑,于是另外锁定了一款富文本编辑器——wangEditor。这是一款轻量级的富文本编辑器,比起百度的ueditor,这款编辑器的界面更加简单,文档也很详细。对于需求不是很高的功能来说,这款编辑器实在是不二之选。
一、wangEditor的基本显示demo
这个部分非常简单,官网文档也写得非常详细,直接参考官网即可
附上文档地址:https://www.kancloud.cn/wangfupeng/wangeditor3/335769
下载地址:https://github.com/wangfupeng1988/wangEditor/releases
编辑器效果如下:

二、图片上传后台接口编写
后台用到的是springboot+mybatis+mysql,为了方便测试,图片上传后是直接放在本地服务器。
2.1、Service层代码
public interface IImgUploadService {

    String imgUpload(String imgPath);
}


@Service("iImgUploadService")
public class ImgUploadServiceImpl implements IImgUploadService {

    @Autowired
    private ImageUploadMapper imageUploadMapper;

    private static Logger logger = LoggerFactory.getLogger("ImgUploadServiceImpl.class");


    /**
     * 存储上传图片的路径
     * @param
     * @return
     */
    public String imgUpload(String imgPath){

        ImageUpload upload = new ImageUpload();
        upload.setImgpath(imgPath);
        // 一定要加非空判断,否则会报空指针异常
        if(upload.getImgpath() == null){
            return "图片地址为空";
        }
//        logger.error("向数据库中存储的路径为:" + upload.getImgpath());
//        logger.error("传递过来的imgPath参数为:" + imgPath);
//        logger.error(upload.toString());
        int rowCount = imageUploadMapper.insertImgPath(upload.getImgpath());
        logger.error(rowCount + "");
        if(rowCount > 0){
            return "图片地址存储成功";
        }
        return "图片地址存储失败";
    }
}
2.2、Controller层代码
public class TestController {

    private static final Logger logger = LoggerFactory.getLogger("TestController.class");
    private final ResourceLoader resourceLoader;
    @Autowired
    private IImgUploadService iImgUploadService;
    @Value("${web.upload-path}")
    private String path;
    @Value("${server.port}")
    private String port;

    @Autowired
    public TestController(ResourceLoader resourceLoader) {
        this.resourceLoader = resourceLoader;
    }

    /**
     * @param file 要上传的文件
     * @return
     */
    @ResponseBody
    @RequestMapping(value = "/fileUpload", method = RequestMethod.POST)
    public Map<String, String> upload(@RequestParam("file") MultipartFile file, HttpServletRequest request) {

        Map<String,String>  map=new HashMap<>();

        String filePath = request.getSession().getServletContext().getRealPath(path);

        //生成随机字符串,用于图片命名
        String uuid = UUID.randomUUID().toString().replaceAll("-", "");

        // 获得文件类型
        String fileType = file.getContentType();
        // 获得文件后缀名称
        String imageName = fileType.substring(fileType.indexOf("/") + 1);
        // 原名称
//        String fileName = file.getOriginalFilename();
        // 新名称
        String newFileName = uuid + "." + imageName;

        System.out.println(imageName);

        try {
            FileUtils.upload(file.getBytes(), filePath, newFileName);
        } catch (Exception e) {
            e.printStackTrace();
        }

        // 拼接图片url
        String imgHost = "http://127.0.0.1:" + port;
        String imgUploadPath = path;
        String imgName = newFileName;
        String imgPath = imgHost + imgUploadPath + imgName;
        iImgUploadService.imgUpload(imgPath);
        map.put("url",imgPath);
        return map;

    }

    /**
     * 跳转到文件上传页面
     *
     * @return
     */
    @RequestMapping("test")
    public String toUpload() {
        return "ttt";
    }
2.3、前端HTML代码
<!DOCTYPE html>
<html lang="en" xmlns:th="http://www.thymeleaf.org">
<head>
    <meta charset="UTF-8"/>
    <title>ueditor-demo</title>
    <script th:src="@{${#httpServletRequest.getContextPath()}+'/js/jquery-1.7.1.min.js'}"></script>
    <script th:src="@{${#httpServletRequest.getContextPath()}+'/js/wangEditor.min.js'}"></script>

</head>
<body>
<h2>wangEditor</h2>

<div id="editor">
    <p>欢迎使用 <b>wangEditor</b> 富文本编辑器</p>
</div>

<!-- 注意, 只需要引用 JS,无需引用任何 CSS !!!-->
<script type="text/javascript" src="/wangEditor.min.js"></script>
<script type="text/javascript">
    var E = window.wangEditor;
    var editor = new E('#editor');

    //开启debug模式
    editor.customConfig.debug = true;
    // 关闭粘贴内容中的样式
    editor.customConfig.pasteFilterStyle = false
    // 忽略粘贴内容中的图片
    editor.customConfig.pasteIgnoreImg = true
    // 使用 base64 保存图片
    //editor.customConfig.uploadImgShowBase64 = true


    editor.customConfig.uploadFileName = "file";
    editor.customConfig.uploadImgServer = '/fileUpload';
    editor.customConfig.debug = true;

    //自定义上传图片事件
    editor.customConfig.uploadImgHooks = {
        before: function (xhr, editor, files) {

        },
        success: function (xhr, editor, result) {
            console.log("上传成功");
        },
        fail: function (xhr, editor, result) {
            console.log("上传失败,原因是" + result);
        },
        error: function (xhr, editor) {
            console.log("上传出错");
        },
        timeout: function (xhr, editor) {
            console.log("上传超时");
        },
        customInsert: function (insertImg, result, editor) {
            // 图片上传并返回结果,自定义插入图片的事件(而不是编辑器自动插入图片!!!)
            // insertImg 是插入图片的函数,editor 是编辑器对象,result 是服务器端返回的结果

            // 举例:假如上传图片成功后,服务器端返回的是 {url:'....'} 这种格式,即可这样插入图片:
            var url = result.url;
            insertImg(url)

            // result 必须是一个 JSON 格式字符串!!!否则报错
        }

    };
    // 或者 var editor = new E( document.getElementById('editor') )
    editor.create()
</script>

</body>

</html>
2.4、效果展示

三、踩坑经历
做的是一个小demo所以代码很简单。下面是我要说的重点,我的踩坑经历。
3.1、上传图片的参数问题
如果后台自定义的上传文件的参数,如图

那么前端js中就得添一句:
editor.customConfig.uploadFileName = 'file'用于指定参数名,否则前端会出现“400”的错误。
3.2、图片上传的接口配置
在这里我被官网的文档给坑了一把,也许是我自己没理解清楚吧,唉!文档中如下图所说配置
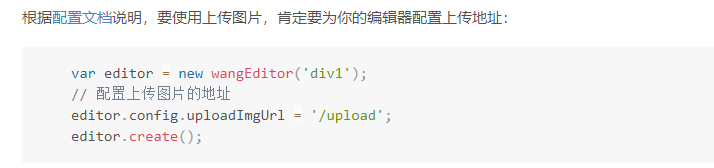
配置地址用的是
editor.config.uploadImgUrl = '/upload';然而我用这个确怎么也无法成功,编辑器都无法创建,后来更改为
// 配置服务器端地址
    editor.customConfig.uploadImgServer = '/upload'
成功创建编辑器。
3.3、后台数据返回与编辑器内部图片显示
如果我们通过上面配置的接口成功将图片上传至服务器了,现需要在编辑器里将刚上传的图片显示在编辑器里面。那么后台需要返回图片的url,格式如http://localhost:8011/uploadfiles/5168898981064558.jpeg,在浏览器中输入该url,然后回车,要能得到刚才上传的图片
例如:

接着要想让此图片在编辑器里面显示,还需要在前端自定义插入图片的事件,因为编辑器是不会自动插入图片的,贴出该事件的代码:
customInsert: function (insertImg, result, editor) {

        // insertImg 是插入图片的函数,editor 是编辑器对象,result 是服务器端返回的结果

        // 举例:假如上传图片成功后,服务器端返回的是 {url:'....'} 这种格式,即可这样插入图片:
        var url = result.url
        insertImg(url)

}注意:result 必须是一个 JSON 格式字符串!!!否则报错
最后贴出demo的完整代码地址:https://gitee.com/1697923044/springboot-wangEditor
1、项目默认将图片上传到本地路径,如果需要上传到服务器路径直接在项目中进行修改即可,不要忘了修改存储到数据库中的路径。
2、项目没有使用任何图片上传控件或插件,原生springBoot实现,简单易上手。
3、项目使用Maven进行构建,朋友们在导入项目时不要导错了。
