支持定义任意多个属性值,简单好用!文章底部获取完整代码!

如何使用
- 新建一个节点
- 为节点添加
graphics组件
- 添加用户脚本
radar
- 调整对应参数

实现原理
需求可以转化成如何画一个有特点的多边形。
先观察一下,雷达图的每个属性有什么特点。
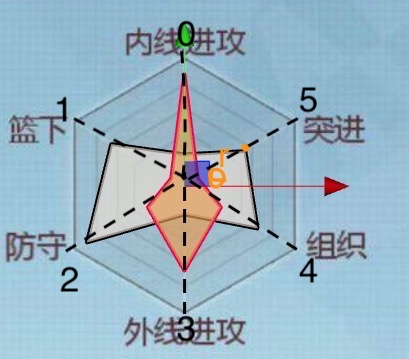
可以看到每个属性值,都是在固定虚线上移动。
而且每条线的夹角都是一样的。这个夹角就是 360度 除以 总共属性数量。
const radians_per = Math.PI * 2 / this.side_count;所以我们可以按照属性次序确定与x轴的夹角。如果我们把第一个属性值放在y轴,那么初始角度为 90。
// 初始边放在y轴,多90度
const radians = side_i * radians_per + Math.PI / 2;
虚线的长度可以由总长度和需要的百分比求出。
const side_length = this.side_max_length * percent;接着根据极坐标到直角坐标系的转换,就能求出该属性的坐标。
// 坐标计算 x = r * cos   y = r * sin
const posX = side_length * Math.cos(radians);
const posY = side_length * Math.sin(radians);
最后将所有的点连起来,完成雷达图的绘制。完整的绘制代码如下。
this.graphics.clear();
// 每个夹角
const radians_per = Math.PI * 2 / this.side_count;
for (let side_i = 0; side_i < this.side_count; side_i++) {
    const percent = (this.side_percent[side_i] || 0) / 100;
    // 每个边的长度
    const side_length = this.side_max_length * percent;
    // 初始边放在y轴,多90度
    const radians = side_i * radians_per + Math.PI / 2;
    // 坐标计算 x = r * cos   y = r * sin
    const posX = side_length * Math.cos(radians);
    const posY = side_length * Math.sin(radians);
    if (side_i === 0) {
        this.graphics.moveTo(posX, posY);
    } else {
        this.graphics.lineTo(posX, posY);
    }
}
this.graphics.close();
this.graphics.stroke();
this.graphics.fill();
以上为白玉无冰使用 Cocos Creator v2.2.2 开发"雷达图"的技术分享。更多精彩欢迎关注wx公中号【白玉无冰】!如果这篇对你有点帮助,欢迎分享给身边的朋友。