Summary
Test on ARTIK 530 connecting to ARTIK Cloud, using ARTIK 530 Switch to control the LED through ARTIK cloud, with successful result.
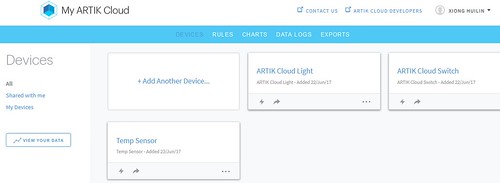
Creating a New Device in ARTIK cloud
Refer to this Link, create the “ARTIK Cloud Light”, “ARTIK Cloud Switch” and “Temp Sensor”.
Getting the Device Token
Generate the device token, device token is used for further interaction between the ARTIK Module and ARTIK Cloud.
Take ARTIK Cloud Light as example:
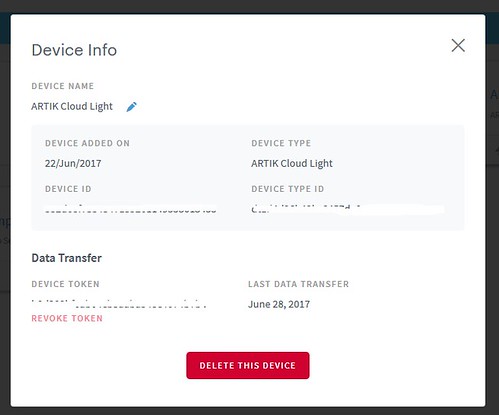
Record down the User ID, DEVICE ID, DEVICE TOKEN for later usage.
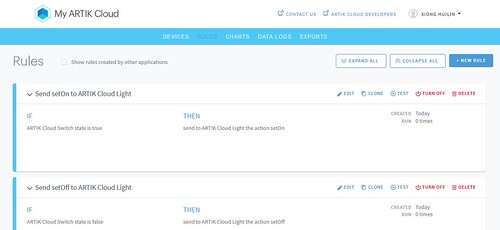
Creating Rules
Refer to this Link to create two rules, the logic is as below,
if ARTIK Cloud Switch state is true, then send to ARTIK Cloud Light the action setOn
if ARTIK Cloud Switch state is false, then send to send to ARTIK Cloud Light the action setOff.
Alternatively, can follow this document, use REST API to create rules.
Below JS code create the rule when Switch is false, send to ARTIK Cloud Light the action setOff, similarly can create another rule to send to ARTIK Cloud Light the action setOn.
Either way is working properly.
var Client = require("node-rest-client").Client
var c = new Client();
var restUrl = "https://api.artik.cloud/v1.1/"
var userToken = "User token fill in" //Copy User Token from Exercise 1, Step 2
var userId = " "
var sourceDeviceId = 'source device ID fill in' //Copy from Exercise 1, Step 2 --ARTIK_CLOUD_SWITCH_DeviceID--
var destDeviceId = 'destination device ID' //Copy from Exercise 1, Step 2 --ARTIK_CLOUD_Light_DeviceID
var rule ={
"if": {
"sdid": sourceDeviceId,
"field": "state",
"operator": "=",
"operand": {
"value": false
}
},
"then": [
{
"ddid": destDeviceId,
"action": "setOff"
}
]
};
function build_mesg ( userId) {
var args = {
"headers": {
"Content-Type": "application/json",
"Authorization": "Bearer "+userToken
},
data: {
"userId": userId,
"rule": rule,
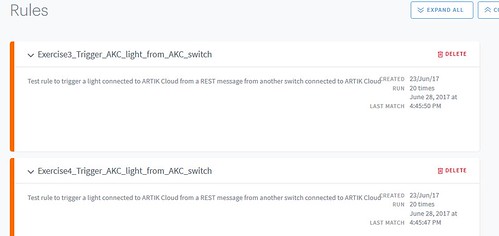
"name": "Exercise3_Trigger_AKC_light_from_AKC_switch",
"description": "Test rule to trigger a light connected to ARTIK Cloud from \
a REST message from another switch connected to ARTIK Cloud"
}
};
return args;
}
function createRule (){
c.get(restUrl+'users/self', build_mesg(), function(data, response) {
userId = data.data.id;
console.log('userId: '+userId);
});
var args = build_mesg( userId);
c.post(restUrl+'rules',args, function(data, response) {
console.log(data);
});
}
/**
* All start here
*/
console.log(' Starting Exercise 5 \n' );
createRule();The nodeJS script executed result as below,
Using Switch control the LED through cloud
If you intend to use REST API, you would need to install node-rest-client as below,
npm install node-rest-clientRefer to this git hub project: artik-sdk-lab, follow the procedure, all the code are working properly, remember to install ARTIK-SDK on ARTIK 530.
test result 1: Control LEDs remotely via ARTIK Cloud
The display example terminal screen is as below (deleted the ID value),
[root@artik ~]# cd artik-sdk-lab/
[root@artik artik-sdk-lab]# npm run cloudLight

> artik-lab@1.0.0 cloudLight /root/artik-sdk-lab
> node artik_cloud_light_ws.js

Launching websocket client.
Starting websocket connection
Message from cloud {"data":{"code":"200","message":"OK"}}
Message from cloud {"type":"ping", "ts":1498717912802}
Message from cloud {"type":"action","cts":1498717936493,"ts":1498717936493,"mid":"","ddid":"ARTIK Cloud Light ID here","data":{"actions":[{"name":"setOn","parameters":{}}]},"ddtid":"DEVICE TYPE ID here","uid":"","mv":1}
Received Action setOn
setLED( 28) value: 1
Message from cloud {"data":{"mid":""}}
Message from cloud {"type":"ping", "ts":1498717942022}
Message from cloud {"type":"action","cts":1498717951916,"ts":1498717951916,"mid":"","ddid":"","data":{"actions":[{"name":"setOff","parameters":{}}]},"ddtid":"","uid":"","mv":1}
Received Action setOff
setLED( 28) value: 0
Message from cloud {"data":{"mid":""}}
Message from cloud {"type":"ping", "ts":1498717972031}
Message from cloud {"type":"ping", "ts":1498718002031}
Message from cloud {"type":"ping", "ts":1498718032026}
Test at cloud side on the rule engine.
Below video shows the overall procedure of the test.
test result 2: Control LEDs by using Switch through ARTIK Cloud
On ARTIK 530, run cloudSwitch and cloudLight, result as below,
[root@artik artik-sdk-lab]# npm run cloudSwitch

> artik-lab@1.0.0 cloudSwitch /root/artik-sdk-lab
> node artik_cloud_switch_rest.js

Button -1
[root@artik artik-sdk-lab]# npm run cloudLight

> artik-lab@1.0.0 cloudLight /root/artik-sdk-lab
> node artik_cloud_light_ws.js

Launching websocket client.
Starting websocket connection
Message from cloud {"data":{"code":"200","message":"OK"}}
Message from cloud {"type":"ping", "ts":1498718872602}
Now ARTIK 530 switch action connected and sent to ARTIK cloud, then trigger the ARTIK cloud rule created, the rule engine send messages back to ARTIK 530 LED to setOn and setOff the LED.
Below video shows the whole procedure.
Reference
Developer.artik.io: Introduction to ARTIK Cloud
https://github.com: SamsungARTIK/artik-sdk-lab
developer.artik.io/downloads/, search “ARTIK Cloud Connectivity Guide”
ARTIK SDK usage
https://github.com/artikcloud:Samsung ARTIK Cloud
ARTK 710 training 8 - Creating secure devices with ARTIK Cloud
ARTK 710 training 9 - ARTIK Cloud Rules Engine
ARTK 710 training 10 - Charts and data logs
Wiki PWM Pulse-width modulation