源码解析
豆瓣电影推荐卡片层叠效果,自定义ViewGroup方式实现,view复合动画,事件处理,view绘制,自带view缓存复用机制。
效果示例
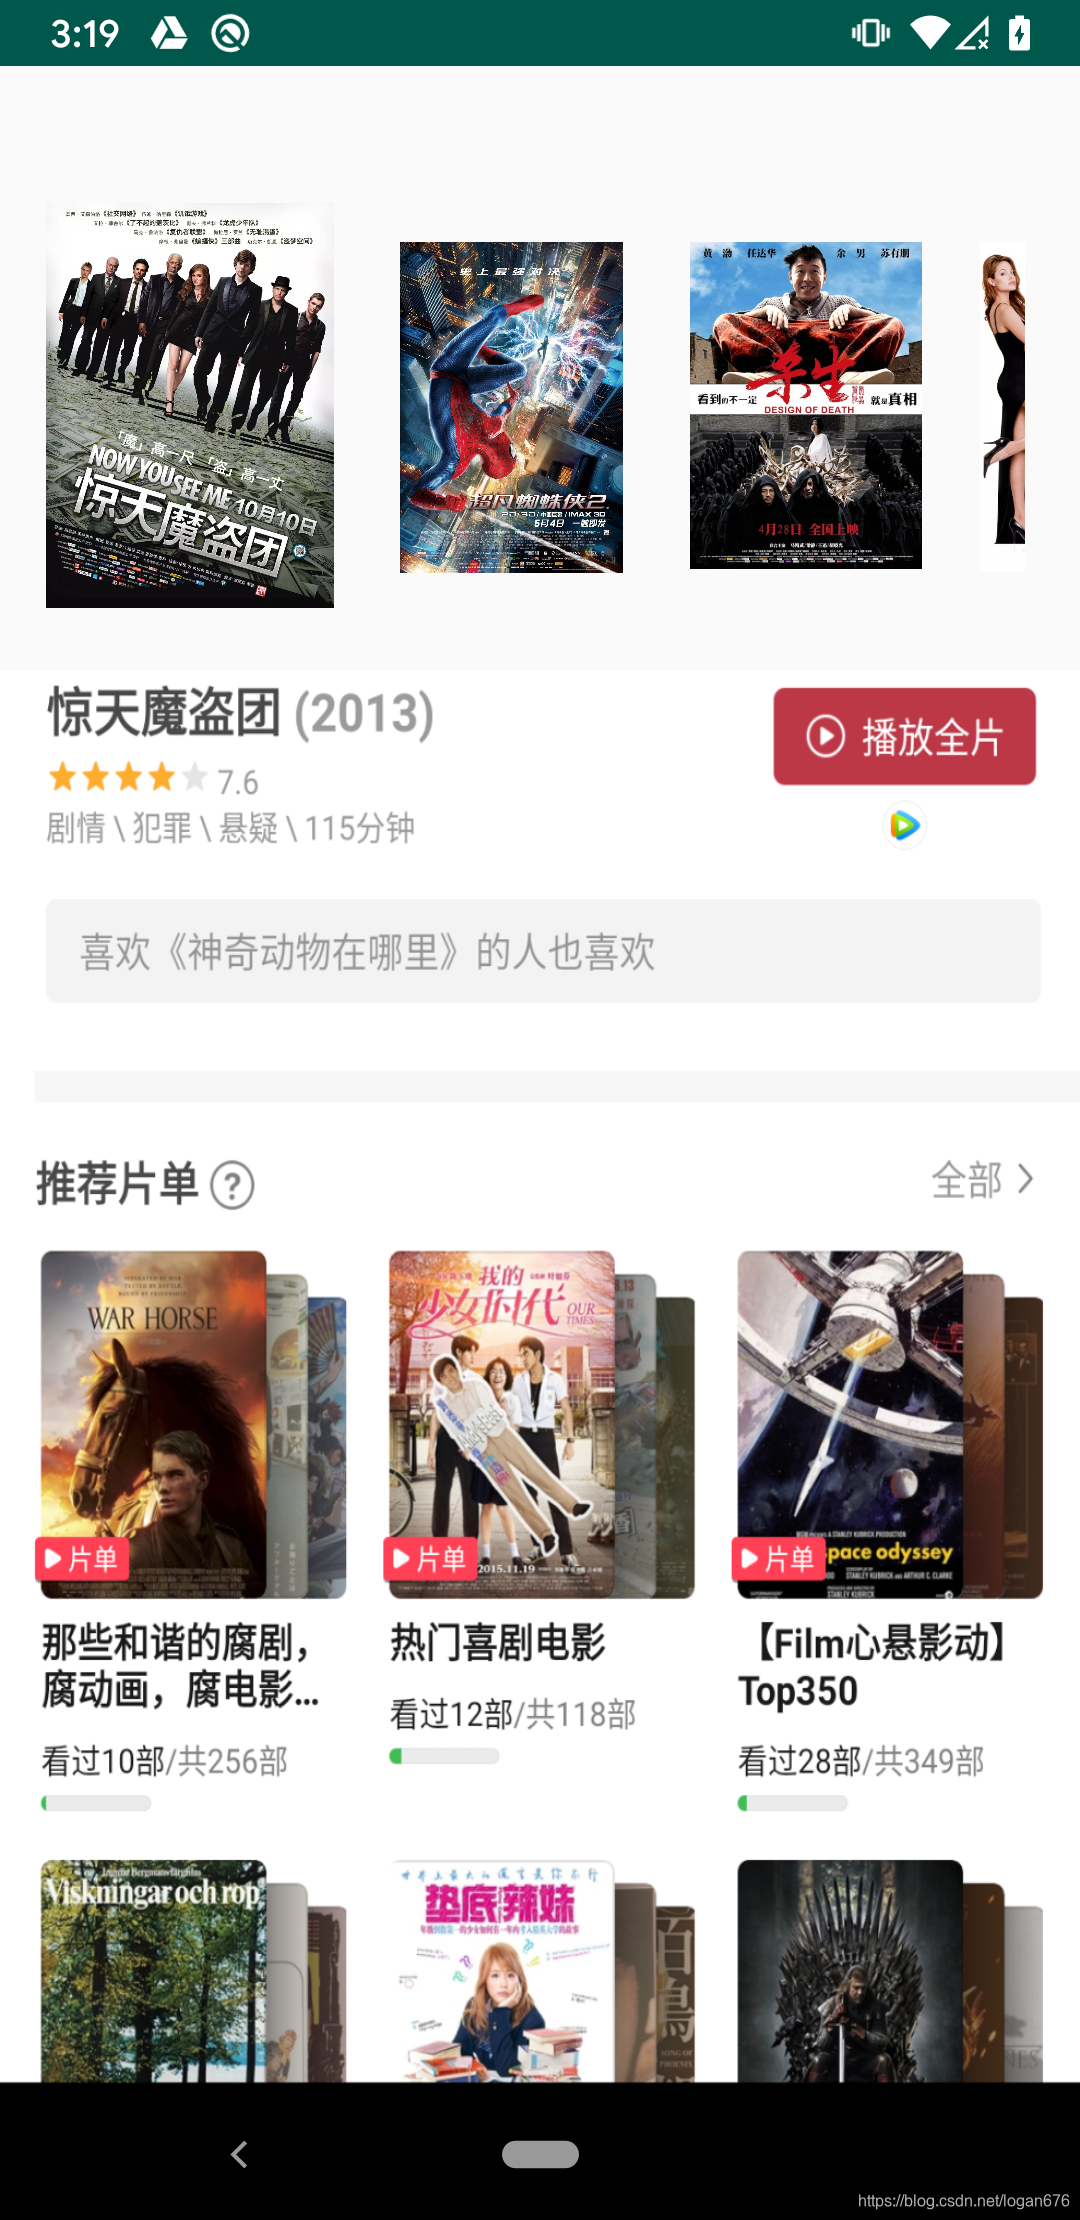

交互效果描述
开始只有一张卡片,随着第二张卡片慢慢往上面叠加,第一张卡片会做位移动画、缩放动画和alpha动画,直到第二张卡片盖住第一张卡片。同样地慢慢滑动第三张卡片,第一张以及第二张同时做位移动画、缩放动画和alpha动画。直到第三张卡片盖住第二张卡片。滑动第四张卡片时,第一张、第二张以及第三张做位移动画、缩放动画和alpha动画。
特别地,从滑动第五张卡片开始,第一张卡片会消失,第二张到第四张做位移动画、缩放动画和alpha动画。以此类推。
卡片放置的动画过程中,不允许打断。不能两个动画同时进行。但是可以通过多次点击滑动的方式干预某个动画。按照卡片是否做动画可以把屏幕中卡片分成两组,一组是层叠的卡片他们会做动画,一组是等待滑动到层叠区域的卡片,他们只左右移动没有动画。
该控件支持左右滑动。支持抛动。有阻尼回弹效果。从左边看,卡片位于起始位置时,继续向右边滑动,无过度拉伸效果。从右边看,卡片位于起终止位置时,继续向左边滑动,无过度拉伸效果。滑动过程有监听,进而可以协调外部元素联动。
实现原理
卡片滑动事件处理
1. 由于是ViewGroup方式实现的,所以使用了自己的一套计算坐标方法,其实就是取代了系统的scrollTo和scrollBy方法,使用scrollToInner和scrollByInner,相应地,新增mScrollX来追踪总体的偏移量。
private void scrollByInner(int x, int y) {
        scrollToInner(mScrollX + x, mScrollY + y);
    }

    private void scrollToInner(int x, int y) {
        if (mScrollX != x || mScrollY != y) {
            if (x > 0) {
                x = 0;
            }

            float minScrollX = (mItemCount - 1) * (mItemMarginLeft + mCardViewWidth + mItemMarginRight + mItemDividerWidth);

            if (x < -1.0f * minScrollX) {
                x = (int) (-1.0f * minScrollX);
            }

            mScrollX = x;
            mScrollY = y;

            invalidateAnimation();
        }
    }
2. 复写dispatchTouchEvent方法,监听各类事件,在这里改变坐标并触发子view滑动。并且在UP事件中根据滑动位置mScrollX和临界值A的关系做自动滚动的动画。自动滚动的动画除了收到临界值的影响还收到滑动速率的影响,比如向右抛动导致速率超过抛动临界值B,这时候即便滑动位置mScrollX没有到达临界值A也会触发向有自动滑动的动画。这样做是为了和用户的操作预期保持一致。
switch (ev.getAction() & MotionEvent.ACTION_MASK) {
            case MotionEvent.ACTION_DOWN:
                mLastMotionX = mInitialMotionX = ev.getX();
                mLastMotionY = mInitialMotionY = ev.getY();
                mActivePointerId = ev.getPointerId(0);
                break;
            case MotionEvent.ACTION_MOVE:
                if (!mIsBeingDragged) {
                    final int pointerIndex = ev.findPointerIndex(mActivePointerId);
                    final float x = ev.getX(pointerIndex);
                    final float xDiff = Math.abs(x - mLastMotionX);
                    final float y = ev.getY(pointerIndex);
                    final float yDiff = Math.abs(y - mLastMotionY);
                    if (xDiff > mTouchSlop && xDiff > yDiff) {
                        mIsBeingDragged = true;

                        mLastMotionX = mLastMotionX - mInitialMotionX > 0 ? mInitialMotionX + mTouchSlop :
                                mInitialMotionX - mTouchSlop;
                        // Disallow Parent Intercept, just in case
                        ViewParent parent = getParent();
                        if (parent != null) {
                            parent.requestDisallowInterceptTouchEvent(true);
                        }
                    }
                }

                if (mIsBeingDragged) {
                    // Scroll to follow the motion event
                    final float x = ev.getX();
                    needsInvalidate = performDrag(x);
                }
                break;

        ...
3. 记录DOWN事件和MOVE事件的滑动偏移量,从而触发子view的偏移。子view的偏移是在performDrag方法中实现的。
if (mIsBeingDragged) {
   // Scroll to follow the motion event
   final float x = ev.getX();
   performDrag(x);
}
performDrag方法内部会改变mScrollX的值并且触发重新绘制,进而改变子view的在屏幕上位置。
private void scrollToInner(int x, int y) {
        if (mScrollX != x || mScrollY != y) {
            if (x > 0) {
                x = 0;
            }

            float minScrollX = (mItemCount - 1) * (mItemMarginLeft + mCardViewWidth + mItemMarginRight + mItemDividerWidth);

            if (x < -1.0f * minScrollX) {
                x = (int) (-1.0f * minScrollX);
            }

            mScrollX = x;
            mScrollY = y;

            invalidateAnimation();
        }
    }
触发重新绘制是通过invalidateAnimation实现的,该方法内部会调用onPageScrolled, onPageScrolled代码如下
    /**
     * 滑动卡片时,下层的卡片有一个缩放动画和位移和aplha动画,位移的落点是左侧
     */
    protected void onPageScrolled() {
        // Offset any decor views if needed - keep them on-screen at all times.
        final int scrollX = mScrollX;
        final int width = getWidth();
        int childCount = getChildCount();

        int start = 0;
        int count = 0;
        final int firstPosition = mFirstPosition;
        for (int i = 0; i < childCount; i++) {
            final View child = getChildAt(i);

            offsetChildLeftAndRight(scrollX, child, i + firstPosition);

            float scale = scaleChild(child, scrollX, i + firstPosition);
            float alpha = alphaChild(child, scrollX, i + firstPosition);
            float tx = translateChild(child, scrollX, i + firstPosition);

            if (mPageTransformer != null) {
                final float transformPos = (float) (child.getLeft() - scrollX) / ((mItemMarginLeft + mCardViewWidth + mItemDividerWidth));
                mPageTransformer.transformPage(child, transformPos);
            }
        }
        switch (DIRECTION) {
            case SCROLL_DIRECTION_LEFT:
                for (int i = 0; i < childCount; i++) {
                    final View child = getChildAt(i);
                    if (child.getAlpha() >= ALPHA_RATIO_L0) {
                        break;
                    } else {
                        count++;
                        int position = firstPosition + i;
                        // The view will be rebound to new data, clear any
                        // system-managed transient state.
                        mRecycler.addScrapView(child, position);
                        Log.d(CARD_TAG, "mRecycler addScrapView left -> position=" + position);
                    }
                }

                break;
            case SCROLL_DIRECTION_RIGHT:
                int childMaxRight = getWidth() - getPaddingRight();
                for (int i = childCount - 1; i >= 0; i--) {
                    final View child = getChildAt(i);
                    if (child.getLeft() <= childMaxRight) {
                        break;
                    } else {
                        start = i;
                        count++;
                        int position = firstPosition + i;
                        mRecycler.addScrapView(child, position);
                        Log.d(CARD_TAG, "mRecycler addScrapView right -> position=" + position);
                    }
                }

                break;
            case SCROLL_DIRECTION_NONE:
                break;
        }

        if (count > 0) {
            Log.d(CARD_TAG, "mRecycler -> detachViewsFromParent start=" + start + ", count=" + count);
            detachViewsFromParent(start, count);
            mRecycler.removeSkippedScrap();
        }


        if (DIRECTION == SCROLL_DIRECTION_LEFT) {
            mFirstPosition += count;
        }

        final boolean down = DIRECTION == SCROLL_DIRECTION_LEFT;
        final boolean up = DIRECTION == SCROLL_DIRECTION_RIGHT;
        final boolean loadLeft = up && getChildAt(0).getAlpha() >= ALPHA_RATIO_L0;
        final int absIncrementalDeltaY = (int) Math.abs(incrementalDeltaY);


        final int end = getWidth() - getPaddingRight();
        int lastBottom = getChildAt(getChildCount() - 1).getRight();
        final int spaceBelow = lastBottom - end;

        if (loadLeft || spaceBelow < absIncrementalDeltaY) {
            fillGap(down);
        }

        mRecycler.fullyDetachScrapViews();
    }
4. 实现子view的偏移是通过修改left坐标实现的,在此过程中也会进行子view的位移动画、缩放动画和alpha动画。需要注意的一个细节是,子view有很多,每一个做动画的状态都不同,有两种思路来实现这些动画状态。一种思路是逐个记录每个字view的状态并且实时更新;另一种思路是根据mScrollX来计算,由于mScrollX是全局偏移量,因此可以通过mScrollX算出来某个子view的left以及动画因子。这里采用的是第二种思路。
int childLeft = paddingLeft + scrollX;

final int childOffset = childLeft - child.getLeft();
if (childOffset != 0) {
   child.offsetLeftAndRight(childOffset);
}
相应地,给子view做动画也是根据mScrollX计算的。子view的动画有位移动画、缩放动画和alpha动画。这里只示例位移动画,其他动画方式类似。
private float translateChild(View child, int scrollX, int childIndex) {
        int r = scrollX +
                childIndex * (mItemMarginLeft + mCardViewWidth + mItemDividerWidth + mItemMarginRight);

        int R = mItemMarginLeft + mCardViewWidth + mItemMarginRight + mItemDividerWidth;

        float tx = 0.f;

        if (r > R) {
            // 不偏移
        } else if (r > 0) {
            tx = (r - R) * 1.0f / R * mTranslateX;
        } else {
            tx = r * 1.0f / R * mTranslateX - mTranslateX;
        }

        child.setTranslationX(tx);
        return tx;
    }
5. view的滑动偏移效果,采用的是ViewPager里的偏移算法。具体参见ViewPager源码,这里引用部分ViewPager源码。
if (!mIsBeingDragged) {
                    final int pointerIndex = ev.findPointerIndex(mActivePointerId);
                    if (pointerIndex == -1) {
                        // A child has consumed some touch events and put us into an inconsistent
                        // state.
                        needsInvalidate = resetTouch();
                        break;
                    }
                    final float x = ev.getX(pointerIndex);
                    final float xDiff = Math.abs(x - mLastMotionX);
                    final float y = ev.getY(pointerIndex);
                    final float yDiff = Math.abs(y - mLastMotionY);
                    if (DEBUG) {
                        Log.v(TAG, "Moved x to " + x + "," + y + " diff=" + xDiff + "," + yDiff);
                    }
                    if (xDiff > mTouchSlop && xDiff > yDiff) {
                        if (DEBUG) Log.v(TAG, "Starting drag!");
                        mIsBeingDragged = true;
                        requestParentDisallowInterceptTouchEvent(true);
                        mLastMotionX = x - mInitialMotionX > 0 ? mInitialMotionX + mTouchSlop :
                                mInitialMotionX - mTouchSlop;
                        mLastMotionY = y;
                        setScrollState(SCROLL_STATE_DRAGGING);
                        setScrollingCacheEnabled(true);

                        // Disallow Parent Intercept, just in case
                        ViewParent parent = getParent();
                        if (parent != null) {
                            parent.requestDisallowInterceptTouchEvent(true);
                        }
                    }
                }
                // Not else! Note that mIsBeingDragged can be set above.
                if (mIsBeingDragged) {
                    // Scroll to follow the motion event
                    final int activePointerIndex = ev.findPointerIndex(mActivePointerId);
                    final float x = ev.getX(activePointerIndex);
                    needsInvalidate |= performDrag(x);
}
6. scrollToInner边界值处理
7. 在pageScrolled方法代码的下半部分还有view的回收和复用机制。回收屏幕外的子view并且缓存起来,当加载新的子view时,优先从缓存数组中取,如果取不到采取加载新的view。具体复用机制见下一节。
view复用机制
1. 为了更方便使用本控件,本控件用于绑定数据的Adapter和ListView的Adapter用法一致。因而view复用机制也和ListView复用机制类似。
public int getCount() {
   return mCardBeans.size();
}

@Override
public abstract Object getItem(int position);

@Override
public long getItemId(int position) {
   return position;
}

@Override
public abstract CardView getView(int position, View convertView, ViewGroup parent);
2. 基本原理是,通过检测滑动方向向左还是向右,来判断子view的坐标和父控件绘制区域边界坐标的关系。
-
如果向左滑动,则从index=0的子view开始遍历,回收父控件绘制区域边界之外的子view。直到遍历到当前屏幕可见的子view处停止,因为屏幕可见的子view正在使用中,不能回收。回收的方式只是detach view,并且把该view缓存起来备用。其中缓存管类同listview的RecycleBin。
-
如果向右滑动,则从childCount-1的子view开始向前遍历,回收父控件绘制区域边界之外的子view,直到遍历到当前屏幕可见的子view处停止,因为屏幕可见的子view正在使用中不能回收。
case SCROLL_DIRECTION_RIGHT:
     int childMaxRight = getWidth() - getPaddingRight();
     for (int i = childCount - 1; i >= 0; i--) {
          final View child = getChildAt(i);
           if (child.getLeft() <= childMaxRight) {
               break;
           } else {
                   start = i;
                   count++;
                   int position = firstPosition + i;
                   mRecycler.addScrapView(child, position);
                   Log.d(CARD_TAG, "mRecycler addScrapView right -> position=" + position);
           }
     }

break;
3. 滑动会触发回收,同时自然也会触发复用。复用的触发机制也和滑动方向有关系。
-
如果向左滑动,当最右边的子view的right坐标减去MOVE deltaX 后如果小于父控件的右边界坐标值则加载后续子view,直到当最右边的子view的right坐标减去MOVE delta 后大于等于父控件的右边界。
final int end = getWidth() - getPaddingRight(); int lastBottom = getChildAt(getChildCount() - 1).getRight(); final int spaceBelow = lastBottom - end; if (spaceBelow < absIncrementalDeltaX) { fillGap(down); } -
如果向右滑动,当最左边的子view的left坐标加上MOVE delta 后如果大于父控件的左边界坐标值则加载前面的子view,直到当最前面的子view的left坐标加上MOVE delta后小于等于父控件的左边界。
复用的逻辑是在fillGap中实现的,fillGap内部会根据滑动方向调用fillDown或者fillUp方法。(其实改成fillLeft或者fillRight更贴切,这里沿用了listview中的命名方法)。fillDown方法代码如下,
private void fillDown(int pos, int nextLeft) {
int end = (mBottom - mTop);
while (nextLeft < end && pos < mItemCount) {
makeAndAddView(pos, nextLeft, true, nextLeft, false);
nextLeft = mScrollX + getPaddingLeft() + mChildrenContentMarginLeft + mItemMarginLeft + (pos + 1) * (mItemMarginLeft + mCardViewWidth + mItemDividerWidth + mItemMarginRight);
pos++;
}
}
在fillDown内部会调用makeAndAddView创建子view,当然创建之前会检测是否可以复用。
makeAndAddView的代码如下,
    private View makeAndAddView(int position, int left, boolean flow, int childrenLeft,
                                boolean selected) {
        if (!mDataChanged) {
            // Try to use an existing view for this position.
            final View activeView = mRecycler.getActiveView(position);
            if (activeView != null) {
                // Found it. We're reusing an existing child, so it just needs
                // to be positioned like a scrap view.
                setupChild(activeView, position, left, flow, childrenLeft, selected, true);
                return activeView;
            }
        }

        // Make a new view for this position, or convert an unused view if
        // possible.
        final View child = obtainView(position, mIsScrap);

        // This needs to be positioned and measured.
        setupChild(child, position, left, flow, childrenLeft, selected, mIsScrap[0]);

        return child;
    }
会优先从recycleBin中取可用的缓存,如果又则直接返回使用,没有才会调用obtainView去创建。obtainView方法内部实现是
{

        outMetadata[0] = false;

        // Check whether we have a transient state view. Attempt to re-bind the
        // data and discard the view if we fail.
        final View transientView = mRecycler.getTransientStateView(position);
        if (transientView != null) {
            final LayoutParams params = (LayoutParams) transientView.getLayoutParams();
            Log.d(CARD_TAG, "re-bind transientView " + position);

            // If the view type hasn't changed, attempt to re-bind the data.
            if (params.viewType == mAdapter.getItemViewType(position)) {
                final View updatedView = mAdapter.getView(position, transientView, this);

                // If we failed to re-bind the data, scrap the obtained view.
                if (updatedView != transientView) {
                    setItemViewLayoutParams(updatedView, position);
                    mRecycler.addScrapView(updatedView, position);
                }
            }

            outMetadata[0] = true;

            // Finish the temporary detach started in addScrapView().
            transientView.dispatchFinishTemporaryDetach();
            return transientView;
        }

        final View scrapView = mRecycler.getScrapView(position);
        final View child = mAdapter.getView(position, scrapView, this);
        if (scrapView != null) {
            Log.d(CARD_TAG, "re-bind scrapView " + position);
            if (child != scrapView) {
                // Failed to re-bind the data, return scrap to the heap.
                mRecycler.addScrapView(scrapView, position);
            } else if (child.isTemporarilyDetached()) {
                outMetadata[0] = true;

                // Finish the temporary detach started in addScrapView().
                child.dispatchFinishTemporaryDetach();
            }
        }

        setItemViewLayoutParams(child, position);

        return child;
    }
这个方法内部如果拿到了可用的缓存,就会调用adapter中的getView方法,并且把参数scrapView传递过去,这个参数就是adapter中的contentView。如果没有可用的缓存则参数scrapView为null,也就意味着adapter中的contentView为null。这样就和listView的adapter的经典使用场景串联起来了。
4. 获取子view的方法同listview adapter的使用方式
@Override
public CardView getView(int position, View convertView, ViewGroup parent) {
       View view;
       if (convertView == null) {
           view = new MovieCardView(mContext);
       } else {
           Log.d(CARD_TAG, "getView reuse " + position);
           view = convertView;
       }
}
5. 获取到子view之后,就是设置子view的属性。首先设置LayoutParams,其次如果是复用的view则重新attach parent,如果是新创建的子view则addViewInLayout。再次是检测子view是否需要measure。最后是调用子view的layout方法修改子 view的坐标值。代码如下
    private void setupChild(View child, int position, int left, boolean flowDown, int childrenLeft,
                            boolean selected, boolean isAttachedToWindow) {

        final boolean needToMeasure = !isAttachedToWindow
                || child.isLayoutRequested();

        // Respect layout params that are already in the view. Otherwise make
        // some up...
        LayoutParams p = (LayoutParams) child.getLayoutParams();
        if (p == null) {
            Log.d(CARD_TAG, "setupChild LayoutParams is null, generateDefaultLayoutParams");
            p = (LayoutParams) generateDefaultLayoutParams();
        }
        p.viewType = mAdapter.getItemViewType(position);
        p.isEnabled = mAdapter.isEnabled(position);

        if ((isAttachedToWindow && !p.forceAdd)) {
            Log.d(CARD_TAG, "setupChild attachViewToParent");
            attachViewToParent(child, flowDown ? -1 : 0, p);

        } else {
            p.forceAdd = false;
            Log.d(CARD_TAG, "setupChild addViewInLayout");
            addViewInLayout(child, flowDown ? -1 : 0, p, true);
        }

        if (needToMeasure) {
            final int childWidthSpec = ViewGroup.getChildMeasureSpec(mWidthMeasureSpec,
                    mListPadding.left + mListPadding.right, p.width);
            final int lpHeight = p.height;
            final int childHeightSpec;
            if (lpHeight > 0) {
                childHeightSpec = MeasureSpec.makeMeasureSpec(lpHeight, MeasureSpec.EXACTLY);
            } else {
                childHeightSpec = MeasureSpec.makeMeasureSpec(getMeasuredHeight(),
                        MeasureSpec.UNSPECIFIED);
            }
            child.measure(childWidthSpec, childHeightSpec);
        } else {
            cleanupLayoutState(child);
        }

        final int w = child.getMeasuredWidth();
        final int h = child.getMeasuredHeight();
        final int childTop = getPaddingTop() + mItemMarginTop;
        final int childLeft = flowDown ? left : left - w;

        if (needToMeasure) {
            final int childRight = childLeft + w;
            final int childBottom = childTop + h;
            child.layout(childLeft, childTop, childRight, childBottom);
        } else {
            child.offsetLeftAndRight(childLeft - child.getLeft());
            child.offsetTopAndBottom(childTop - child.getTop());
        }
    }
到此view的复用机制就结束了。
总结一下,本控件中有两个核心技术点,一个是通过监听滑动事件实现子 view的移动以及动画;另一个是子view的复用机制,复用机制借鉴了listview的复用机制原理。感兴趣的同学可以在源代码基础上继续修改定制,也可以参考源码学习自定义view和view复用机制的原理。
源代码地址 DoubanMovieCard
