使用wangEditor 富文本编辑器于项目之中,过程如下
简单介绍一下wangEditor
wangEditor是基于javascript和css开发的 Web富文本编辑器, 轻量、简洁、易用、开源免费
优点:轻量简洁,最重要的是开源且中文文档齐全。设计的UI漂亮。
以前我经常用百度的UEditor,虽然插件多,基本可以满足各种需求,类似贴吧中的回复界面,但是恕本人直言,实在是界面太不美观了,有些小丑。所以本人比较推荐使用wangEditor,这个插件也基本能满足需求,页面个人觉得比较美观,好看。
好了,不多说了,进入正题。
一、下载wangEditor
官方网站:http://www.wangeditor.com
-
点击 https://github.com/wangfupeng1988/wangEditor/releases
下载最新版。进入release文件夹下找到wangEditor.js或者wangEditor.min.js即可。 -
使用bower下载:
bower install wangEditor(前提保证电脑已安装了bower) -
使用npm下载:
npm install wangeditor(注意 wangeditor 全部是小写字母)
在这里我项目中采用的是直接下载 wangEditor.min.js 使用的
二、wangEditor的使用
我的项目中是使用了同时使用了两个wangEditor编辑器
- 首先将下载好的
wangEditor.min.js导入项目中
- 页面中引入
wangEditor.min.js,如下:

<!-- 注意, 只需要引用 JS,无需引用任何 CSS !!!-->
<script src="javascript/wangEditor.min.js" charset="utf-8"></script>
接下来大家直接看代码
javascript
<script type="text/javascript">
		//  初始化编辑器
		var E = window.wangEditor

		var editor = new E('#div1')
		var editor1 = new E('#div2')

	window.onload = function() {

		var $text1 = $('#text1')
		editor.customConfig.onchange = function(html) {
			// 监控变化,同步更新到 textarea
			$text1.val(html)
		}
		editor.create()
		// 初始化 textarea 的值
		$text1.val(editor.txt.html())

		var $text2 = $('#text2')
		editor1.customConfig.onchange = function(html) {
			// 监控变化,同步更新到 textarea
			$text2.val(html)
		}
		editor1.create()
		// 初始化 textarea 的值
		$text2.val(editor1.txt.html())

	}
</script>
Html
<tr>
	<td>
		<div class="form-group-col-2">
			<div class="form-label">隐私政策:</div>
			<div class="form-cont" id="div1"></div>
			<textarea id="text1" name="privacypolicy"
				style="width: 100%; height: 200px; display: none"></textarea>
		</div>
	</td>
</tr>

<tr>
	<td>
		<div class="form-group-col-2">
			<div class="form-label">使用条款:</div>
			<div class="form-cont" id="div2"></div>
			<textarea id="text2" name="termsofuse"
				style="width: 100%; height: 200px; display: none"></textarea>

		</div>
	</td>
</tr>
回显编辑器的内容:
	//回显编辑器内容

	editor.create()
	editor.txt.html($('#text1').val())

	editor1.create()
	editor1.txt.html($('#text2').val())
*记得每次要清空编辑器内容
	//清空富文本编辑器
	editor.txt.clear()
	editor1.txt.clear()
禁用编辑功能
// 禁用编辑功能
editor.$textElem.attr('contenteditable', false)

// 开启编辑功能
editor.$textElem.attr('contenteditable', true)
这是我运行出来的效果图
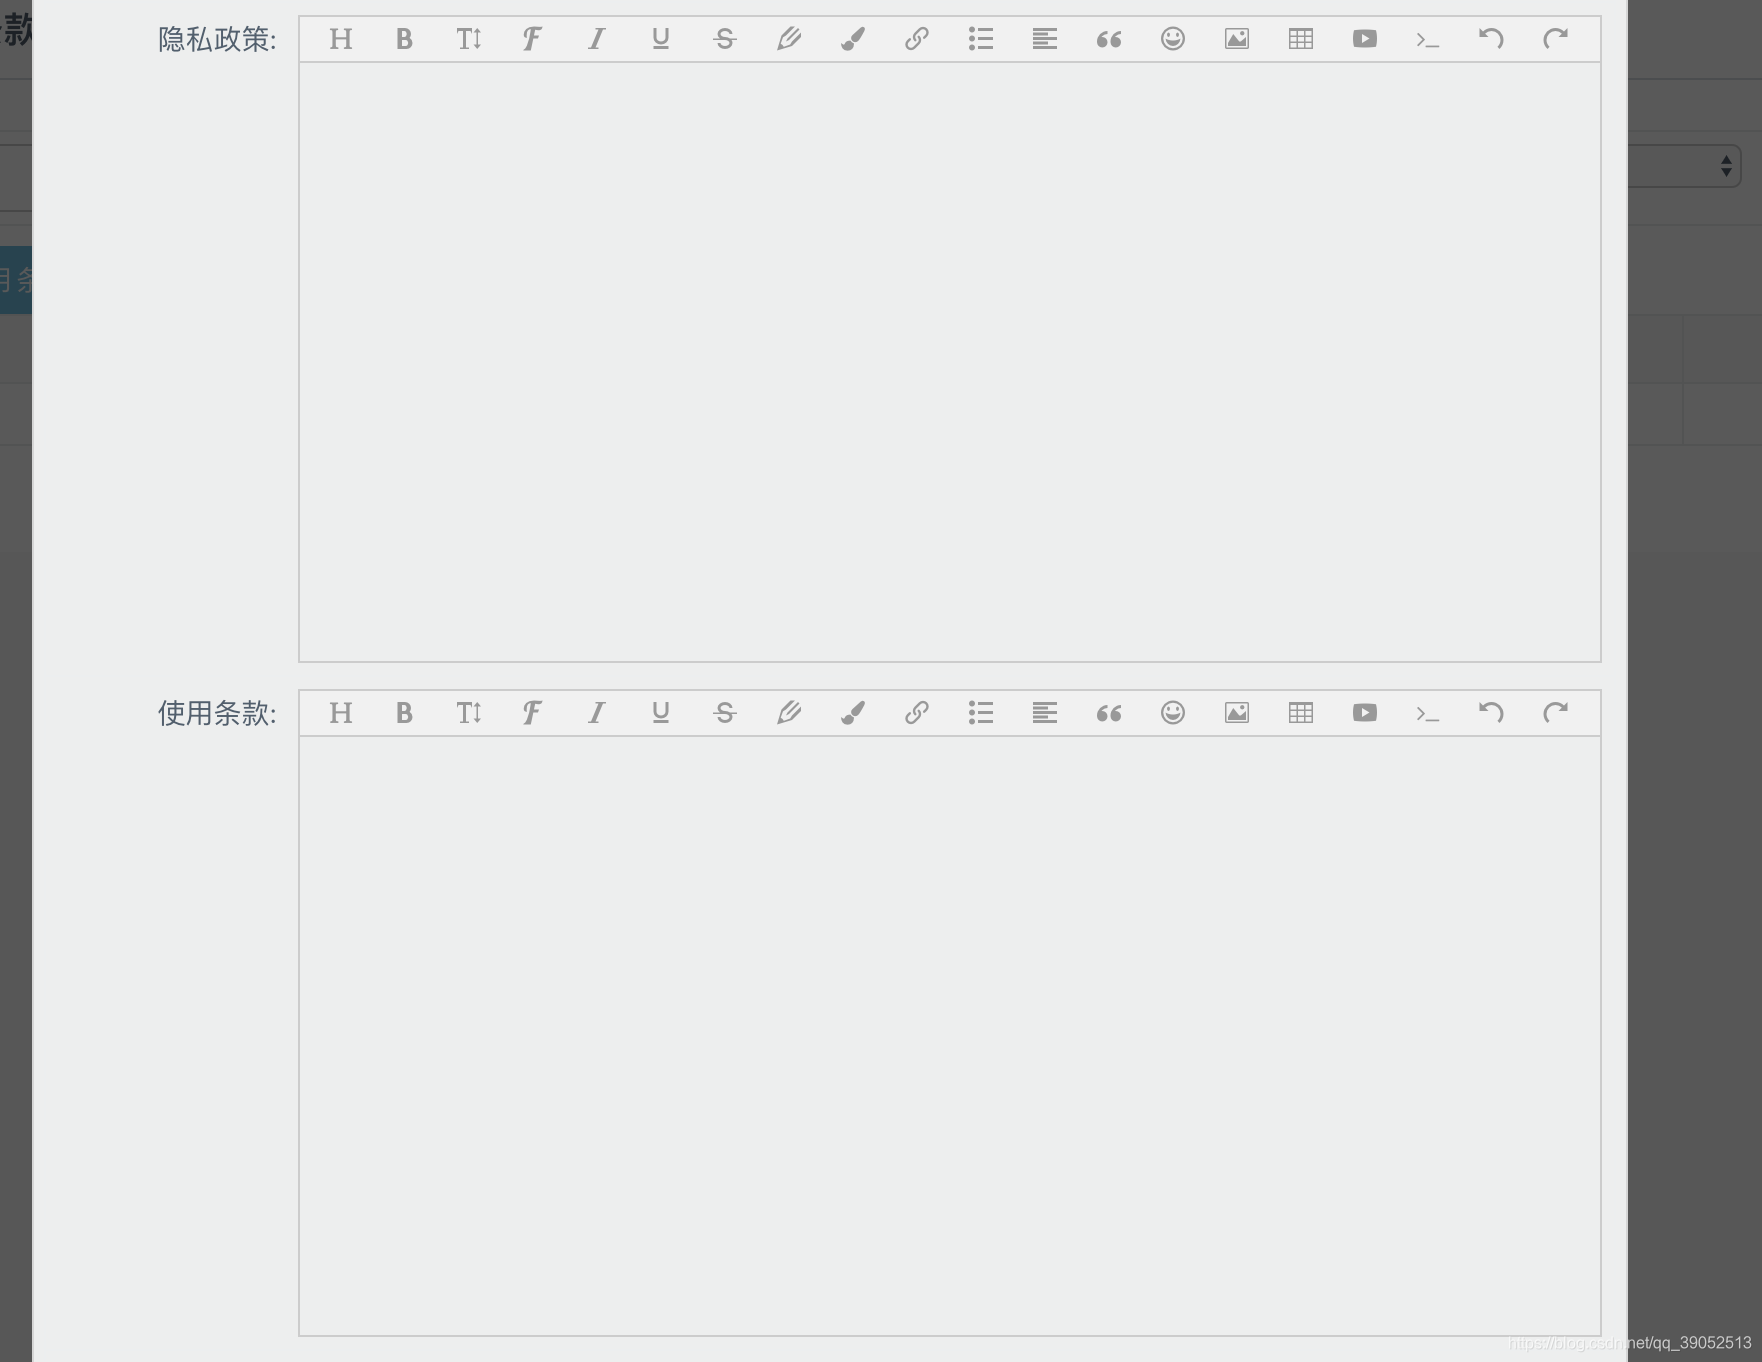
是不是效果很棒棒呐,喜欢的伙伴快快去试一试哟,相信你哟,哈哈?
也可以自定义菜单
<script type="text/javascript">
    var E = window.wangEditor
    var editor = new E('#div1')
    // 自定义菜单配置
    editor.customConfig.menus = [
        'head',
        'bold',
        'italic',
        'underline'
    ]
    editor.create()
</script>
[
    'head',  // 标题
    'bold',  // 粗体
    'fontSize',  // 字号
    'fontName',  // 字体
    'italic',  // 斜体
    'underline',  // 下划线
    'strikeThrough',  // 删除线
    'foreColor',  // 文字颜色
    'backColor',  // 背景颜色
    'link',  // 插入链接
    'list',  // 列表
    'justify',  // 对齐方式
    'quote',  // 引用
    'emoticon',  // 表情
    'image',  // 插入图片
    'table',  // 表格
    'video',  // 插入视频
    'code',  // 插入代码
    'undo',  // 撤销
    'redo'  // 重复
]
