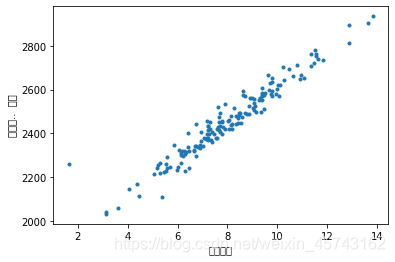
1.绘制散点图:一个变量为横坐标,另一变量为纵坐标,利用散点的分布形态反应变量关系的一种图形。
散点图绘图函数:
plot(x,y,'.',color=(r,g,b));第一个参数,x,y:x,y轴的序列,。和.的分别,color可以用rgb定义也可以用英文字母定义。
plt.xlabel('x轴标签')
plt.ylabel('y轴标签')
plt.frid((True)
import matplotlib
from pandas import read_csv
df=read_csv(r'C:\Users\13056\Desktop\data.csv',encoding='utf-8')
matplotlib.pyplot.plot(df['广告费用'],df['购买用户数'],'.')
matplotlib.pyplot.xlabel('广告费用')
matplotlib.pyplot.ylabel('购买用..  户数')
matplotlib.pyplot.grld(True)
matplotlib.pyplot.show()
结果:
2.折线图:
plot(x,y,样式,颜色,宽度)
import matplotlib
from pandas import read_csv
df=read_csv(r'C:\Users\13056\Desktop\data.csv',encoding='utf-8')
matplotlib.pyplot.plot(df['广告费用'],df['购买用户数'],'-',color='r')
matplotlib.pyplot.xlabel('广告费用')
matplotlib.pyplot.ylabel('购买用..  户数')
matplotlib.pyplot.grld(True)
matplotlib.pyplot.show()
#不大好看,各位自己拿自己的数据试试
3.饼图:
pie(进行绘图的序列,饼图各部分标签,饼图各部分颜色,突出的,显示格式)
4.柱状图:
bar(x位置的序列一般用一个arrnge函数产生一个序列,y的数值序列就是高度,宽度,颜色)
barh(x位置的序列一般用一个arrnge函数产生一个序列,y的数值序列就是高度,宽度,颜色)
5.直方图:高度表示在给定间隔内数据出现的频数,变化的搞度形态表示的数据分布的情况。
hist(需要进行绘制的向量,颜色,分组个数,是否累积计数)
有些东西我现在暂时也没有例子,大家如果想看例子的话,评论一下,我给补上。
6.爬虫
我们的数据有时候需要从网页上获取,那就需要爬虫技术。如果大家对爬虫感兴趣我还是可以发一些关于爬虫的博客的。
6.1.了解json:JSON是JavaScript对象表现法,是存储和交换文本信息的语法。具有文本量小、更快、更容易解析的特点,主要用于传递数据,所以一般作为数据的查询接口。
JSON举例:
{
    "json_lizi"[
        {"1":"A"},
        {"2":"B"},
        {"3":"C"}
    ]
}
我们只是去简单的爬虫所以会这些就可以了。
import urllib.request
import json
response=urllib.request.urlopen('D:\BaiduNetdiskDownload\6\6.2\json.json')
JS=response.read()
jo=json.loads(JS.decode())
print(jo['employees'])
6.2 requests包详解
1.基本方法
   requests.get(‘xxxxxx’)                # GET请求
   requests.post(“xxxxxxx”)              # POST请求
   requests.put(“xxxxxxx”)               # PUT请求
   requests.delete(“xxxxxxxx”)           # DELETE请求
   requests.head(“xxxxxxx”)              # HEAD请求
   requests.options(“xxxxxxx” )          # OPTIONS请求


2.为url传递参数
>>> url_params = {'key':'value'}       #    字典传递参数,如果值为None的键不会被添加到url中
>>> r = requests.get('your url',params = url_params)
>>> print(r.url)
#改变请求头

3.响应内容:
r.encoding                       #获取当前的编码
r.encoding = 'utf-8'             #设置编码
r.text                           #以encoding解析返回内容。字符串方式的响应体,会自动根据响应头部的字符编码进行解码。
r.content                        #以字节形式(二进制)返回。字节方式的响应体,会自动为你解码 gzip 和 deflate 压缩。

r.headers                        #以字典对象存储服务器响应头,但是这个字典比较特殊,字典键不区分大小写,若键不存在则返回None

r.status_code                     #响应状态码
r.raw                             #返回原始响应体,也就是 urllib 的 response 对象,使用 r.raw.read()
r.ok                              # 查看r.ok的布尔值便可以知道是否登陆成功
 #*特殊方法*#
r.json()                         #Requests中内置的JSON解码器,以json形式返回,前提返回的内容确保是json格式的,不然解析出错会抛异常
r.raise_for_status()             #失败请5.求(非200响应)抛出异常

4.post发送json请求
 import requests
 import json
 r = requests.post('xxxxx', data=json.dumps({'some': 'data'}))
 print(r.json())

5.设置header请求
header = {'user-agent': 'my-app/0.0.1''}
cookie = {'key':'value'}
 r = requests.get/post('your url',headers=header,cookies=cookie)
data = {'some': 'data'}
headers = {'content-type': 'application/json',
           'User-Agent': 'Mozilla/5.0 (X11; Ubuntu; Linux x86_64; rv:22.0) Gecko/20100101 Firefox/22.0'}

r = requests.post('https://api.github.com/some/endpoint', data=data, headers=headers)
print(r.text)

6.响应状态码
 r = requests.get('http://www.itwhy.org')
 print(r.text, '\n{}\n'.format('*'*79), r.encoding)
 r.encoding = 'GBK'
 print(r.text, '\n{}\n'.format('*'*79), r.encoding)

7.响应
r.headers                                  #返回字典类型,头信息
r.requests.headers                         #返回发送到服务器的头信息
r.cookies                                  #返回cookie
r.history                                  #返回重定向信息,当然可以在请求是加上allow_redirects = false 阻止重定向

8.超时
r = requests.get('url',timeout=1)           #设置秒数超时,仅对于连接有效

9.会话对象,能够跨请求保持某些参数
s = requests.Session()
s.auth = ('auth','passwd')
s.headers = {'key':'value'}
r = s.get('url')
r1 = s.get('url1')

10.代理
proxies = {'http':'ip1','https':'ip2' }
requests.get('url',proxies=proxies)
6.3
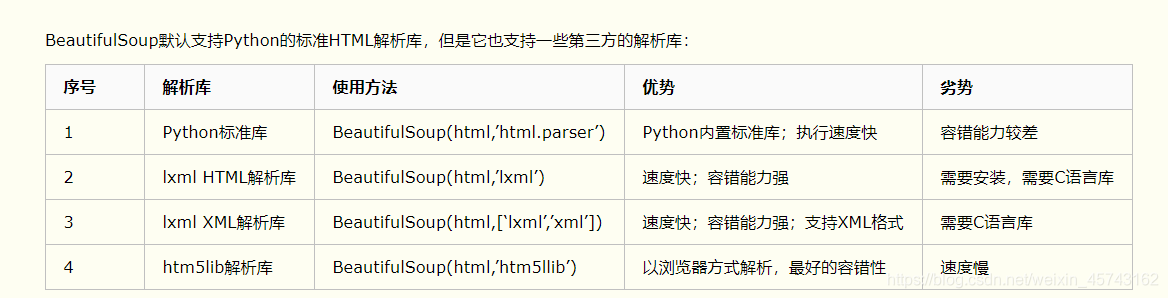
Beautiful模块详解:
1.基本使用:
# 找到第一个div标签
soup.find(name='div')
# 找到所有的div标签
soup.find_all(name='div')
# 找到id为importdiv的标签
soup.select('#importdiv')

2.具体使用:
###### 1.name 标签名称 ######

html = '<html><body><a>我是一个兵</a></body></html>'
soup = BeautifulSoup(html, 'lxml')
tag = soup.find('a')

print(tag)            # <a>我是一个兵</a>
print(tag.name)        # a
tag.name = 'div'     # 设置标签
print(tag)            # <div>我是一个兵</div>
print(tag.name)        # div


###### 2.attr 标签属性 ######

html = '<html><body><a href="xxx" class="xxx">我是一个兵</a></body></html>'
soup = BeautifulSoup(html, 'lxml')
tag = soup.find('a')

# 获取属性
print(tag.attrs)    # {'href': 'xxx', 'class': ['xxx']}

# 设置属性
tag.attrs = {'href': 'sss'}
print(tag.attrs)    # {'href': 'sss'}


###### 3.children 所有子标签 ######

tag = soup.find('div')    # 找第一个div标签
tag.children    # 找div下的所有子标签


###### 4.descendants 所有子子孙孙标签 ######

tag = soup.find('div')    # 找第一个div标签
tag.descendants    # 找div下的所有的子子孙孙标签

###### 5.clear 清空子标签 ######

html = '<html><body><a href="xxx" class="xxx">我是一个兵</a></body></html>'
soup = BeautifulSoup(html, 'lxml')
tag = soup.find('body')

tag.clear()   # 将body下的所有内容及标签清空
print(tag)    # <body></body>


###### 6.decompose 递归删除所有标签 ######

tag = soup.find('body')

tag.decompose()
print(tag)    # <None></None>


###### 7.extract 递归删除所有标签,并获取 ######

html = '<html><body><a href="xxx" class="xxx">我是一个兵</a></body></html>'
soup = BeautifulSoup(html, 'lxml')
tag = soup.find('body')    # 递归删除所有的标签,并获取删除的标签

delect_tags = tag.extract()
print(tag)    # <None></None>
print(delect_tags)    # <body><a class="xxx" href="xxx">我是一个兵</a></body>


###### 8.decode和decode_contents ######

# decode(): 转换为字符串(包含当前标签)
# decode_contents(): 转换为字符串(不包含当前标签)

print(tag.decode())    # <body><a class="xxx" href="xxx">我是一个兵</a></body>
print(tag.decode_contents())    # <a class="xxx" href="xxx">我是一个兵</a>


###### 9.encode和encode_contents ######

# encode(): 转换为字节(包含当前标签)
# encode_contents(): 转换为字节(不包含当前标签)

print(tag.encode())    # b'<body><a class="xxx" href="xxx">\xe6\x88\x91\xe6\x98\xaf\xe4\xb8\x80\xe4\xb8\xaa\xe5\x85\xb5</a></body>'
print(tag.encode_contents())    # b'<a class="xxx" href="xxx">\xe6\x88\x91\xe6\x98\xaf\xe4\xb8\x80\xe4\xb8\xaa\xe5\x85\xb5</a>'


###### 10.find 获取匹配的第一个标签 ######

html = '<html><body><a class="xxx">我是一个兵</a></body></html>'
soup = BeautifulSoup(html, 'lxml')
tag = soup.find(name='a', attrs={'class', 'xxx'}, text='我是一个兵', recursive=True)


###### 11.find_all 获取匹配的所有标签 ######

# 普通查找
soup.find_all('a')

# 限制查找条数
soup.find_all('a', limit=1)

# 使用列表来查找
soup.find_all(name=['a', 'img'])    # 查找标签名为a和img的,[<a class="xxx">我是一个兵</a>, <img/>, <a></a>]
soup.find_all(attrs={'class': ['xxx', 'yyy']})    # 查找属性为xxx和yyy的,[<a class="xxx">我是一个兵</a>, <img class="yyy"/>]
# 也可适用于text,id,href等等

# 使用正则来查找
pattern = re.compile('^x')    # 匹配以x开头class的标签
tag = soup.find_all(attrs={'class': pattern})
# 正则可以用于name;id;href等等

# 方法筛选
def foo(tag):
    return tag.has_attr('class') and tag.has_attr('id')
soup.find_all(name=foo)

# get方法获取属性标签
tag = soup.find('a')
print(tag.get('class'))    # ['xxx']


###### 12.has_attr 检查标签是否具有该属性 ######

tag = soup.find('a')
print(tag.has_attr('id'))    # False


###### 13.get_text 获取标签文本内容 ######

tag = soup.find('a')
print(tag.get_text())    # 我是一个兵


###### 14.index 获取标签在某标签中的索引位置 ######

tag = soup.find('body')
print(tag.index(tag.find('a')))    # 0

tag = soup.find('body')
for k, v in enumerate(tag):
    print(k, v)     # k为索引;v为标签和内容


###### 15.is_empty_element 是否是空标签或者自闭合标签 ######

tag = soup.find('img')
print(tag.is_empty_element)   # True


###### 16.当前标签的关联标签 ######

soup.next
soup.next_element
soup.next_elements
soup.next_sibling
soup.next_siblings

tag.previous
tag.previous_element
tag.previous_elements
tag.previous_sibling
tag.previous_siblings

tag.parent
tag.parents


###### 17.查找某标签的关联标签 ######

tag.find_next(...)
tag.find_all_next(...)
tag.find_next_sibling(...)
tag.find_next_siblings(...)

tag.find_previous(...)
tag.find_all_previous(...)
tag.find_previous_sibling(...)
tag.find_previous_siblings(...)

tag.find_parent(...)
tag.find_parents(...)
# 参数同find_all


###### 18.select, select_one, CSS选择器 ######

tag = soup.select('div > a.xxx')    # 选择div下的class为xxx的a标签
tag = soup.select('div, a')    # 选择div或a标签
soup.select('a[href*=".com/el"]')    # 正则匹配

from bs4.element import Tag
def default_candidate_generator(tag):
    for child in tag.descendants:
        if not isinstance(child, Tag):
            continue
        if not child.has_attr('href'):
            continue
        yield child
tags = soup.find('body').select("a", _candidate_generator=default_candidate_generator, limit=1)
print(type(tags), tags)


###### 19.更改标签的内容 ######

html = '<html><body><a class="xxx">我是一个兵</a></body></html>'
soup = BeautifulSoup(html, 'lxml')
tag = soup.find('a')

print(tag.string)    # 获取文本内容:我是一个兵
tag.string = '我不是一个兵'    # 设置值
print(soup)    # <html><body><a class="xxx">我不是一个兵</a></body></html>

tag = soup.find('body')
# 递归内部获取所有标签的文本
print(tag.stripped_strings  )    # <generator object stripped_strings at 0x0137FC60>


###### 20.append 在当前标签内部追加一个标签 ######

tag = soup.find('a')
tag.append(soup.find('img'))
print(soup) # <html><body><a class="xxx">我是一个兵<img/></a></body></html>

tag = soup.find('a')
from bs4.element import Tag
obj = Tag(name='span', attrs={'id': 'id_1'})
obj.string = 'span标签'
tag.append(obj)
print(soup)    # <html><body><a class="xxx">我是一个兵<span id="id_1">span标签</span></a></body></html>


###### 21.insert 在当前标签内部指定位置插入一个标签 ######

obj = soup.find('img')
tag = soup.find('a')
tag.insert(0, obj)  # 插入最前边
print(soup)    # <html><body><a class="xxx"><img/>我是一个兵</a></body></html>


###### 22.insert_after, insert_before 在当前标签前面或后面插入 ######

obj = soup.find('img')
tag = soup.find('a')
tag.insert_after(obj)
tag.insert_before(obj)


###### 23.replace_with 当前标签替换为指定标签 ######

obj = soup.find('img')
tag = soup.find('a')
tag.replace_with(obj)


###### 24.setup 创建标签之间的关系 ######

obj = soup.find('img')
tag = soup.find('a')
tag.setup(next=a)
print(tag.next)


###### 25.wrap 用指定标签把当前标签包裹起来 ######

obj = soup.find('img')
tag = soup.find('a')
tag.wrap(obj)

tag = soup.find('a')
tag.wrap(soup.find('img'))


###### 26.unwrap 去掉当前标签,将保留其包裹的标签 ######

tag = soup.find('a')
tag.unwrap()
今天有点长请各位多点耐心看一下。
