添加依赖
<!-- spring security 权限框架依赖 -->
<dependency>
	<groupId>org.springframework.boot</groupId>
	<artifactId>spring-boot-starter-security</artifactId>
</dependency>
Spring Security配置
@Configuration
@EnableWebSecurity
public class WebSecurityConfig extends WebSecurityConfigurerAdapter {

	@Autowired
	private UserDetailsService userDetailsService;

	/**
	 * 授权请求(主要就是静态界面、下载一些静态文件)
	 */
	@Override
	public void configure(WebSecurity web) throws Exception {
		web.ignoring().antMatchers("/assets/**");
	}

	/**
	 * 验证用户的信息、处理注销
	 */
	@Override
	protected void configure(HttpSecurity http) throws Exception {
		http
        .authorizeRequests()
        	//spring boot监控放行
			.antMatchers("/manage/**").permitAll()
            .antMatchers("/").permitAll()
            // swagger-ui
			.antMatchers("/swagger-ui.html", "/webjars/springfox-swagger-ui/**", "/swagger-resources/**",
					"/v2/api-docs")
			.permitAll()
            .anyRequest().authenticated()
            .and()
        .formLogin()
            .loginPage("/login.xhtml")
            .loginProcessingUrl("/login")
            .successForwardUrl("/index.xhtml")
            .permitAll()
            .and()
        .logout()
        .logoutUrl("/logout")
            .permitAll();
	}

	/**
	 * 全局的用户校验
	 */
	@Autowired
    public void configureGlobal(AuthenticationManagerBuilder auth) throws Exception {
		auth.userDetailsService(userDetailsService).passwordEncoder(new BCryptPasswordEncoder());
    }


}
看到代码中我使用的是UserDetailsService,这里具体谈一下UserDetailsService。之前我们采用了配置文件的方式从数据库中读取用户进行登录。虽然该方式的灵活性相较于静态账号密码的方式灵活了许多,但是将数据库的结构暴露在明显的位置上,绝对不是一个明智的做法。本文通过Java代码实现UserDetailsService接口来实现身份认证。
UserDetailsService在身份认证中的作用
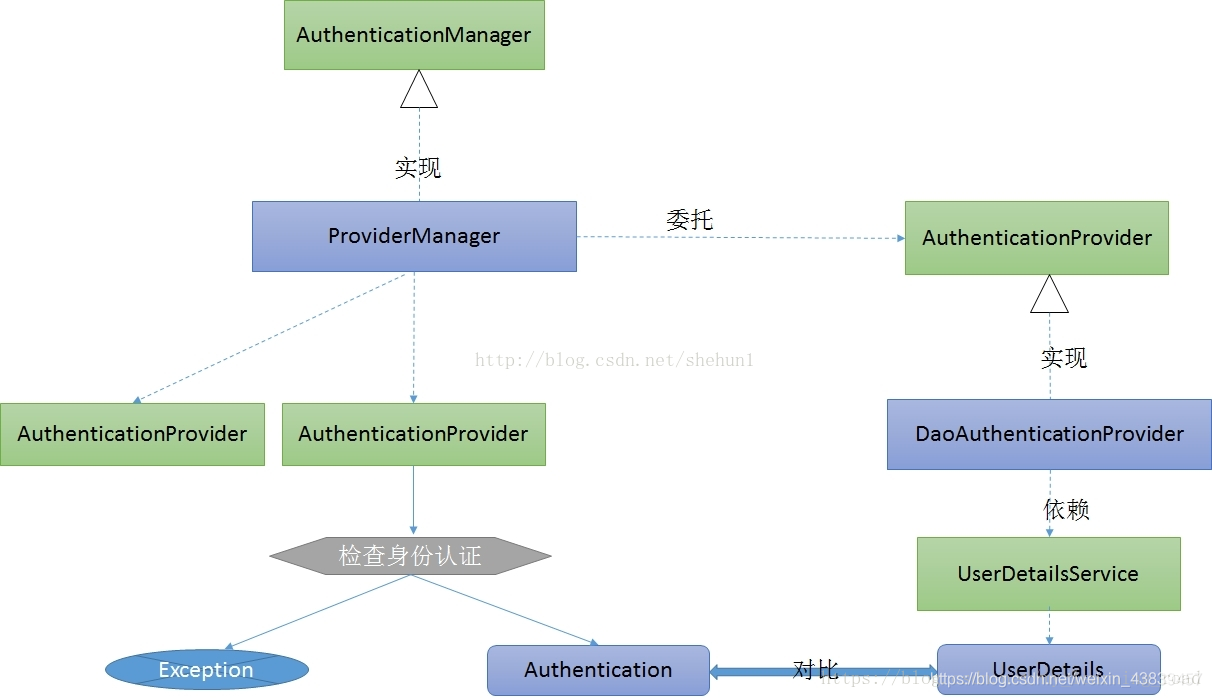
	Spring Security中进行身份验证的是AuthenticationManager接口,ProviderManager是它的一个默认实现,但它并不用来处理身份认证,而是委托给配置好的AuthenticationProvider,每个AuthenticationProvider会轮流检查身份认证。检查后或者返回Authentication对象或者抛出异常。
	验证身份就是加载响应的UserDetails,看看是否和用户输入的账号、密码、权限等信息匹配。此步骤由实现AuthenticationProvider的DaoAuthenticationProvider(它利用UserDetailsService验证用户名、密码和授权)处理。包含 GrantedAuthority 的 UserDetails对象在构建 Authentication对象时填入数据。
	上图解释:
新建CustomUserService类实现UserDetailsService接口
@Service
public class CustomUserService implements UserDetailsService {

	@Autowired
	private UserService userService;

	@Override
	public UserDetails loadUserByUsername(String username) throws UsernameNotFoundException {
		User user = userService.getUserByUsername(username);
		if (user == null) {
			throw new UsernameNotFoundException("用户名不存在");
		}
		if (!user.getStatus()) {
			throw new UsernameNotFoundException("用户账号已被删除");
		}

		return new org.springframework.security.core.userdetails.User(username, user.getPassword(), true, true, true,
				true, getGrantedAuthorities(user));
	}

	private List<GrantedAuthority> getGrantedAuthorities(User user) {

		List<GrantedAuthority> authorities = new ArrayList<>();
		return authorities;
	}

}
UserService 添加一个接口实现方法查询数据库:
User getUserByUsername(@RequestParam(name = "username") String username);
上述代码完成,剩下的就是编写界面代码了login.html。
<!DOCTYPE html>
<html xmlns="http://www.w3.org/1999/xhtml"
xmlns:th="http://www.thymeleaf.org"
xmlns:sec="http://www.thymeleaf.org/thymeleaf-extras-springsecurity4">
<head th:include="include/head::head"></head>
<head>
<link th:href="@{/assets/pages/css/login.css}" rel="stylesheet" type="text/css" />
</head>
<body class=" login">
<div class="logo">
</div>
<div class="content">
<form class="login-form" th:action="@{/login}" method="post">
<h3 class="form-title font-green">登 录</h3>
<div th:if="${param.error}" class="alert alert-danger ">
<button class="close" data-close="alert"></button>
<span >用户名或密码错误</span>
</div>
<div class="form-group">
<!--ie8, ie9 does not support html5 placeholder, so we just show field title for that-->
<label class="control-label visible-ie8 visible-ie9">用户名</label>
<input class="form-control form-control-solid placeholder-no-fix" type="text" autocomplete="off" placeholder="用户名" name="username" />
</div>
<div class="form-group">
<label class="control-label visible-ie8 visible-ie9">密码</label>
<input class="form-control form-control-solid placeholder-no-fix" type="password" autocomplete="off" placeholder="密码" name="password" />
</div>
<div class="form-actions">
<button type="submit" class="btn green uppercase">登 录</button>
</div>
</form>
</div>
</body>
</html>
最后就是做成功界面了接口,与界面实现了。
@RestController
public class IndexController extends BaseController {

	@Autowired
	private UserService userService;

	@RequestMapping("index.xhtml")
	public ModelAndView index(HttpServletRequest request) {
		User user = userService.getUserByUsername(getPrincipal());
		setSesionAttribute(request, Constants.SESSION_USER, user);
		return new ModelAndView("index");

	}

	private String getPrincipal() {
		String userName = null;
		Object principal = SecurityContextHolder.getContext().getAuthentication().getPrincipal();

		if (principal instanceof UserDetails) {
			userName = ((UserDetails) principal).getUsername();
		} else {
			userName = principal.toString();
		}
		return userName;
	}

}
