一、RabbitMQ 使用场景
RabbitMQ 是一个消息中间件,最主要的作用:信息的缓冲区,应用场景如下:
1、系统集成与分布式系统的设计
各种子系统通过消息来对接,这种解决方案也逐步发展成一种架构风格,即“通过消息传递的架构”。
例:现在医院有两个科“看病科”和“住院科”在之前他们之间是没有任何关系的,如果你在“看病课”看完病后注册的信息和资料,到住院科后还得重新注册一遍?那现在要改革,你看完病后可以直接去住院科那两个系统之间需要打通怎么办?这里就可以使用我们的消息中间件了。
2、异步任务处理结果回调的设计
例:记录日志,假如需要记录系统中所有的用户行为日志,如果通过同步的方式记录日志势必会影响系统的响应速度,当我们将日志消息发送到消息队列,记录日志的子系统就会通过异步的方式去消费日志消息。这样不需要同步的写入日志了。
3、并发请求的压力高可用性设计
例:比如电商的秒杀场景。当某一时刻应用服务器或数据库服务器收到大量请求,将会出现系统宕机。如果能够将请求转发到消息队列,再由服务器去消费这些消息将会使得请求变得平稳,提高系统的可用性。
参考:https://www.cnblogs.com/luotianshuai/p/7469365.html
二、RabbitMQ 安装
由于 RabbitMQ是建立在 Erlang OTP 平台上的,所以我们需要安装 Erlang 和 RabbitMQ。
2.1 安装 Erlang
1)下载 Erlang
64位:http://erlang.org/download/otp_win64_20.3.exe
32位:http://erlang.org/download/otp_win32_20.3.exe
2)安装,点击 exe 文件进行安装。
3)配置环境变量
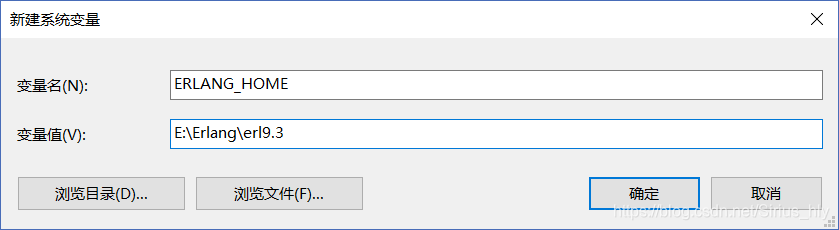
添加完成后,将 %ERLANG_HOME%\bin 添加到 Path 中。
4)检查是否安装成功,打开 cmd,输入 erl,如下

2.2 安装 RabbitMQ
1)下载
https://www.rabbitmq.com/install-windows.html
2)点击 exe 文件安装。
3)运行
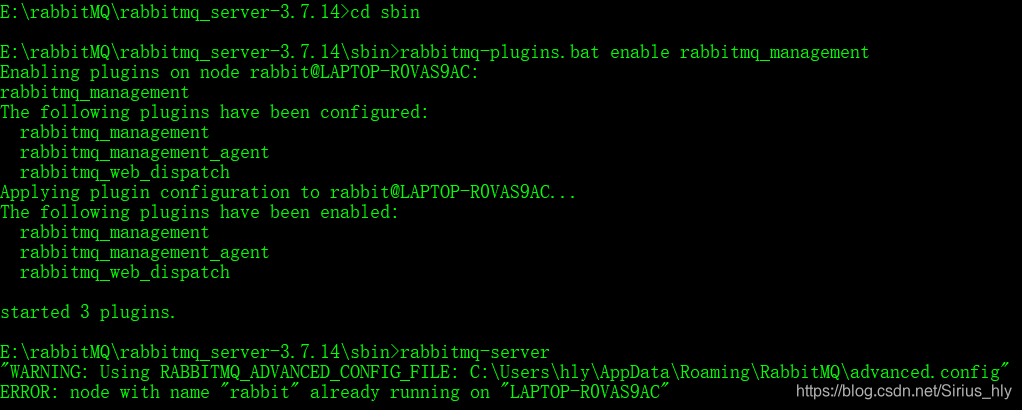
1.首先使用 cmd 进入sbin 目录,比如我的安装路径是
E:\rabbitMQ\rabbitmq_server-3.7.14\sbin
2.输入以下命令开启插件
rabbitmq-plugins.bat enable rabbitmq_management
3.启动服务
rabbitmq-server
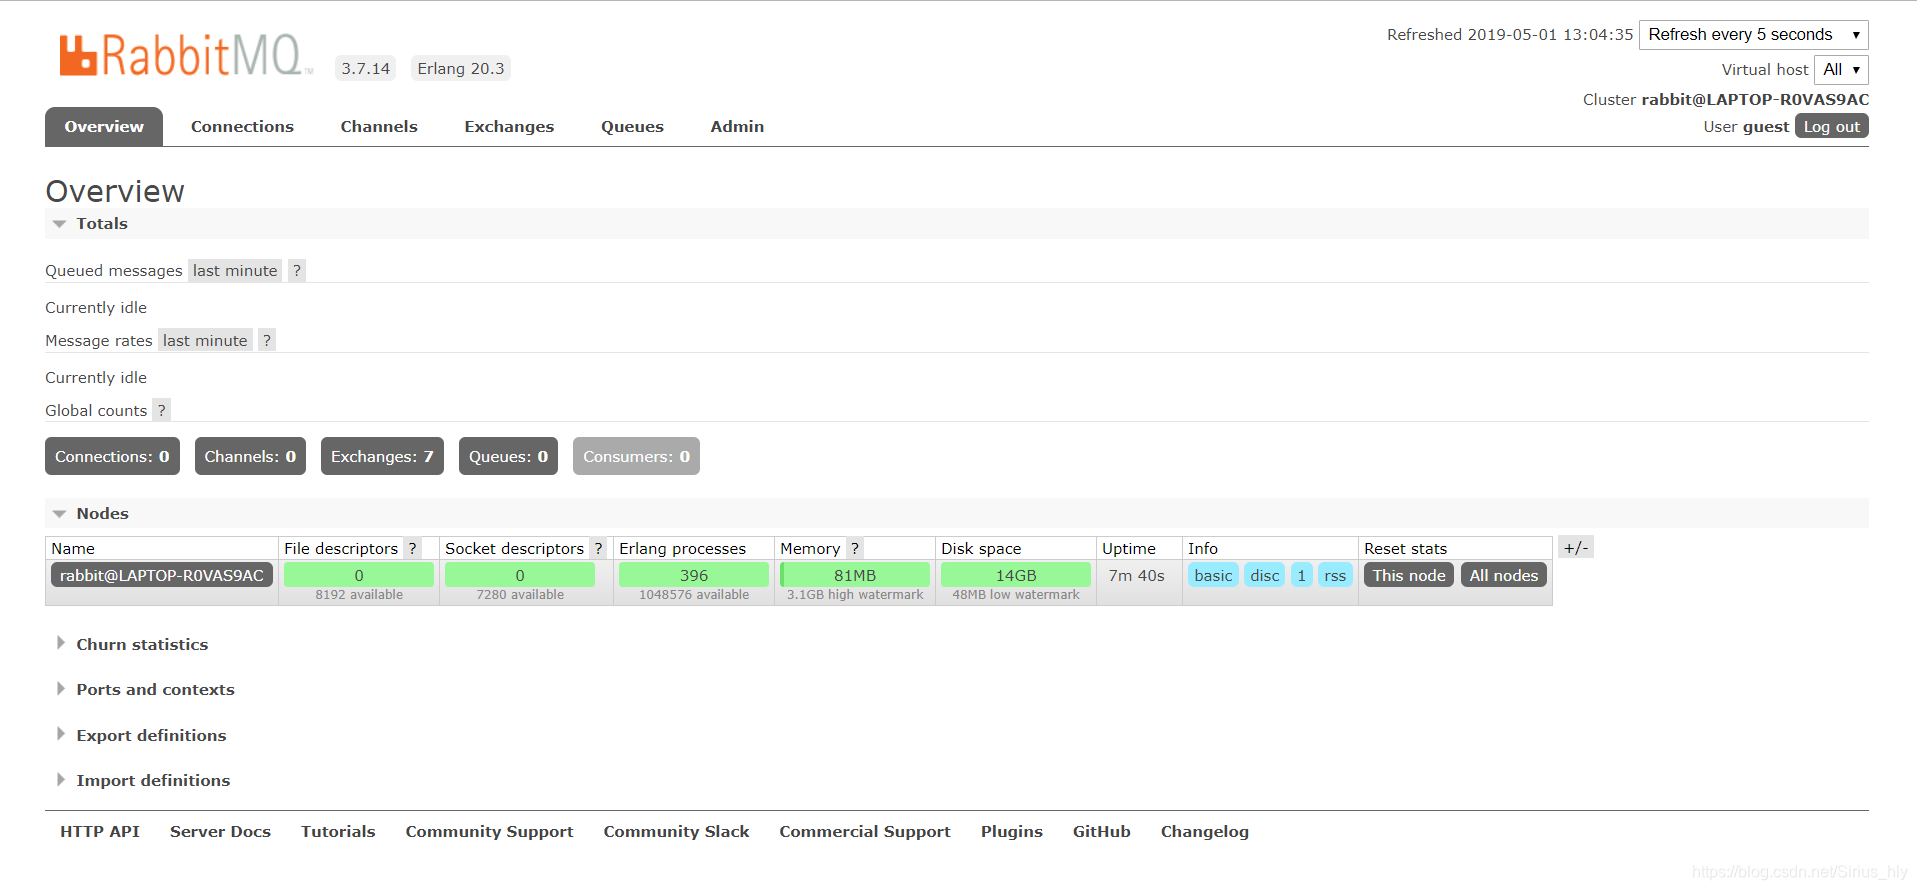
4.浏览器输入 localhost:15672 访问 RabbitMQ 的后台管理页面,初始化用户名和密码都是 guest。
三.SpringBoot 集成RabbitMQ
1 添加依赖
		<dependency>
			<groupId>org.springframework.boot</groupId>
			<artifactId>spring-boot-starter-amqp</artifactId>
		</dependency>
2 创建消息接收者
创建消息接收器,相应发布的消息。Receiver是一个简单的 POJO,它定义了一种接收消息的方法。当注册接收消息时,可以将其命名为任何名称。
这个POJO 有一个 CountDownLatch,它可以发出信号表示已收到消息。
@Component
public class Receiver {

    private CountDownLatch latch = new CountDownLatch(1);
    public void receiveMessage(String message) {
        System.out.println("Received <" + message + ">");
        latch.countDown();
    }
    public CountDownLatch getLatch() {
        return latch;
    }
}
3 注册监听器并发送消息
Spring AMQP RabbitTemplate 提供了使用RabbitMQ发送和接收消息所需的一切。具体来说,需要配置:
-
消息侦听器容器
-
声明队列,交换以及它们之间的绑定
-
用于发送一些消息以测试侦听器的组件
Spring Boot会自动创建连接工厂和 RabbitTemplate,从而减少必须编写的代码量。
代码注释见官网 https://spring.io/guides/gs/messaging-rabbitmq/
package com.javahly.springbootrabbitmq.rabbit;
import com.javahly.springbootrabbitmq.SpringBootRabbitmqApplication;
import org.springframework.amqp.core.Binding;
import org.springframework.amqp.core.BindingBuilder;
import org.springframework.amqp.core.Queue;
import org.springframework.amqp.core.TopicExchange;
import org.springframework.amqp.rabbit.connection.ConnectionFactory;
import org.springframework.amqp.rabbit.listener.SimpleMessageListenerContainer;
import org.springframework.amqp.rabbit.listener.adapter.MessageListenerAdapter;
import org.springframework.boot.SpringApplication;
import org.springframework.boot.autoconfigure.SpringBootApplication;
import org.springframework.context.annotation.Bean;

@SpringBootApplication
public class Application {

    static final String topicExchangeName = "spring-boot-exchange";

    static final String queueName = "spring-boot";

    @Bean
    Queue queue() {
        return new Queue(queueName, false);
    }

    @Bean
    TopicExchange exchange() {
        return new TopicExchange(topicExchangeName);
    }

    @Bean
    Binding binding(Queue queue, TopicExchange exchange) {
        return BindingBuilder.bind(queue).to(exchange).with("foo.bar.#");
    }

    @Bean
    SimpleMessageListenerContainer container(ConnectionFactory connectionFactory,
                                             MessageListenerAdapter listenerAdapter) {
        SimpleMessageListenerContainer container = new SimpleMessageListenerContainer();
        container.setConnectionFactory(connectionFactory);
        container.setQueueNames(queueName);
        container.setMessageListener(listenerAdapter);
        return container;
    }

    @Bean
    MessageListenerAdapter listenerAdapter(Receiver receiver) {
        return new MessageListenerAdapter(receiver, "receiveMessage");
    }

    public static void main(String[] args) throws InterruptedException {
        SpringApplication.run(Application.class, args).close();
    }
}
4 发送测试消息
package com.javahly.springbootrabbitmq.rabbit;

/**
 * @author :hly
 * @github :https://github.com/huangliangyun
 * @blog :http://www.javahly.com/
 * @CSDN :blog.csdn.net/Sirius_hly
 * @date :2019/5/1
 */
import java.util.concurrent.TimeUnit;
import org.springframework.amqp.rabbit.core.RabbitTemplate;
import org.springframework.boot.CommandLineRunner;
import org.springframework.stereotype.Component;
@Component
public class Runner implements CommandLineRunner {

    private final RabbitTemplate rabbitTemplate;
    private final Receiver receiver;

    public Runner(Receiver receiver, RabbitTemplate rabbitTemplate) {
        this.receiver = receiver;
        this.rabbitTemplate = rabbitTemplate;
    }

    @Override
    public void run(String... args) throws Exception {
        System.out.println("Sending message...");
        rabbitTemplate.convertAndSend(Application.topicExchangeName, "foo.bar.baz", "Hello from RabbitMQ!");
        receiver.getLatch().await(10000, TimeUnit.MILLISECONDS);
    }
}

参考资料
https://spring.io/guides/gs/messaging-rabbitmq/
关于笔者
我的 Github:Github
CSDN : CSDN 博客
个人网站: 天狼星的博客
完整代码:SpringBoot 2.0 | SpringBoot 集成RabbitMQ
微信公众号:[Mr sirius]