Spring Cloud学习笔记【八】Bus、RabbitMQ和WebHooks实现配置中心与客户端的自动刷新功能
一、架构了解
Spring Cloud Bus提供了批量刷新配置的机制,它使用轻量级的消息代理(例如RabbitMQ、Kafka等)连接分布式系统的节点,这样就可以通过Spring Cloud Bus广播配置的变化或者其他的管理指令。
(1)利用消息总线触发一个客户端/bus/refresh,而刷新所有客户端的配置:

(2)使用Config Server的/bus/refresh端点,而刷新所有客户端的配置:

上面两张图都可以实现消息自动刷新的功能,但唯一的不同在于一个更利于操作、更加优雅。图二的架构显然更加适合,图一不适合的原因如下:
(1) 打破了微服务的职责单一性。微服务本身是业务模块,它本不应该承担配置刷新的职责。
(2) 破坏了微服务各节点的对等性。
(3) 有一定的局限性。例如,微服务在迁移时,它的网络地址常常会发生变化,此时如果想要做到自动刷新,那就不得不修改WebHook的配置。
(上面的图都是网上找的,实在是很多博客都是一样,不知道哪个是原创了,所以出处未进行注明!!)
二、环境准备
1.安装RabbitMQ(这里不再赘述)
RabbitMQ在浏览器中输入地址查看:http://127.0.0.1:15672/

使用默认账号登录:guest/ guest
2、git仓库,可以准备多个环境,和多个分支进行测试!建议采用github或者gitlib这两种!!!

3、springcloud的版本Hoxton.SR1,springboot的版本是2.2.2.RELEASE。
三、Eureka服务搭建
a.依赖引入
implementation 'org.springframework.cloud:spring-cloud-starter-netflix-eureka-server'b.配置文件
spring.application.name=eureka
#eureka默认端口
server.port=8761
#禁止自己当做服务去注册
eureka.client.register-with-eureka=false
#自我保护模式关闭
eureka.server.enable-self-preservation=false
# 清理无效节点的时间间隔(单位毫秒,默认是60*1000)
# 生产环境,不会频繁重启,所以,一定要把自我保护机制打开,否则网络一旦终端,就无法恢复。
eureka.server.eviction-interval-timer-in-ms=10000
c.启动类
@SpringBootApplication
@EnableEurekaServer
public class DemoApplication {
    public static void main(String[] args) {
        SpringApplication.run(DemoApplication.class, args);
    }
}
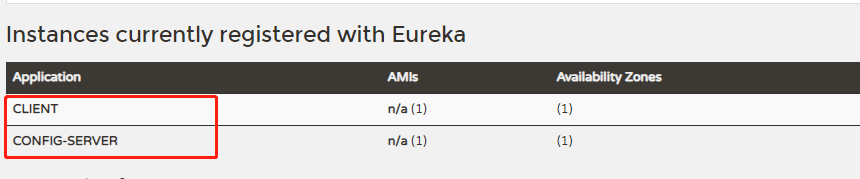
d.测试

四、Config服务端搭建
a.在springcloud-configServer中配置bus,加入pom依赖
<dependency>
	<groupId>org.springframework.cloud</groupId>
	<artifactId>spring-cloud-starter-netflix-eureka-client</artifactId>
</dependency>
<dependency>
	<groupId>org.springframework.cloud</groupId>
	<artifactId>spring-cloud-starter-bus-amqp</artifactId>
</dependency>
<dependency>
	<groupId>org.springframework.cloud</groupId>
	<artifactId>spring-cloud-config-server</artifactId>
</dependency>
<dependency>
	<groupId>org.springframework.boot</groupId>
	<artifactId>spring-boot-starter-actuator</artifactId>
</dependency>
或者
implementation 'org.springframework.cloud:spring-cloud-config-server'
implementation 'org.springframework.cloud:spring-cloud-starter-bus-amqp'
implementation 'org.springframework.boot:spring-boot-starter-actuator'
implementation 'org.springframework.cloud:spring-cloud-starter-netflix-eureka-client'配置中心:spring-cloud-config-server,消息总线:spring-cloud-starter-bus-amqp,服务注册:spring-cloud-starter-netflix-eureka-client
b.配置文件:application.properties
#服务端口
server.port=9008
#项目名称
spring.application.name=config-server
#往配置中心添加服务的地址
eureka.client.service-url.defaultZone:http://localhost:8761/eureka/
# git仓库地址(项目地址,直接复制链接但要去除.git就行)
spring.cloud.config.server.git.uri=http://192.168.3.6:3000/laihx/spring-cloud-config
# git仓库地址下的相对搜索地址(可用使用通配符),可以配置多个,用分割,可以{application}实现按应用查配置
spring.cloud.config.server.git.search-paths=config
# git仓库的账号(公开仓库无需账号信息)
[email protected]
# git仓库的密码(公开仓库无需账号信息)
spring.cloud.config.server.git.password=laihx123456
#git默认分支
spring.cloud.config.server.git.default-label=master
#文件拉取的保存路径
spring.cloud.config.server.git.basedir=E:/basedir
#日志配置(详细日志,便于观察)
logging.level.web=trace
#是否开启actuator认证
management.endpoints.web.exposure.include=*
#RabbitMq的地址、端口,用户名、密码
spring.rabbitmq.host=localhost
spring.rabbitmq.port=5672
spring.rabbitmq.username=guest
spring.rabbitmq.password=guest
c.启动类
@SpringBootApplication
@EnableEurekaClient
@EnableConfigServer
public class DemoApplication {
    public static void main(String[] args) {
        SpringApplication.run(DemoApplication.class, args);
    }
}
d.启动测试:RabbitMQ新增了bus的队列

注意点:
在springcloud 配置config的时候遇到了几个比较烦的坑!先说1.5x版本的一些配置吧!
端点暴露的方式
management.security.enabled = false #事实上在spring boot 2.0+已经废弃2.0之后的版本
management.endpoints.web.exposure.include=* #解除限制刷新配置的接口(手动刷新测试使用到)
1.5x的时候用的路径是:http://ip:port/bus/refresh
2.0直接访问这个路径直接抛出错误

2.0之后直接访问:http://ip:port/actuator/bus-refresh
五、客户端搭建
a.引入依赖
implementation "com.alibaba:fastjson:1.2.55"
implementation"mysql:mysql-connector-java:5.1.32"
implementation"org.springframework.boot:spring-boot-starter-data-jpa"
implementation 'org.springframework.cloud:spring-cloud-config-client'
implementation 'org.springframework.cloud:spring-cloud-starter-bus-amqp'
implementation'org.springframework.cloud:spring-cloud-starter-openfeign'
implementation 'org.springframework.boot:spring-boot-starter-web'
implementation 'org.springframework.cloud:spring-cloud-starter-netflix-eureka-client'配置中心客户端:spring-cloud-config-client,消息总线:spring-cloud-starter-bus-amqp,服务注册:spring-cloud-starter-netflix-eureka-client
b.bootstrap.yml文件配置(这里不再适用application.properties或者application.yml,主要是优先级的问题)
spring:
  cloud:
    config:
      discovery:
        enabled: true
        service-id: CONFIG-SERVER
      profile: dev
      name: config
      label: master
    bus:
      id: ${spring.application.name}:${spring.cloud.config.profile}:${random.value} #注意:2.0版本必须配置,不然@RefreshScope更新不了,这是非常大的坑
  application:
    name: client
c.git中配置文件application.yml

d.启动类添加注解
@SpringBootApplication
@EnableEurekaClient
@EnableFeignClients
public class DemoApplication {
    public static void main(String[] args) {
        SpringApplication.run(DemoApplication.class, args);
    }
}
f.刷新配置:@RefreshScope进行刷新,需要自动刷新的位置加入
@Component
@RefreshScope
public class OrderCodeConfig implements Serializable {
@Value("${platform.order.code.profile}")
private String profile;
@Value("${platform.order.code.suffix}")
private String suffix;
public String getProfile() {
return profile;
}
public void setProfile(String profile) {
this.profile = profile;
}
public String getSuffix() {
return suffix;
}
public void setSuffix(String suffix) {
this.suffix = suffix;
}
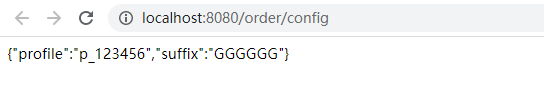
}g.启动测试
RabbitMQ新增了bus的队列

刚开始获取的信息配置
进行配置文件修改,使用Git工具,点击 Git Bash,curl -X POST http://localhost:9008/actuator/bus-refresh进行刷新!
curl -X POST http://localhost:9008/actuator/bus-refresh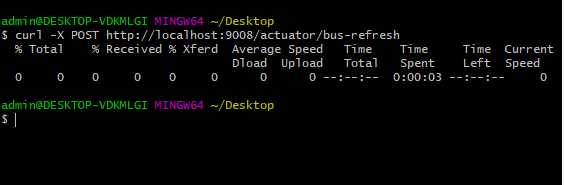
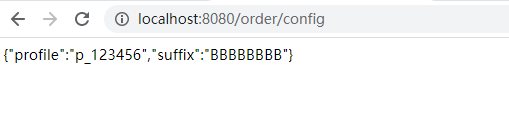
再次测试

配置文件刷新成功,但这样做不符合实际,每次修改之后需要手动去调用接口,在生成中,肯定不会这样来做!
六、WebHooks自动刷新
配置git的WebHooks进行更改事件之后,进行自动上报更新事件!!!使用github,可以采用内网穿透,比如花生壳,natapp等等!
将网站复制到URL里面,后面加上/monitor,使用application/json格式


配置参数修改,获取成功 !
查询数据库数据,获取成功!

注意点:
1、 WebHooks尽量采用github gitlib去测试,因为其他的是不支持的,亲测!!!
2、client一定要配置bus.id,不然更新不成功,这是个大坑,不然文件配置已经更新,就是获取数据不更新,亲测试多遍!!!
