一、前言
我们在 Git仓库上改了配置,重新访问http://localhost:8889/hi,发现还是 foo dev version 27,说明配置尚未刷新。
发送 POST 请求到 http://localhost:8889/refresh,例如: curl -X POST http://localhost:8889/refresh,再次请求 http://localhost:8889/hi,返回结果 foo dev version 27 refresh bus,表示这个配置属性已被刷新。
上面是使用/refresh 端点手动刷新配置,但如果所有服务节点的配置都需要手动去刷新,工作量可想而知。不仅如此,随着系统不断扩张,会越来越难以维护。因此,实现配置的自动刷新是很有必要的。接下来我们就来实现配置的自动刷新。
二、Spring Cloud Bus 简介
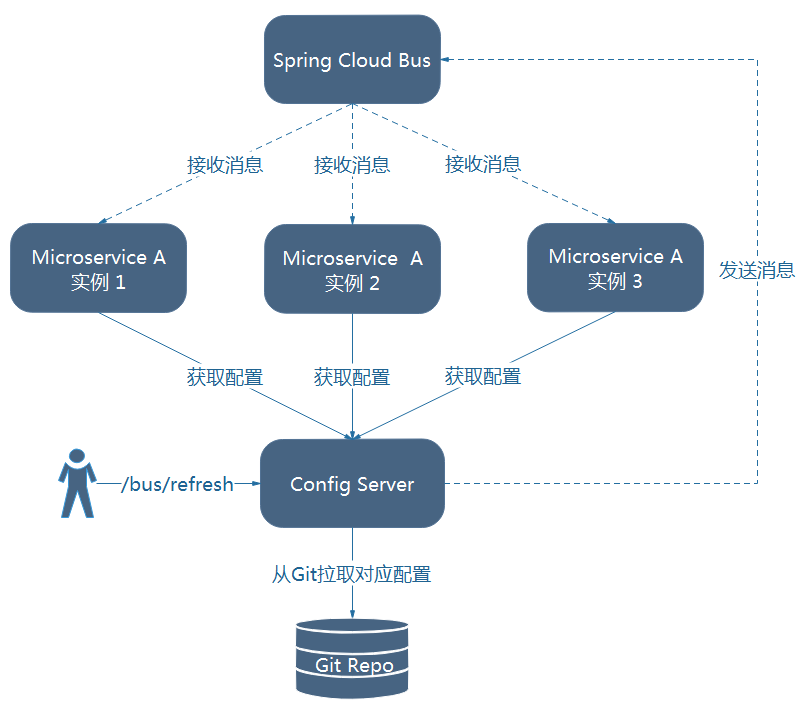
Spring Cloud Bus 使用轻量级的消息代理(例如 RabbitMQ、Kafka等)连接分布式的节点。这样就可以广播传播状态的更改(例如配置的更新)或者其他的管理指令。可将 Spring Cloud Bus 想象成一个分布式的 Spring Boot Actuator。Spring Cloud Bus的架构图如下:

由图可知,微服务A的所有的实例都通过消息总线连接到了一起,每个实例都会订阅配置更新事件。当其中一个微服务节点的 /bus/refresh 端点被请求时,该实例就会向消息总线发送一个配置更新事件,其他实例获得该实例后也会更新配置。
三、改造 microservice-provider-service-config
本文在上一篇改造来实现的。点击上一篇文章
(1)、在 pom 文件加上起步依赖 spring-cloud-starter-bus-amqp,完整的配置文件如下:
<dependency>
		<groupId>org.springframework.boot</groupId>
		<artifactId>spring-boot-starter-web</artifactId>
	</dependency>
	<dependency>
		<groupId>org.springframework.cloud</groupId>
		<artifactId>spring-cloud-starter-config</artifactId>
	</dependency>
	<dependency>
		<groupId>org.springframework.cloud</groupId>
		<artifactId>spring-cloud-starter-netflix-eureka-client</artifactId>
	</dependency>
	<dependency>
		<groupId>org.springframework.cloud</groupId>
		<artifactId>spring-cloud-starter-bus-amqp</artifactId>
	</dependency>
	<dependency>
		<groupId>org.springframework.boot</groupId>
		<artifactId>spring-boot-starter-actuator</artifactId>
	</dependency>
</dependencies>
(2)、在配置文件application.properties中加上RabbitMq的配置,包括RabbitMq的地址、端口,用户名、密码。并需要加上spring.cloud.bus的三个配置,具体如下:
server:
  port: 8889

spring:
  application:
    name: microservice-provider-service-config
  cloud:
    config:
      profile: dev
      label: master
      discovery:
        enabled: true
        service-id: microservice-eureka-server-config
    bus:
      enabled: true
      trace:
        enabled: true

  rabbitmq:
    host: localhost
    port: 15672
    username: guest
    password: guest

management:
  endpoint:
    web:
      exposure:
        include: bus-refresh

eureka:
  client:
    serviceUrl:
      defaultZone: http://localhost:8761/eureka/
(3)、MicroserviceProviderServiceConfigApplication 启动类代码如下:
package com.riemann.microserviceproviderserviceconfig;

import org.springframework.beans.factory.annotation.Value;
import org.springframework.boot.SpringApplication;
import org.springframework.boot.autoconfigure.SpringBootApplication;
import org.springframework.cloud.client.discovery.EnableDiscoveryClient;
import org.springframework.cloud.context.config.annotation.RefreshScope;
import org.springframework.cloud.netflix.eureka.EnableEurekaClient;
import org.springframework.web.bind.annotation.RequestMapping;
import org.springframework.web.bind.annotation.RestController;

@SpringBootApplication
@RestController
@EnableEurekaClient
@EnableDiscoveryClient
@RefreshScope
public class MicroserviceProviderServiceConfigApplication {

	public static void main(String[] args) {
		SpringApplication.run(MicroserviceProviderServiceConfigApplication.class, args);
	}

	@Value("${foo}")
	private String foo;

	@RequestMapping(value = "/hi")
	public String hi() {
		return foo;
	}

}
(4)、依次启动 microservice-eureka-server、microservice-eureka-server-config、microservice-provider-service-config
访问 http://localhost:8889/hi,浏览器显示:foo dev version 27

这时我们去代码仓库将foo的值改为“foo dev version 27 refresh bus”,即改变配置文件foo的值。如果是传统的做法,需要重启服务,才能达到配置文件的更新。此时,我们只需要发送post请求:http://localhost:8881/actuator/bus-refresh,你会发现microservice-provider-service-config会重新读取配置文件。
重新读取配置文件:
这时我们再访问 http://localhost:8889/hi 浏览器显示:
foo dev version 27 refresh bus
另外,/actuator/bus-refresh接口可以指定服务,即使用"destination"参数,比如 “/actuator/bus-refresh?destination=customers:**” 即刷新服务名为customers的所有服务。
