Spring Cloud Bus 将分布式的节点用轻量的消息代理连接起来。它可以用于广播配置文件的更改或者服务之间的通讯,也可以用于监控。可使用AMQP(RabbitMQ)或Kafka作为通道。
消息总线(Bus)的典型应用场景就是配置中心客户端刷新。
一、客户端发起通知,架构图如下:

流程步骤说明:
- webhook监听被触发,给configClient A发送bus-refresh请求刷新配置
- configClient A读取configServer中的配置,并且发送消息给Bus
- Bus接收消息后并通知其他configClient
- 其他configClient收到消息读取最新配置
下面将对ConfigClient进行改造(eureka_ribbon):
1. pom.xml引入amqp
<dependency>
	<groupId>org.springframework.cloud</groupId>
	<artifactId>spring-cloud-starter-bus-amqp</artifactId>
</dependency>
2. application.properties
#Actuator endpoints
management.endpoints.web.exposure.include=info,health,refresh,bus-refresh

#Tracing Bus Events
spring.cloud.bus.trace.enabled=true

#RabbitMQ
spring.rabbitmq.host=localhost
spring.rabbitmq.port=5672
spring.rabbitmq.username=root
spring.rabbitmq.password=123
3. 测试
1)启动两个eureka_ribbon

2)在RabbitMQ的控制台,可以看到多了2个SpringCloudBus的queue

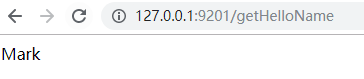
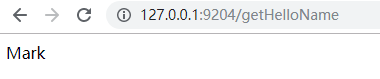
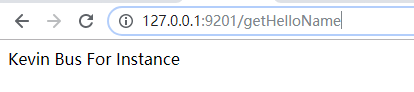
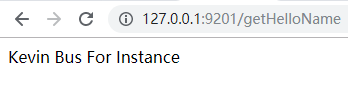
3)分别访问eureka_ribbon的配置
http://127.0.0.1:9201/getHelloName
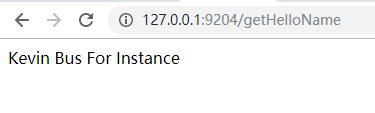
http://127.0.0.1:9204/getHelloName
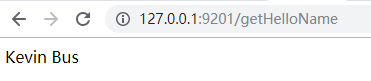
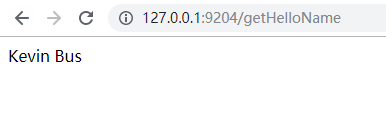
4) 修改github上的配置文件

5) 使用postman以POST的方式调用http://127.0.0.1:9201/actuator/bus-refresh
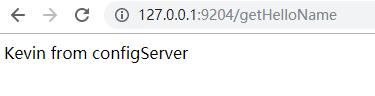
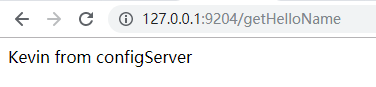
6)再次分别访问eureka_ribbon的配置
http://127.0.0.1:9201/getHelloName
http://127.0.0.1:9204/getHelloName
7)查看后台日志可以看到client收到bus的消息
2019-06-20 17:46:06.203 INFO 22048 --- [nio-9201-exec-6] o.s.cloud.bus.event.RefreshListener : Received remote refresh request. Keys refreshed [management.endpoints.web.exposure.include, config.client.version, hello.name]
客户端发起通知缺陷:
1. 导致各客户端节点不对等,以及打破了微服务的职责单一性;
2. 客户端地址会发生变化(相对频次高),存在一定局限性;
二、服务端发起通知
为了解决客户端发起通知缺陷,改用服务端发起通知,架构图如下:

流程步骤说明:
- webhook监听被触发,给configServer发送bus-refresh请求刷新配置
- configServer发送消息给Bus
- Bus接收消息后并通知所有configClient
- 各configClient收到消息读取最新配置
从图上可以看出,configClient客户端的职责就是接收刷新消息读取配置,而且各客户端完全对等。
下面对ConfigServer进行改造:
1. pom.xml引入amqp
<dependency>
	<groupId>org.springframework.cloud</groupId>
	<artifactId>spring-cloud-starter-bus-amqp</artifactId>
</dependency>
2. application.properties
#Actuator endpoints
management.endpoints.web.exposure.include=bus-refresh

#Tracing Bus Events
spring.cloud.bus.trace.enabled=true

#RabbitMQ
spring.rabbitmq.host=localhost
spring.rabbitmq.port=5672
spring.rabbitmq.username=root
spring.rabbitmq.password=123
3. 测试
1)启动configServer

2)修改github上的配置文件

3)调用configServer的bus-refresh, http://127.0.0.1:9111/actuator/bus-refresh
4)访问客户端,均已更新为最新配置

三、局部刷新
有时候需要针对特定的服务的配置进行刷新

1. 刷新单个实例
可以通过配置spring.cloud.bus.id来标识实例的service ID,默认使用应用名spring.application.name加端口server.port,如:
http://127.0.0.1:9111/actuator/bus-refresh/eurekaRibbon:9201
刷新后,9201获取了最新的配置,但9204还是旧的配置
2. 通配符刷新实例
http://127.0.0.1:9111/actuator/bus-refresh/eurekaRibbon:**
调用后:
参考:
https://cloud.spring.io/spring-cloud-static/Greenwich.SR1/single/spring-cloud.html#_spring_cloud_bus