1. spring cloud bus 自动刷新配置的原理
 、
、
2. 在config-server中导入依赖
<!--自动刷新配置-->
<dependency>
	<groupId>org.springframework.cloud</groupId>
	<artifactId>spring-cloud-starter-bus-amqp</artifactId>
</dependency>
<dependency>
	<groupId>org.springframework.cloud</groupId>
	<artifactId>spring-cloud-config-monitor</artifactId>
</dependency>
在config-client 中导入
<!--自动刷新配置-->
<dependency>
	<groupId>org.springframework.cloud</groupId>
	<artifactId>spring-cloud-starter-bus-amqp</artifactId>
</dependency>
3. 启动项目后,在rabbitmq 中可以看到两个实例

4. 在github 中配置config-server的外网地址

5. 修改github 上配置文件的内容

6. 查看config-server的后台日志

显示重新加载配置文件
7. 可以看到rabbitmq 中的消息已经送达

8. 查看config-client 端的后台日志,显示为重新拉取配置,加载配置,重启项目


显示从远程上拉取配置的日志:
Located property source: CompositePropertySource {name='configService', propertySources=[MapPropertySource {name='configClient'}, MapPropertySource {name='https://github.com/springcloud-wxsell/config-repo.git/order-test.yml'}]}9. 当你的项目后台打印出这些日志时,说明自动刷新配置构建完成,可以进行访问了

不用重启项目,也可以动态的刷新配置,这就是spring-cloud-bus的优秀所在,在这里恭喜自己坚持不懈吧!
@Data
@Component
@ConfigurationProperties("boy")
@RefreshScope // 动态刷新相关值
public class BoyConfig {

    // 姓名
    private String name;

    // 年龄
    private Integer age;
}
@RestController
@RequestMapping("/boy")
public class BoyController {
@Autowired
private BoyConfig boyConfig;
@GetMapping("/print")
public String print() {
return "name:" + boyConfig.getName() + "; age:" + boyConfig.getAge();
}
}10. 重点来了,spring-cloud-bus的爬坑思路和启示,看到这里的小伙伴,你们才真正是最成功的
往往不要太在意结果,更多的关注应该放在找bug和解决bug的过程上来,希望小伙伴学到这个思路之后,遇到其他问题,可以举一反三。
问题发现:
我在github上修改了相关配置之后,config-server后台日志,就开始打印出从远程拉取最新配置的日志,加载配置重启项目,一切都是我所期望的那样,然后再查看rabbitmq, 消息的图线也显示为折线图,说明消息在mq中传递是没有问题的,而config-client端的后台日志也打印了,只是缺少拉取配置文件,和重启项目的日志,仔细分析后,觉得是config-client在接收mq消息的地方出了问题,甚至怀疑已经接收到了消息,我第一个猜测是spring-cloud-bus的组件的判断出了问题。
那这个组件,spring-cloud-bus监听消息的入口在哪里,首先我想到可以通过查看日志
问题解决:
第1步:增加spring-cloud-bus的日志记录

第2步:修改配置文件,并查看config-client的后台日志

可以看到要匹配order:test: 和 order:8090: ,很明显,匹配不上。
于是,我又猜测,是否可以将端口号8090 修改为test,应该就可以匹配上了,开始验证
我想到的是从获取端口号的源头开始,
第3步:下载spring-cloud-bus的源码(我用到的spring-cloud-bus的版本是2.0.0.RELEASE),并导入进来
# down下来
git clone https://github.com/spring-cloud/spring-cloud-bus.git
# 强制reset 到2.0.0.RELEASE 提交的节点
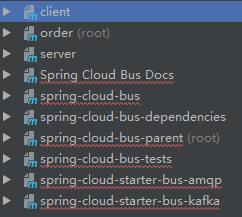
git reset --hard 1974b23选择根目录下的pom.xml文件,将项目导入进来

判断项目是否成功引入,可以点击

看看是不是直接跳到源码
![]()

如果跳不到,请检查依赖的版本和源码版本是否一致
第4步:查看相关类和方法

private String getDefaultServiceId(ConfigurableEnvironment environment) {
		return "${vcap.application.name:${spring.application.name:application}}:${vcap.application.instance_index:${spring.application.index:${local.server.port:${server.port:0}}}}:${vcap.application.instance_id:${random.value}}";
	}
该方法的作用就是获取配置信息
In match: order:test:**,
order:8090:fc4fc7f19d834b9c1d2e56936b341057


return "${vcap.application.name:${spring.application.name:application}}:${vcap.application.instance_index:
${spring.application.index:${local.server.port:${server.port:0}}}}:${vcap.application.instance_id:${random.value}}";
第5步:修改源码(我们想获取的配置信息是test)
![]()
修改为: ${spring.cloud.config.profile}
我的配置文件中配置信息为:

就可以将test值拿到
修改后需要返回的参数为
return "${vcap.application.name:${spring.application.name:application}}:${vcap.application.instance_index:${spring.cloud.config.profile:${local.server.port:${server.port:0}}}}:${vcap.application.instance_id:${random.value}}";编译,重启动项目,查看日志.
再次对比一下修改前后的后台日志
修改本地的spring-cloud-bus 相关源码后,显示的日志为

修改源码之前,显示的日志

完成!过程很重要,欢迎指点!
ps: 个人不建议修改源码直接使用,配置自动刷新在生产上先不要使用,坐等官方发布新版本之后修复bug之后自然会有解决方案