
Vue的生命周期就像人的一生,从出生、儿童、青年、中年、老年到死亡,经历不同过程,Vue的组件也会经历从创建到更新或销毁的过程,而钩子函数,就是把不同的任务挂到不同的阶段,如ajax获取数据就可以在mounted阶段。下面结合网上一些学习到的东西综合自己的见解简述一下这部分内容。
一、Vue生命周期简介
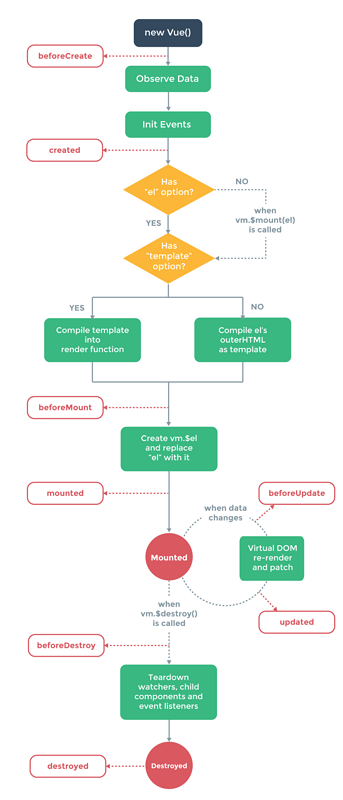
vue生命周期
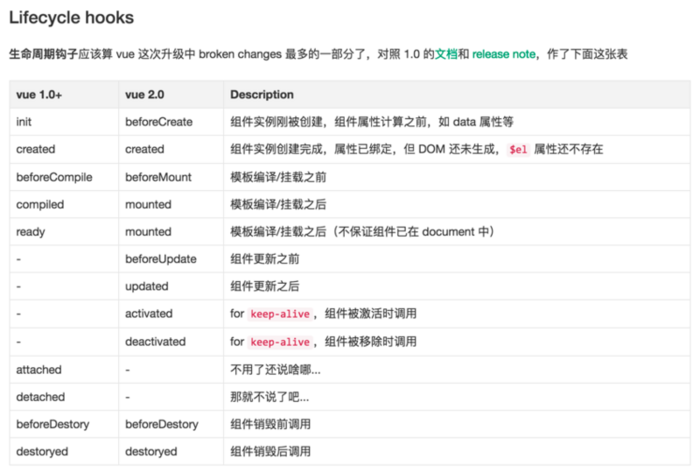
Vue生命周期钩子函数Vue1.0+和Vue2.0对比
上面两张图片分别是VueJs官网文档中对于组件生命周期的说明和Vue1.0+和Vue2.0钩子函数的对比。讲上面的内容简化一下,可以得到如下这张简化版的:
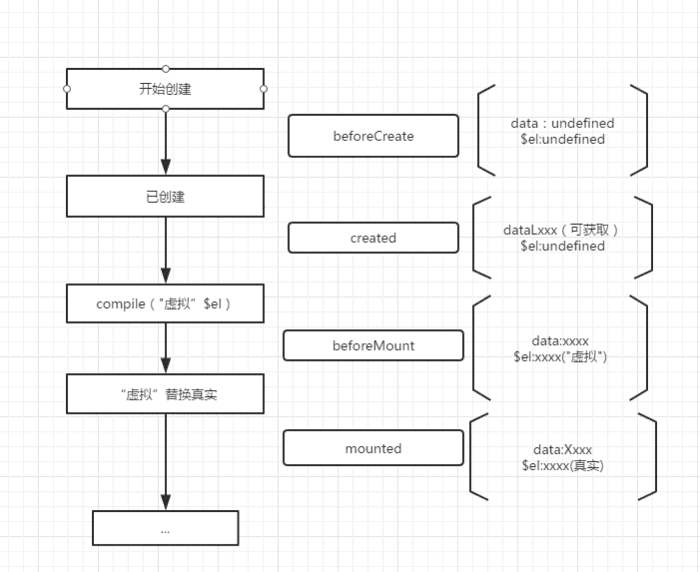
看起来简单更加清晰了一些。
二、生命周期探究
为了更加直白的理解,网上有一段测试代码,通过控制台输出的方式清晰地把每一个钩子函数一一展现,对理解很有用处,下载搬过来用一下以便加深记忆。
<!DOCTYPE html>
<html>
<head>
  <title>Vue2.0生命周期与钩子函数</title>
  <script type="text/javascript" src="https://cdn.jsdelivr.net/vue/2.1.3/vue.js"></script>
  <body>

    <div id="app">
      <p>{{ message }}</p>
      <input type="button" @click="updated" value="更新数据" />
      <input type="button" @click="destroy" value="销毁" />
    </div>

    <script type="text/javascript">
      var vm = new Vue({
        el: '#app',
        data: {
          message: "Welcome Vue"
        },
        methods: {
          updated() {
            this.message = '现在是更新后'
          },
          destroy () {
            vm.$destroy ();
          }
        },
        beforeCreate: function () {
          console.group('beforeCreate 创建前状态===============》');
          console.log("%c%s", "color:red", "el     : " + this.$el); //undefined
          console.log("%c%s", "color:red", "data   : " + this.$data); //undefined
          console.log("%c%s", "color:red", "message: " + this.message);//undefined
        },
        created: function () {
          console.group('created 创建完毕状态===============》');
          console.log("%c%s", "color:red", "el     : " + this.$el); //undefined
          console.log("%c%s", "color:green", "data   : " + this.$data); //[object Object]  =>  已被初始化
          console.log("%c%s", "color:green", "message: " + this.message); //Welcome Vue  =>  已被初始化
        },
        beforeMount: function () {
          console.group('beforeMount 挂载前状态===============》');
          console.log("%c%s", "color:green", "el     : " + (this.$el)); //已被初始化
          console.log(this.$el); // 当前挂在的元素
          console.log("%c%s", "color:green", "data   : " + this.$data); //已被初始化
          console.log("%c%s", "color:green", "message: " + this.message); //已被初始化
        },
        mounted: function () {
          console.group('mounted 挂载结束状态===============》');
          console.log("%c%s", "color:green", "el     : " + this.$el); //已被初始化
          console.log(this.$el);
          console.log("%c%s", "color:green", "data   : " + this.$data); //已被初始化
          console.log("%c%s", "color:green", "message: " + this.message); //已被初始化
        },
        beforeUpdate: function () {
          alert("更新前状态");
          console.group('beforeUpdate 更新前状态===============》'); //这里指的是页面渲染新数据之前
          console.log("%c%s", "color:green", "el     : " + this.$el);
          console.log(this.$el);
          console.log("%c%s", "color:green", "data   : " + this.$data);
          console.log("%c%s", "color:green", "message: " + this.message);
          alert("更新前状态2");
        },
        updated: function () {
          console.group('updated 更新完成状态===============》');
          console.log("%c%s", "color:green", "el     : " + this.$el);
          console.log(this.$el);
          console.log("%c%s", "color:green", "data   : " + this.$data);
          console.log("%c%s", "color:green", "message: " + this.message);
        },
        beforeDestroy: function () {
          console.group('beforeDestroy 销毁前状态===============》');
          console.log("%c%s", "color:red", "el     : " + this.$el);
          console.log(this.$el);
          console.log("%c%s", "color:red", "data   : " + this.$data);
          console.log("%c%s", "color:red", "message: " + this.message);
        },
        destroyed: function () {
          console.group('destroyed 销毁完成状态===============》');
          console.log("%c%s", "color:red", "el     : " + this.$el);
          console.log(this.$el);
          console.log("%c%s", "color:red", "data   : " + this.$data);
          console.log("%c%s", "color:red", "message: " + this.message)
        }
      })
    </script>
  </body>
</html>
通过控制台的输出情况可以让我们更直观的了解各个钩子函数的作用。
1.created、mounted 创建和挂载
beforecreated:el 和 data 并未初始化created:完成了 data 数据的初始化,el没有
beforeMount:完成了 el 和 data 初始化
mounted :完成挂载
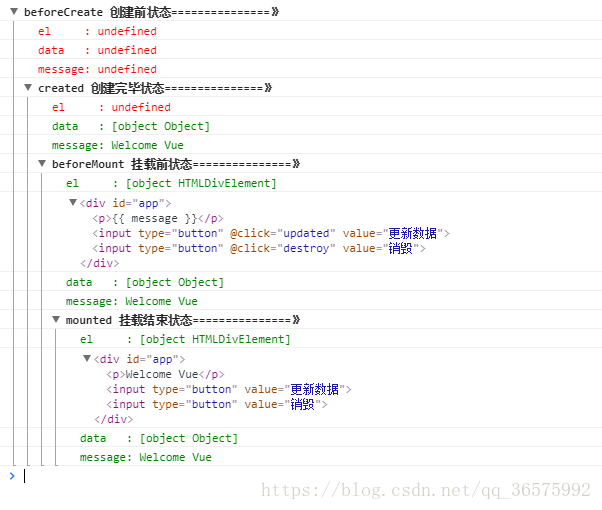
另外注意beforeMount时的p标签内容还是{{ message }},这里就是应用的 Virtual DOM(虚拟Dom)技术,先把坑占住了。到后面mounted挂载的时候再把值渲染进去。
2.update 更新
我们单击页面中的“更新数据”按钮,或直接键入vm.message="现在是更新后的数据",将数据更新。下面就能看到data里的值被修改后,将会触发update的操作。
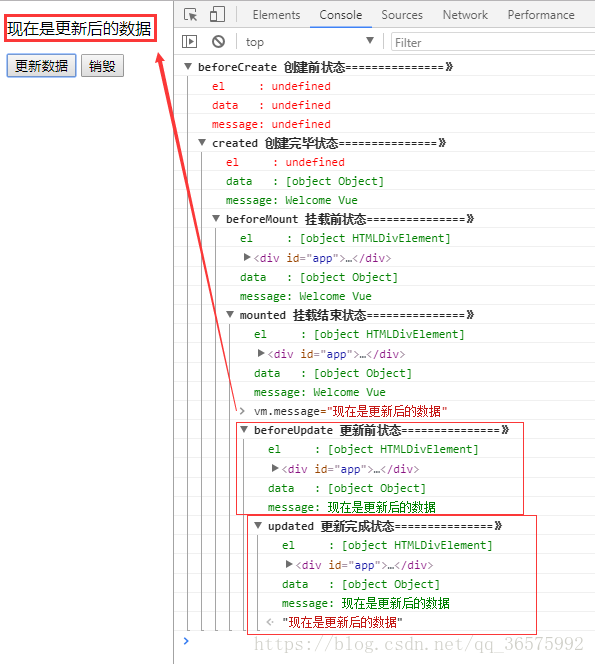
这里需要指出的时更新并非是data数据的更新,而是view层的数据更新而触发的,这点要格外注意。
3.destroy 销毁
点击销毁按钮或直接在控制台键入vm.$destroy(),销毁完成后,我们再重新改变message的值,vue不再对此动作进行响应了。但是原先生成的dom元素还存在,可以这么理解,执行了destroy操作,后续就不再受vue控制了。因为这个Vue实例已经不存在了。

总结
beforecreate : 可以在这加个loading事件;
mounted : 在这发起后端请求,拿回数据,配合路由钩子做一些事情;
beforeDestory: 你确认删除XX吗? destoryed :当前组件已被删除,清空相关内容。