上一节讲解了spring IOC的介绍以及它的实现原理,这一节我将继续总结IOC的一些知识。大致分为以下几个内容:
①spring 的bean
②spring 的继承
③spring 的依赖
④spring 读取外部资源
⑤spring 的p命名空间
可能有些你还不是特别清楚,那么请看下边的详细总结吧。
第一节:spring 的bean
bean是根据scope来生成的,表示bean的作用域。这个bean我们可以理解为我们所要创建的对象在IOC容器中的另一个别称,其中scope有4种类型:
singleton,单例,表示通过spring 容器(IOC)获取的该对象是唯一的。
prototype,原型,表示通过spring容器获取的对象都是不同的。
request,请求,表示在一次HTTP请求内有效。
session,会话,表示在一个用户会话内有效。
后两种只适用于web项目,大多数情况下,我们只会使用singleton和prototype两种。在我们不声明的时候,scope的默认值是singleton。
下面我们通过一个例子来简单说明singleton和prototype的区别:
!----------------------------分割线---------------------------------------------------------------!
分割线内容为pom.xml,spring.xml和实体类,大家可以忽略这一小部分。
public class Student {
    private int id;
    private String name;
    private int age;
    private Classes classes;
    //setter,getter,toStrig方法我在此忽略
   <!--pom.xml其他内容我在此忽略,仅将重要部分列举如下:-->>
   <dependencies>
        <dependency>
            <groupId>org.springframework</groupId>
            <artifactId>spring-context</artifactId>
            <version>${spring.version}</version>
        </dependency>

        <dependency>
            <groupId>org.springframework</groupId>
            <artifactId>spring-beans</artifactId>
            <version>${spring.version}</version>
        </dependency>
    </dependencies>
!--------------------------------------分割线--------------------------------------------------!
    <bean id="stu" class="entity.Student">
        <property name="id" value="1"></property>
        <property name="name" value="jacob"></property>
        <property name="age" value="18"></property>
        <property name="classes" ref="classes"></property>
    </bean>
    <bean id="classes" class="entity.Classes">
        <property name="class_id" value="1001"></property>
        <property name="class_name" value="class_jacob"></property>
    </bean>
这里我们没有声明scope,因此默认值是singleton
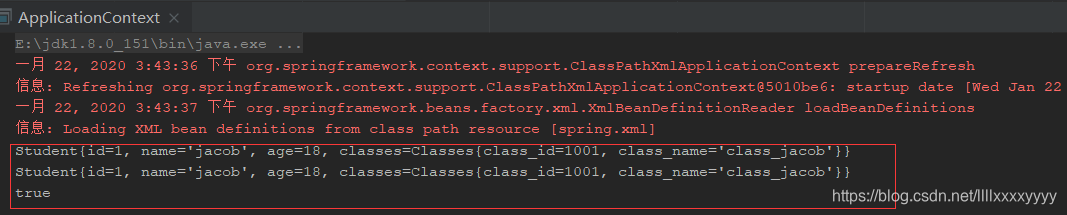
我们看到,运行结果为true,说明当scope为singleton时,后者创建的对象stu1其实和stu对象是同一个。
下面我们改变bean中scope的值为prototype
    <bean id="stu" class="entity.Student" scope="prototype">
        <property name="id" value="1"></property>
        <property name="name" value="jacob"></property>
        <property name="age" value="18"></property>
        <property name="classes" ref="classes"></property>
    </bean>
    <bean id="classes" class="entity.Classes">
        <property name="class_id" value="1001"></property>
        <property name="class_name" value="class_jacob"></property>
    </bean>

我们看到,运行结果为false,说明当scope为prototype时,后者创建的对象stu1和前者创建的对象stu不是同一个。
看到这里相信大家已经对scope的几个属性相当明白了。
第二节:spring的继承
看到继承,我们往往会想到,之前学习Java,c++的时候不是也有继承吗,当然,万物皆有源头,万物皆有继承。
spring的继承可不是像Java,c++的继承,spring的继承仅仅是继承对象属性,不继承该对象所特有的方法,而学过Java,c++的同学知道,它们的继承是继承属性和方法。
下面,我们通过一些简单的例子说明:
    <bean id="stu" class="entity.Student" scope="prototype">
        <property name="id" value="1"></property>
        <property name="name" value="jacob"></property>
        <property name="age" value="18"></property>
    </bean>
    <!--我们将stu1继承于stu-->>
    <bean id="stu1" class="entity.Student" parent="stu">
public class ApplicationContext {
    public static void main(String[] args){
        AbstractApplicationContext applicationContext=new ClassPathXmlApplicationContext("spring.xml");
        Student stu=(Student)applicationContext.getBean("stu");
        System.out.println(stu);
        Student stu1=(Student)applicationContext.getBean("stu1"); //此时可不声明强转,因为我们是通过类的反射机制获取的,但是也有弊端
        System.out.println(stu1);
    }
}
运行结果:

我们看到,stu1的bean虽然我们没有对其进行属性赋值,创建出来的对象仍然具备stu的属性,说明stu1确实继承于stu。
那么,仅仅只能继承吗,难道stu1部分属性不能自己特有吗?答案当然不是,下面我再以一个简单例子加以说明:
    <bean id="stu" class="entity.Student" scope="prototype">
        <property name="id" value="1"></property>
        <property name="name" value="jacob"></property>
        <property name="age" value="18"></property>
    </bean>
    <!--我们将stu1继承于stu-->>
    <bean id="stu1" class="entity.Student" parent="stu">
        <!--这个是stu1特有属性,相当于覆盖了stu对应的属性-->>
        <property name="name" value="jacob_csdn"></property>
    </bean>
运行结果:

我们看到,stu1的name是覆盖后的jacob_csdn,说明stu1确实可以覆盖stu中对应的属性,这里所说的对应是这两个属性列表完全一致,不然会报错。
相信有人会有一个疑惑,我们同类之间对象可以继承,那么不同类之间可以继承吗?答案是可以的,但是我们要注意的是,不同类之间的继承必须要达到类中的属性列表完全一致,不然同样会报错。
不同类之间的继承用到的少之又少,因此我不在此举例说明,读者只需要有个简单了解就可以了。
第三节:spring的依赖
依赖,顾名思义,就是一个东西依托与另一个东西,后者若想有,则前者必有才可。它与继承类似,依赖也是bean和bean之间的一种关联方式。
下面我们以一些例子加以说明:
public class Student {
    private int id;
    private String name;
    private int age;

    public Student(){
        System.out.println("创建了Student对象");
    }
public class Classes {
    private int class_id;
    private String class_name;

    public Classes(){
        System.out.println("创建了Classes对象");
    }
    <bean id="stu" class="entity.Student">
        <property name="id" value="1"></property>
        <property name="name" value="jacob"></property>
        <property name="age" value="18"></property>
        <property name="classes" ref="classes"></property>
    </bean>
    <bean id="classes" class="entity.Classes">
        <property name="class_id" value="1001"></property>
        <property name="class_name" value="class_jacob"></property>
    </bean>
运行结果:
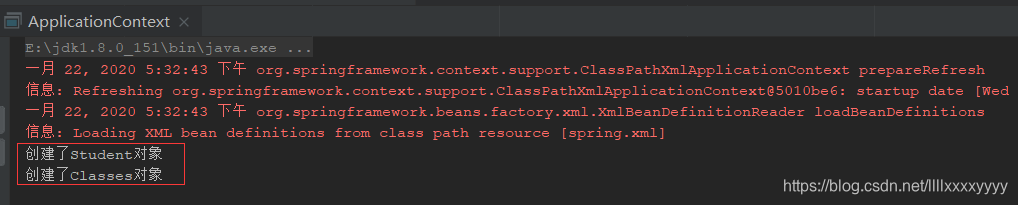
此时我们看到,程序是根据bean的先后顺序先创建了Student对象,其次是Classes对象
那么,我们将bean中stu和classes顺序更换一下
    <!--depends-on将classes依赖于stu-->>
    <bean id="classes" class="entity.Classes" depends-on="stu">
        <property name="class_id" value="1001"></property>
        <property name="class_name" value="class_jacob"></property>
    </bean>
    <bean id="stu" class="entity.Student">
        <property name="id" value="1"></property>
        <property name="name" value="jacob"></property>
        <property name="age" value="18"></property>
        <property name="classes" ref="classes"></property>
    </bean>
结果如下:

我们看到,哪怕我们将stu和classes顺序更换了,但结果依旧是先创建stu后创建classes,这是因为classes依赖于stu,就如我刚才所说,后者依赖于前者,则前者必存在才可。
第四节:spring读取外部资源
spring读取外部资源是什么意思呢?又是读什么资源呢?
我们前边所写的配置信息都是在spring.xml中,假如我们想在spring.xml中引入其他配置文件呢?请看下面例子:
我们在实际开发中,数据库配置一般会保存在properties文件中方便维护,如果使用spring 容器(IOC)来生成数据源对象,如何读取到properties配置文件中的内容?
(1)创建jdbc.properties
driverName=com.mysql.jdbc.Driver
url=jdbc:mysql://localhost:3306/jacob?useUnicode=true&characterEncoding=UTF-8
user=root
pwd=root
(2)spring.xml中配置
<!--导入外部资源文件-->
<context:property-placeholder location="classpath:jdbc.properties"></context:property-placeholder>
<bean id="dataSource"
<!--通过${}表达式取出外部资源文件的值-->
class="org.springframework.jdbc.datasource.DriverManagerDataSource">
     <property name="driverClassName" value="${driverName}"/>
     <property name="url" value="${url}"/>
     <property name="username" value="${user}"/>
     <property name="password" value="${pwd)"/>
</bean>
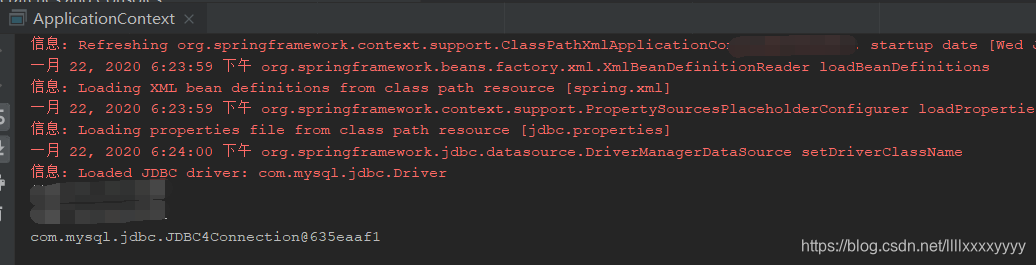
(3)测试类中获取spring创建的dataSource对象
public class ApplicationContext {
    public static void main(String[] args){
        AbstractApplicationContext applicationContext=new ClassPathXmlApplicationContext("spring.xml");
        DataSource dataSource=(DataSource)applicationContext.getBean("dataSource");
        Connection connection=null;
        try{
            connection=dataSource.getConnection();
        }catch(SQLException e){
            e.printStackTrace();
        }
        System.out.println(connection);
    }
}
运行结果:
第五节:spring的p命名空间
除了使用property元素为Bean的属性装配置和引用外,spring还提供了另外一种bean属性的装配方式:p命名空间,该方式进一步简化配置代码。
p命名空间
下面我们以一个简单的例子加以说明:
<bean id="classes" class="entity.Classes" p:class_id="1001" p:class_name="jacob"></bean>
public class ApplicationContext {
    public static void main(String[] args){
        AbstractApplicationContext applicationContext=new ClassPathXmlApplicationContext("spring.xml");
        Classes classes=applicationContext.getBean(Classes.class);
        System.out.println(classes);
    }
}
运行结果:
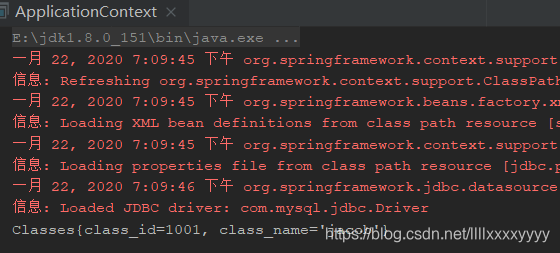
我们看到通过p命名空间依旧可以像property元素那样给对象属性赋值。
以上便是我对这一部分的理解,如果有错误或者你有其他疑惑都可以留言给出,我都会一一进行回复,希望对你有所帮助,如果写的不好也请您多多包涵。欢迎在下方补充留言哟。
对SSM框架感兴趣的童鞋,可以移步这里,在这里你可以快速的搭建好一个SSM框架。
