上一节我们总结了spring IOC的一些特性,包括spring bean的作用域,spring的继承,依赖,以及spring如何读取外部资源,spring的p命名空间。如果还有疑惑的朋友都可以下方留言或与我私信哦,我看到后都会一一回复的,我们共同交流,共同进步。
这一节我们总结spring IOC 工厂方法创建对象以及spring IOC自动装载
第一节:spring IOC工厂方法
IOC是典型的工厂模式,下面我们就来学习如何使用工厂模式来创建bean,IOC 通过工厂模式创建bean有两种方式:
静态工厂方法
实例工厂方法
按照惯例,我们依旧通过代码示例一起学习工厂方法,我们先来学习静态工厂方法。
(1)创建Car实体类
public class Car {
    private int num;
    private String name;
    public Car(int num,String name){
        super();
        this.num=num;
        this.name=name;
    }
    //在此我们省略了toString方法
(2)创建静态工厂类,静态工厂方法
public class CarFactory {
    private static Map<Integer,Car> cars;
    static{
        cars=new HashMap<Integer,Car>();
        cars.put(1,new Car(1,"奔驰"));
        cars.put(2,new Car(2,"奥迪"));
    }
    public static Car getCar(int id){
        return cars.get(id);
    }
}
(3)在spring.xml中配置静态工厂
   <bean id="car1" class="entity.CarFactory" factory-method="getCar">
        <constructor-arg value="1"></constructor-arg>
    </bean>
    <!--factory-method指向的是静态方法;constructor-arg的value属性为调用静态方法所传的参数-->
(4)在测试类中获取car1对象
public class ApplicationContext {
    public static void main(String[] args){
        AbstractApplicationContext applicationContext=new ClassPathXmlApplicationContext("spring.xml");
        Car car=(Car)applicationContext.getBean("car1");
        System.out.println(car);
    }
}
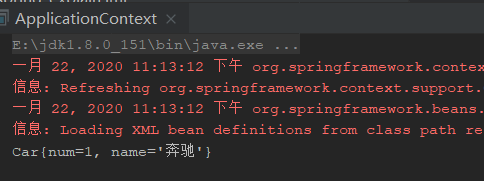
运行结果:
实例工厂方法
(1)创建实例工厂类,工厂方法
public class InstanceCarFactory {
    private Map<Integer,Car> cars;
    public InstanceCarFactory(){
        cars=new HashMap<Integer, Car>();
        cars.put(1,new Car(1,"奔驰"));
        cars.put(2,new Car(2,"奥迪"));
    }
    public Car getCar(int id){
        return cars.get(id);
    }
}
(2)spring.xml中配置bean
   <bean id="carFactory" class="entity.InstanceCarFactory"></bean>
    <bean id="car2" factory-bean="carFactory" factory-method="getCar">
        <constructor-arg value="2"></constructor-arg>
    </bean>
(3)在测试类中获取car2对象
public class ApplicationContext {
    public static void main(String[] args){
        AbstractApplicationContext applicationContext=new ClassPathXmlApplicationContext("spring.xml");
        Car car=(Car)applicationContext.getBean("car2");
        System.out.println(car);
    }
}
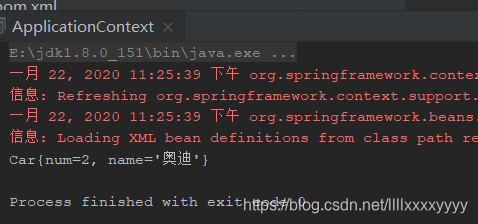
运行结果:
通过上边两种工厂方式创建的对象,我们可以看出,静态工厂方法的方式创建car对象,不需要实例化工厂对象,通过spring.xml我们也可以看出,我们仅仅配置了Car bean,没有配置工厂 bean。因为静态工厂的静态方法,不需要创建对象即可调用。
而实例工厂创建Car对象,我们必须先实例化工厂对象,因为调用的是非静态方法,必须通过工厂对象调用,不能通过类来调用。所以spring.xml中先配置了工厂bean,再配置Car bean。
简单而言,静态工厂方式是工厂类中为静态方法,实例工厂方式是工厂类中为非静态方法。
第二节:spring IOC自动装载
自动装载其实和依赖注入有点相似,我们前边学到依赖注入,A类中包含B类,那么我们可以通过property的ref将B类注入到A类中。自动装载是什么呢?简单来说就是A类中包含B类,我们可以在bean中使用autowire将B类自动装载到A类中。
其中autowire有两个重要属性值,分别是byName和byType,下面我们就通过一些简单的例子讲解一下这两个属性值的用法:
byName:
        <!--spring.xml-->>
        <!--设置了bean标签autowire属性,属性值设为byName,在这里IOC容器能通通过id值将bean进行匹配,然后创建对象由API调用-->>
        <bean id="stu" class="entity.Student" autowire="byName">
            <property name="id" value="1"></property>
            <property name="name" value="jacob"></property>
            <property name="age" value="18"></property>
        </bean>
        <bean id="classes" class="entity.Classes">
            <property name="class_name" value="jacob_classes"></property>
            <property name="class_id" value="1001"></property>
        </bean>
//Student.class
public class Student {
    private int id;
    private String name;
    private int age;
    private Classes classes;
//Classes.class
public class Classes {
    private int class_id;
    private String class_name;
//测试类
public class ApplicationContext {
    public static void main(String[] args){
        AbstractApplicationContext applicationContext=new ClassPathXmlApplicationContext("spring.xml");
        Student student=(Student)applicationContext.getBean("stu");
        System.out.println(student);
    }
}
运行结果:

我们可以看到,我们在id为stu的bean中添加了autowire,并将其值设为byName后,生成的对象student中Classes属性值正是我们配置给id为classes的属性值,说明id为stu的bean是通过byName(bean的id值)匹配到classes并实行自动装载的。
那么我们来看一下autowire的另一个值byType:
我们可以将它和API获取对象的方式放在一起来记忆,不知道小伙伴们还记不记得application是通过什么方式获取bean的,一种是id,一种是运行时类,其实自动装载和它极为相似。
        <!--spring.xml-->>
        <!--bean的autowire值设置为byType,IOC通过Student中属性Classes(entity.Classes)和bean中其他class匹配-->>
        <bean id="stu" class="entity.Student" autowire="byType">
            <property name="id" value="1"></property>
            <property name="name" value="jacob"></property>
            <property name="age" value="18"></property>
        </bean>
        <bean id="classes" class="entity.Classes">
            <property name="class_name" value="jacob_classes"></property>
            <property name="class_id" value="1001"></property>
        </bean>
运行结果:

如果我在spring.xml中设置两个bean,它们都是类Classes的bean,我们再来看一下结果:

我们看到,程序报错了,原因是在xml配置中,我们配置了两个相同class的bean,这也证明了属性byType就是通过class进行匹配的。
总结:
这一节我们总结了spring IOC通过工厂模式创建对象,包括静态工厂方式和实例工厂方式,其中静态工厂方式创建对象时,我们在spring.xml中只需配置需要创建对象的bean,因为静态工厂类中均为静态方法,可以直接用类来调用,而实例工厂方式创建对象需要配置工厂类bean和需要创建对象的类bean。接着我们讲解了IOC中另一个特性,自动装载,它和依赖注入极为相似,不同的是,它需要配置在bean标签头中,有两种属性值,分别为byName和byType,前者通过id匹配,后者通过运行时类匹配,但是需要注意的是,使用byType时,spring.xml中只能配置一种运行时类的bean,配置多个程序会报错。
以上便是我对这一部分的理解,如果有错误或者你有其他疑惑都可以留言给出,我都会一一进行回复,希望对你有所帮助,如果写的不好也请您多多包涵。欢迎在下方补充留言哟。
对SSM框架感兴趣的童鞋,可以移步这里,在这里你可以快速的搭建好一个SSM框架。
如果你在写项目的时候,遇到一些不寻常的问题,也可以关注我的博客园,上边会发布一些我在写项目中遇到的各种问题以及解决方式。
