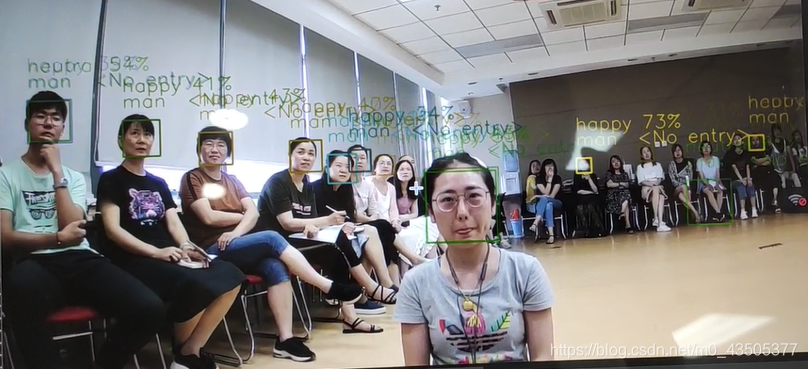
本模型可以检测7种表情,分别是:生气、厌恶、害怕、开心、难过、惊奇、中立
另外还可以检测性别
一、环境
建议安装 Anconda
Anconda 官网:https://www.anaconda.com/
系统环境建议:
windows、ubuntu
环境建议:
python 3.6
tensorflow-gpu 1.13
keras-gpu 2.24
所需包建议(版本影响不大):
statistics
pandas== 0.19.1
numpy== 1.12.1
h5py== 2 .7.0
opencv-python==3.2.0
注意:如果运行中缺少了一谢基本包可直接pip安装即可
如:pip install scipy
后面可加上: -i https://pypi.tuna.tsinghua.edu.cn/simple 加快下载速度
如:pip install numpy -i https://pypi.tuna.tsinghua.edu.cn/simple
在anconda 中一键安装也是可以的哦!
二、代码文件:
我就不卖官子啦!直接放源代码文件咯(有环境可以直接运行的那种)!
代码文件中我放了大量的注释,对python有一点基础的很快就可以简单理解!
链接:https://pan.baidu.com/s/1WxtQpLwvqF1s-BP9tC6n9Q 密码:lxiw
三、代码文件解析

解压后有3个文件
第一个文件是存放模型的文件夹(可以自行切换模型)
第二个是基础模块文件夹
第三个是主文件,环境安装完成后可直接运行检测模型
主文件(emotion_sex_recognition.py)
from statistics import mode

import cv2
from keras.models import load_model
import numpy as np

from utils_base.datasets import get_labels
from utils_base.inference import detect_faces
from utils_base.inference import draw_text
from utils_base.inference import draw_bounding_box
from utils_base.inference import apply_offsets
from utils_base.inference import load_detection_model
from utils_base.preprocessor import preprocess_input

import threading
from urllib import parse,request

#这是数据传输模块,没有需要的时候不需要使用
def swop(emotion,name,sex,age,gl):
    values={"id":name,"number":emotion}
    data=parse.urlencode(values)
    try:
        url = 'http://127.0.0.1.ngrok.xiaomiqiu.cn/saw_2'
        req = request.Request(url, data.encode(encoding='utf-8'))
        print("服务器接入成功,数据成功传输!")
    except:
        print("服务器接入失败,数据将临时保存")

# 加载数据和图像的参数
detection_model_path = 'models/detection_models/haarcascade_frontalface_default.xml'
emotion_model_path = 'models/emotion_models/fer2013_mini_XCEPTION.110-0.65.hdf5'
gender_model_path = 'models/gender_models/simple_CNN.81-0.96.hdf5'
emotion_labels = get_labels('fer2013')
gender_labels = get_labels('imdb')
font = cv2.FONT_HERSHEY_SIMPLEX

# 定义形状的超参数
frame_window = 10
gender_offsets = (30, 60)
emotion_offsets = (20, 40)

# 加载模型
face_detection = load_detection_model(detection_model_path)
emotion_classifier = load_model(emotion_model_path, compile=False)
gender_classifier = load_model(gender_model_path, compile=False)

# 获取用于推理的输入模型形状
emotion_target_size = emotion_classifier.input_shape[1:3]
gender_target_size = gender_classifier.input_shape[1:3]

# 计算模式的起始列表
gender_window = []
emotion_window = []

#预先打开窗口
cv2.namedWindow('window_frame')

#连接网络摄像头识别
video_capture = cv2.VideoCapture(0)

while True:
    bgr_image = video_capture.read()[1]
    #图像模式的转换
    gray_image = cv2.cvtColor(bgr_image, cv2.COLOR_BGR2GRAY)
    rgb_image = cv2.cvtColor(bgr_image, cv2.COLOR_BGR2RGB)

    #查找人脸
    faces = detect_faces(face_detection, gray_image)

    for face_coordinates in faces:
        #获取坐标进行框选
        x1, x2, y1, y2 = apply_offsets(face_coordinates, gender_offsets)
        rgb_face = rgb_image[y1:y2, x1:x2]

        x1, x2, y1, y2 = apply_offsets(face_coordinates, emotion_offsets)
        gray_face = gray_image[y1:y2, x1:x2]

        #图像大小
        try:
            rgb_face = cv2.resize(rgb_face, (gender_target_size))
            gray_face = cv2.resize(gray_face, (emotion_target_size))
        except:
            continue
        #标准化
        gray_face = preprocess_input(gray_face, False)

        #扩展数组的形状
        gray_face = np.expand_dims(gray_face, 0)
        gray_face = np.expand_dims(gray_face, -1)
        #计算相似度
        emotion_prediction = emotion_classifier.predict(gray_face)
        #寻找可能性最大的表情
        emotion_probability = np.max(emotion_prediction)
        emotion_label_arg = np.argmax(emotion_prediction)

        print("表情种类:",emotion_label_arg)

        emotion_label_arg = np.argmax(emotion_classifier.predict(gray_face))
        emotion_text = emotion_labels[emotion_label_arg]
        emotion_window.append(emotion_text)

        rgb_face = np.expand_dims(rgb_face, 0)

        rgb_face = preprocess_input(rgb_face, False)
        #相似度
        gender_prediction = gender_classifier.predict(rgb_face)
        #找出相似度最高的性别
        gender_label_arg = np.argmax(gender_prediction)
        print("性别:",gender_label_arg)
        gender_text = gender_labels[gender_label_arg]
        gender_window.append(gender_text)

        #长度限制
        if len(gender_window) > frame_window:
            emotion_window.pop(0)
            gender_window.pop(0)
        #获取名称
        try:
            emotion_mode = mode(emotion_window)
            gender_mode = mode(gender_window)
        except:
            continue

        #框的颜色
        if emotion_text == 'angry':
            color = emotion_probability * np.asarray((255, 0, 0))
        elif emotion_text == 'sad':
            color = emotion_probability * np.asarray((0, 0, 255))
        elif emotion_text == 'happy':
            color = emotion_probability * np.asarray((255, 255, 0))
        elif emotion_text == 'surprise':
            color = emotion_probability * np.asarray((0, 255, 255))
        else:
            color = emotion_probability * np.asarray((0, 255, 0))

        color = color.astype(int)
        color = color.tolist()

        #图像上绘制边框。
        draw_bounding_box(face_coordinates, rgb_image, color)

        gender_mode=gender_mode+"  "+"<No entry>"
        #打印在图片上
        draw_text(face_coordinates, rgb_image, gender_mode,
                  color, 0, -20, 1, 1)
        #显示识别相似度百分比
        emotion_probability=int(emotion_probability*100)
        emotion_mode=emotion_mode+" "+str(emotion_probability)+"%"
        #显示视频帧率
        fps = "fps:"+str(video_capture.get(cv2.CAP_PROP_FPS))
        cv2.putText(rgb_image, fps, (5, 25), cv2.FONT_HERSHEY_DUPLEX, 0.9, (0, 255, 0), 0)

        draw_text(face_coordinates, rgb_image, emotion_mode,
                  color, 0, -45, 1, 1)
        #输出部分数据
        demo=fps+"--"+emotion_mode+"--"+gender_mode
        print(demo)
        #开启多线程传输数据,默认屏蔽
        #  thread1=threading.Thread(target=swop,args=(emotion_label_arg,j, gender_label_arg, 18, emotion_probability))
        #  thread1.start()

    bgr_image = cv2.cvtColor(rgb_image, cv2.COLOR_RGB2BGR)
    bgr_image = cv2.resize(bgr_image, dsize=(1280, 720))
    cv2.imshow('window_frame', bgr_image)
    if cv2.waitKey(1) & 0xFF == ord('q'):
        break
video_capture.release()
cv2.destroyAllWindows()
基础模块文件(inference.py)
import cv2
import matplotlib.pyplot as plt
import numpy as np
from keras.preprocessing import image

#装载模型
def load_detection_model(model_path):
    detection_model = cv2.CascadeClassifier(model_path)
    return detection_model

#查找脸部
def detect_faces(detection_model, gray_image_array):
    return detection_model.detectMultiScale(gray_image_array, 1.2, 4)
                    #3个参数,第一个参数是查找的图像
                     #第2个是脸部最小的大小
                      #第3个是检测到几次才确定是人脸,与准确率直接挂钩

#画出脸部矩形
def draw_bounding_box(face_coordinates, image_array, color):
    x, y, w, h = face_coordinates
    cv2.rectangle(image_array, (x, y), (x + w, y + h), color, 2)

#确定脸的矩形位置
def apply_offsets(face_coordinates, offsets):
    x, y, width, height = face_coordinates
    x_off, y_off = offsets
    return (x - x_off, x + width + x_off, y - y_off, y + height + y_off)

#文字打印在图片上
def draw_text(coordinates, image_array, text, color, x_offset=0, y_offset=0,
                                                font_scale=2, thickness=2):
    x, y = coordinates[:2]
    cv2.putText(image_array, text, (x + x_offset, y + y_offset),
                cv2.FONT_HERSHEY_SIMPLEX,
                font_scale, color, thickness, cv2.LINE_AA)
#颜色
def get_colors(num_classes):
    colors = plt.cm.hsv(np.linspace(0, 1, num_classes)).tolist()
    colors = np.asarray(colors) * 255
    return colors
序号对于名称文件(datasets.py)
#表情序号对应的表情
def get_labels(dataset_name):
    if dataset_name == 'fer2013':
        return {0: 'angry', 1: 'disgust', 2: 'fear', 3: 'happy',
                4: 'sad', 5: 'surprise', 6: 'neutral'}
    elif dataset_name == 'imdb':
        return {0: 'woman', 1: 'man'}
    elif dataset_name == 'KDEF':
        return {0: 'AN', 1: 'DI', 2: 'AF', 3: 'HA', 4: 'SA', 5: 'SU', 6: 'NE'}
    else:
        raise Exception('Invalid dataset name')
标准化(preprocessor.py)
import numpy as np
from scipy.misc import imread, imresize


def preprocess_input(x, v2=True):
    x = x.astype('float32')
    x = x / 255.0
    if v2:
        x = x - 0.5
        x = x * 2.0
    return x
#标准化
我是站在巨人的肩膀上的:

