运行程序输入:
import input_emotion_data

data = input_emotion_data.read_data(input_dir = 'emotion')

import cnnemotion
cnnemotion.run_training(data=data, n_training_data=data.train.images.shape[0],
               is_CAENN=False, batch_size=170, n_training_epochs = 10, n_cae_training_epochs=5)
input_emotion_data.py
def read_data(input_dir, cut64x64=False, test_rate = 0.2, one_hot=True):
    temp_dir = path.join(input_dir, 'temp')
os.path.join()
os.path.join()是在拼接路径时使用的,上句返回路径"emotion/temp"
在运行语句"import input_emotion_data"后,在emotion文件夹里生成temp文件夹,但temp里面是空的。
在运行语句“data = input_emotion_data.read_data(input_dir = 'emotion')”后,temp文件变成如下:

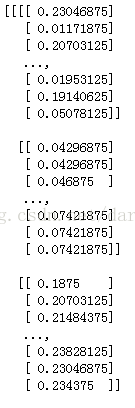
并且输出了一些one-hot数组和内容是浮点数的数组。
它们究竟是什么?我猜是labels和images~不过images长得形状有点奇怪,要好好研究下它为什么长那样。

  # 如果序列化文件存在,则直接将其数据反序列化读入data中,然后函数返回data即可。
 filename = "Emotion_pic_cut64x64_%s_rate_%.1f_onehot_%s.pickle" % (str(cut64x64), test_rate, str(one_hot))
    if path.exists(path.join(temp_dir, filename)):
        with open(path.join(temp_dir, filename), 'rb') as f_pickle:
            data = pickle.load(f_pickle)
            print("type(data)")
            print(type(data))
        return data

  # 否则,继续运行read_data()函数下面的其他语句
       pic_with_anger_dir = path.join(temp_dir, 'anger')
    pic_with_happiness_dir = path.join(temp_dir, 'happiness')
    pic_with_sadness_dir = path.join(temp_dir, 'sadness')
    pic_with_calm_dir = path.join(temp_dir, 'calm')


    if not path.exists(temp_dir):
        os.mkdir(temp_dir)
序列化
在程序运行的过程中,所有的变量都是在内存中,但是一旦程序结束,变量所占用的内存就被操作系统全部回收。
我们把变量从内存中变成可存储或传输的过程称之为序列化,在Python中叫pickling。
序列化之后,就可以把序列化后的内容写入磁盘,或者通过网络传输到别的机器上。
反过来,把变量内容从序列化的对象重新读到内存里称之为反序列化,即unpickling。
pickle.load(file):注解:从file中读取一个字符串,并将它重构为原来的python对象。
 # unzip
    zipfile.ZipFile(path.join(input_dir, 'anger.zip')).extractall(path=temp_dir)
    zipfile.ZipFile(path.join(input_dir, 'happiness.zip')).extractall(path=temp_dir)
    zipfile.ZipFile(path.join(input_dir, 'sadness.zip')).extractall(path=temp_dir)
    zipfile.ZipFile(path.join(input_dir, 'calm.zip')).extractall(path=temp_dir)

# get all pictures filename
    pic_with_anger_filenames = os.listdir(pic_with_anger_dir)
    pic_with_happiness_filenames = os.listdir(pic_with_happiness_dir)
    pic_with_sadness_filenames = os.listdir(pic_with_sadness_dir)
    pic_with_calm_filenames = os.listdir(pic_with_calm_dir)
listdir()
os.listdir() 方法用于返回指定的文件夹包含的文件或文件夹的名字的列表。这个列表以字母顺序。 它不包括 '.' 和'..' 即使它在文件夹中。
只支持在 Unix, Windows 下使用。
方法格式如下:os.listdir(path)
 for pic_filename in pic_with_anger_filenames:                #anger的数据预处理
        img = Image.open(path.join(pic_with_anger_dir, pic_filename))
        img = np.asarray(img, dtype = np.float32)
        print("anger_img in line 60")
        print(img)
        print(img.shape[0],img.shape[1])
        if cut64x64 == True:
            img = img[7:71, 7:71, 0] # 原图大小为79*79,现只居中取其64*64,而且图像是灰度图像,三个通道的值均相同,因此只取其中一个通道即可
        img = img.reshape(img.shape[0], img.shape[1], 1) / 256.
        print("anger_img in line 66")
        print(img)
        print(img.shape[0],img.shape[1],img.shape[2])
        pic_with_anger.append(img)
    pic_with_anger = np.stack(pic_with_anger, axis = 0)
输出:
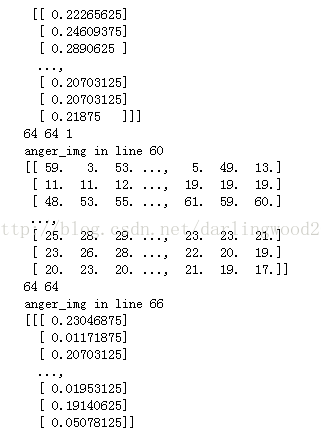
可以看出来,经过np.asarray()的图像是一个64*64的二维数组,且其中每个元素在0到255之间;
而经过img.reshape()的二维数组变成了一个64*64*1的三维数组,且其中每个元素都小于1。
numpy.asarray()
>>> a =[[1,2],[1,0]]
>>> a = numpy.asarray(a)
>>> a
array([[1, 2],
       [1, 0]])
>>> numpy.asarray(a,'f')
array([[ 1.,  2.],
       [ 1.,  0.]], dtype=float32)
Image.open()

灰度图像
在计算机领域中,这类图像通常显示为从最暗黑色到最亮的白色的灰度,尽管理论上这个采样可以任何颜色的不同深浅,甚至可以是不同亮度上的不同颜色。
用于显示的灰度图像通常用每个采样像素8位的非线性尺度来保存,这样可以有256级灰度。这种精度刚刚能够避免可见的条带失真,并且非常易于编程。
np.stack()
看上去是合并数组的。
    >>> arrays = [np.random.randn(3, 4) for _ in range(10)]
    >>> np.stack(arrays, axis=0).shape
    (10, 3, 4)

    >>>

    >>> np.stack(arrays, axis=1).shape
    (3, 10, 4)

    >>>

    >>> np.stack(arrays, axis=2).shape
    (3, 4, 10)

    >>>

    >>> a = np.array([1, 2, 3])
    >>> b = np.array([2, 3, 4])
    >>> np.stack((a, b))
    array([[1, 2, 3],
           [2, 3, 4]])

    >>>

    >>> np.stack((a, b), axis=-1)
    array([[1, 2],
           [2, 3],
           [3, 4]])
cnnemotion.py
神经网络中对epoch和batch的理解:
一次epoch=所有训练数据forward+backward后更新参数的过程。
一次iteration=[batch size]个训练数据forward+backward后更新参数过程。
for i in range(data.train.images.shape[0] // batch_size):‘//’表示地板除,//除法不管操作数为何种数值类型,总是会舍去小数部分,返回数字序列中比真正的商小的最接近的数字。
utils.py
class DataSet(object):
  """create same API with input_data.DataSet, but not change the data format
  """
  def __init__(self, images, labels):
    self._num_examples = images.shape[0]
    self._images = images
    self._labels = labels
    self._epochs_completed = 0
    self._index_in_epoch = 0
    # Shuffle the data
    perm = np.arange(self._num_examples)
    np.random.shuffle(perm)
    self._images = self._images[perm]
    self._labels = self._labels[perm]
  @property
  def images(self):
    return self._images
  @property
  def labels(self):
    return self._labels
  @property
  def num_examples(self):
    return self._num_examples
  @property
  def epochs_completed(self):
    return self._epochs_completed
  def next_batch(self, batch_size):
    start = self._index_in_epoch
    self._index_in_epoch += batch_size
    if self._index_in_epoch > self._num_examples:
        # Finished epoch
        self._epochs_completed += 1
        # Shuffle the data
        perm = np.arange(self._num_examples)
        np.random.shuffle(perm)
        self._images = self._images[perm]
        self._labels = self._labels[perm]
        # Start next epoch
        start = 0
        self._index_in_epoch = batch_size
        assert batch_size <= self._num_examples
    end = self._index_in_epoch
    return self._images[start:end], self._labels[start:end]
np.arange()
np.random.shuffle()
>>> import numpy as np
>>> perm = np.arange(20)      # 返回一个序列,可以被当做向量使用
>>> perm
array([ 0,  1,  2,  3,  4,  5,  6,  7,  8,  9, 10, 11, 12, 13, 14, 15, 16,
       17, 18, 19])
>>> np.random.shuffle(perm)   # 用于将列表中的元素打乱
>>> perm
array([11,  0,  9,  4, 16,  7,  1, 14, 12, 18,  8, 15, 19,  5, 13,  3,  2,
       17, 10,  6])
错误
1.AttributeError: module 'tensorflow' has no attribute 'global_variables_initializer'
将tf.global_variables_initializer()改成tf.initialize_all_variables()就好啦~
(不是说initialize_all_variables已被弃用,在2017-03-02之后删除,使用tf.global_variables_initializer代替吗???)
表情数据库
-
JAFFE数据库:数据库是由10个人的7种正面表情(6种基本表情+1种自然表情)组成的213幅灰度图像,图像是以大小为256*256的8位灰度级存储的,格式为.tiff型,平均每个人每种表情有2到4张。图片命名中包含表情标注。表情包括HAP(高兴) SAD(悲伤) SUR(惊讶) ANG(生气) DIS(厌恶) FEA(恐惧) NE(自然)。
-
CK+数据库:这个数据库包括123个subjects, 593 个 image sequence, 每个image sequence的最后一张 Frame 都有action units 的label, 而在这593个image sequence中,有327个sequence 有 emotion的 label。图像是以大小为480*480的8位灰度级存储的。这个数据库是人脸表情识别中比较流行的一个数据库,很多文章都会用到这个数据做测试。表情包括Disgust 3(厌恶59)Happy 5(高兴69)Surprise 7(惊讶83)Fear 4(恐惧25)Angry 1(生气45)Contempt 2(蔑视18)Sadness 6(忧伤28) Neutral 0(自然)。
问题
- 如何确定需要几层网络?几个卷积层?几个dropout?几个全连接层?有什么参考依据吗?
- 如何确定每层需要多少个特征图?有参考依据吗?
目前进度
2017年3月16日版本:
-
基本模型建立起来了,只有197个训练数据,batch取120,epoch取50,发现准确率在50%左右,但在测试集上准确率只有30%左右。
- 只有四类表情:生气(45幅),平静(112幅),开心(69幅),忧伤(28幅)。
- 存在问题:训练数据量太小;泛化率太差!
2017年3月20日结果:
- 将jaffe数据库处理成只包含人脸的96*96大小图像
- 将ck+数据库处理成只包含人脸的64*64大小图像
2017年3月22日结果:
- 解决了一个warning,通过在这里f1 = f1_score(y_true, y_pred, average="weighted")添加average属性。
- 加入了dropout操作,不过正不正确不晓得啦~
2017年3月23日结果:
- 对数据集进行旋转操作
目前结果
2017年3月20日结果:
1.来自CK+数据集(生气(45幅),平静(112幅),开心(69幅),忧伤(28幅)),训练集共211幅图像,分四类。

2.来自CK+和jaffe数据集(生气(75幅),平静(142幅),开心(100幅),忧伤(59幅)),训练集共302幅图像,分四类。

对于今天跑出来的结果,我很不明白。
为什么在第一种情况下大约10个epoch参数就不再更新了?并且前面正确率变化幅度那样的大?
为什么在第二种情况下爱经过了120个epoch参数还是没有平稳?
怎样选择epoch,minibatch?
现在应该从哪些方面改进?有什么基准吗?
需要对CK+库里的图像做光照补偿吗?
图像预处理需要做到什么程度?
3月20号抛出模型以后,就一筹莫展,不知道该怎么评估自己的模型。
紧接着就去翻看视频资料、图书资料,去查找评估模型的方法。
Epoch 119, loss=0.00, AUC=1.00, accuracy=1.0000, precision=1.00, recall=1.00, f1=1.00 (3.021 sec)
test set: AUC=0.85, accuracy=0.6351, precision=0.70, recall=0.64, f1=0.66
听说训练集上正确率达到100%,很可能是模型过拟合了。所以接下来打算再仔细研读代码,增加dropout试试。
2017年3月22日结果:
1.修改batch_size为50(原来为120),正确率提高啦~
Epoch 49, loss=0.03, AUC=1.00, accuracy=0.9967, precision=1.00, recall=1.00, f1=1.00 (2.407 sec)
test set: AUC=0.86, accuracy=0.7027, precision=0.72, recall=0.70, f1=0.71

2.加入dropout操作,训练的时候0.5
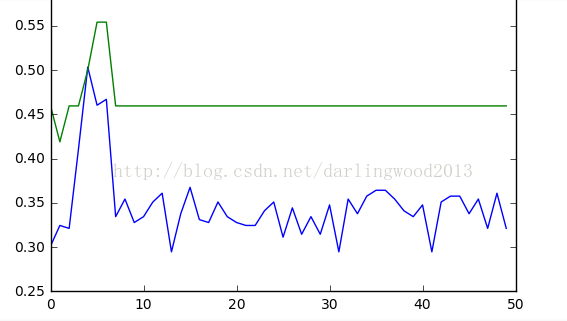

使用dropout了以后,每次运行结果竟然会差这么多!!运行了4次,其中1,3次像第一张图,2,4次像第二张图。
哈哈哈,为什么呀???