实战:深度学习构建人脸面部表情识别系统
一、表情数据集
数据集采用了kaggle面部表情识竞赛的人脸表情识别数据集。
https://www.kaggle.com/c/challenges-in-representation-learning-facial-expression-recognition-challenge/data
如果数据下载不下来的话,可以从网盘下载
链接:https://pan.baidu.com/s/1pB55JalBCzDtv9jvppp9Xg
提取码:y1t0
数据主要是由48*48像素的灰度图像组成。面部表情有7种类别(0 =愤怒,1 =厌恶,2 =恐惧,3 =快乐,4 =悲伤,5 =惊喜,6 =中立)
对于kaggle数据集来说,第一列是表情的类别,第二列是图像的像素点,第三列表示是Training,PublicTest,PrivateTest
import pandas as pd

df = pd.read_csv("./fer2013.csv")
df.head()
| emotion | pixels | Usage | |
|---|---|---|---|
| 0 | 0 | 70 80 82 72 58 58 60 63 54 58 60 48 89 115 121... | Training |
| 1 | 0 | 151 150 147 155 148 133 111 140 170 174 182 15... | Training |
| 2 | 2 | 231 212 156 164 174 138 161 173 182 200 106 38... | Training |
| 3 | 4 | 24 32 36 30 32 23 19 20 30 41 21 22 32 34 21 1... | Training |
| 4 | 6 | 4 0 0 0 0 0 0 0 0 0 0 0 3 15 23 28 48 50 58 84... | Training |
将数据集转换成图片格式
#encoding:utf-8
import pandas as pd
import numpy as np
import os
import cv2

emotions = {
    "0":"anger",
    "1":"disgust",
    "2":"fear",
    "3":"happy",
    "4":"sad",
    "5":"surprised",
    "6":"normal"
}

def createDir(dir):
    if os.path.exists(dir) is False:
        os.makedirs(dir)


def saveImageFromFer2013(file):

    # 读取csv文件
    faces_data = pd.read_csv(file)
    imageCount = 0
    # 遍历csv文件内容,并将图片数据按分类保存
    for index in range(len(faces_data)):
        # 解析每一行csv文件内容
        emotion_data = faces_data.loc[index][0]
        image_data = faces_data.loc[index][1]
        usage_data = faces_data.loc[index][2]
        # 将图片数据转换为48*48
        data_array = list(map(float,image_data.split()))
        data_array = np.asarray(data_array)
        image = data_array.reshape(48,48)

        # 选择分类,并创建文件名
        dirName = usage_data
        emotionName = emotions[str(emotion_data)]

        # 图片要保存的文件夹
        imagePath = os.path.join(dirName,emotionName)

        # 创建分类文件夹以及表情文件夹
        createDir(dirName)
        createDir(imagePath)

        # 图片文件名
        imageName = os.path.join(imagePath,str(index)+".jpg")

        # 保存图片
        cv2.imwrite(imageName,image)
        imageCount = index
    print("总共有"+str(imageCount)+"张图片")

if __name__ == "__main__":
    saveImageFromFer2013("fer2013.csv")
总共有35886张图片
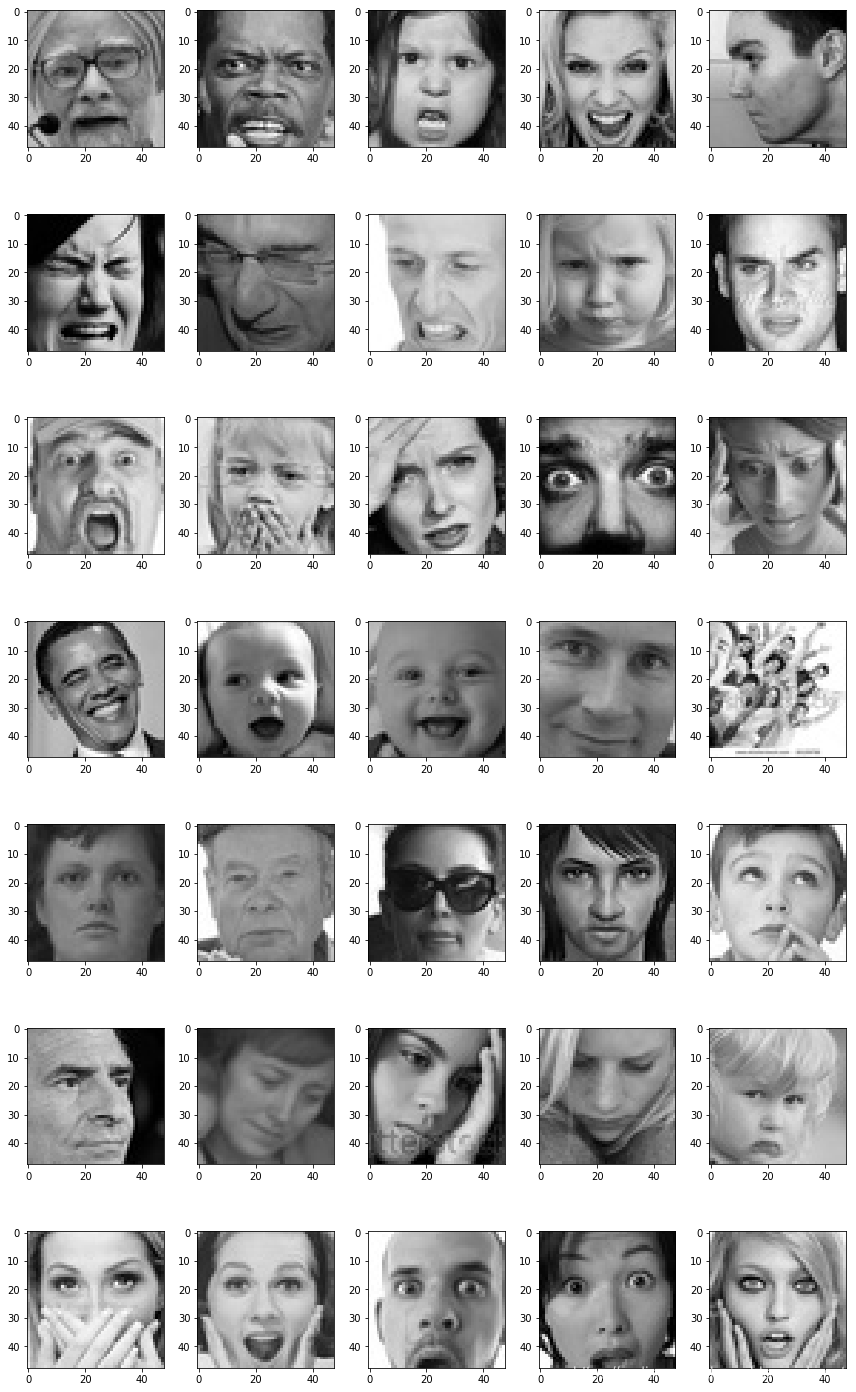
# 可视化图像 anger disgust fear happy normal sad surprised
from tensorflow.keras.preprocessing.image import load_img,img_to_array
import matplotlib.pyplot as plt
import os
%matplotlib inline

# 图像像素大小为48*48
pic_size = 48
plt.figure(0,figsize=(12,20))
cpt = 0
for expression in os.listdir("./Training/"):
    for i in range(1,6):
        cpt = cpt +1
        plt.subplot(7,5,cpt)
        img = load_img("./Training/"+expression+"/"+os.listdir("./Training/"+expression)[i],target_size=(pic_size,pic_size))
        plt.imshow(img,cmap="gray")
plt.tight_layout()
plt.show()
# 统计训练图像中每个类别的数量
for expression in os.listdir("./Training/"):
    print(str(len(os.listdir("./Training/"+expression)))+" " + expression +" images")
3995 anger images
436 disgust images
4097 fear images
7215 happy images
4965 normal images
4830 sad images
3171 surprised images
使用ImageDataGenerator来提供批量数据来训练深度学习模型
# 通过提供批量数据来训练深度学习模型。Keras 有一个非常有用的类来自动从目录中提供数据:ImageDataGenerator。
from tensorflow.keras.preprocessing.image import ImageDataGenerator

batch_size = 128
datagen_train = ImageDataGenerator()
datagen_validation = ImageDataGenerator()
train_generator = datagen_train.flow_from_directory("./Training",
                                                    target_size=(pic_size,pic_size),
                                                    color_mode="grayscale",
                                                    batch_size=batch_size,
                                                    class_mode="categorical",
                                                    shuffle=True)
validation_generator = datagen_validation.flow_from_directory("./PublicTest",
                                                              target_size=(pic_size,pic_size),
                                                              color_mode="grayscale",
                                                              batch_size=batch_size,
                                                              class_mode="categorical",
                                                              shuffle=False)
Found 28709 images belonging to 7 classes.
Found 3589 images belonging to 7 classes.
二、卷积神经网络模型搭建
定义模型
# 定义cnn结构

# 导入需要的模块
from tensorflow.keras.layers import Dense,Input,Dropout,GlobalAveragePooling2D,Flatten,Conv2D,BatchNormalization,Activation,MaxPooling2D
from tensorflow.keras.models import Model,Sequential
from tensorflow.keras.optimizers import Adam

# 类别数量
n_classes = 7

# 初始化CNN
model = Sequential()

# 第1层卷积层
model.add(Conv2D(64,(3,3),padding="same",input_shape=(48,48,1)))
model.add(BatchNormalization())
model.add(Activation("relu"))
model.add(MaxPooling2D(pool_size=(2,2)))
model.add(Dropout(0.25))

# 第2层卷积层
model.add(Conv2D(128,(5,5),padding="same"))
model.add(BatchNormalization())
model.add(Activation("relu"))
model.add(MaxPooling2D(pool_size=(2,2)))
model.add(Dropout(0.25))

# 第3层卷积层
model.add(Conv2D(512,(3,3),padding="same"))
model.add(BatchNormalization())
model.add(Activation("relu"))
model.add(MaxPooling2D(pool_size=(2,2)))
model.add(Dropout(0.25))

# 第4层卷积层
model.add(Conv2D(512,(3,3),padding="same"))
model.add(BatchNormalization())
model.add(Activation("relu"))
model.add(MaxPooling2D(pool_size=(2,2)))
model.add(Dropout(0.25))

# 1层展平层
model.add(Flatten())

# 第1层全连接层
model.add(Dense(256))
model.add(BatchNormalization())
model.add(Activation("relu"))
model.add(Dropout(0.25))

# 第2层全连接层
model.add(Dense(512))
model.add(BatchNormalization())
model.add(Activation("relu"))
model.add(Dropout(0.25))

model.add(Dense(n_classes,activation="softmax"))

opt = Adam(lr=0.0001)
model.compile(optimizer=opt,loss="categorical_crossentropy",metrics=["accuracy"])
WARNING:tensorflow:From D:\software\Anaconda\anaconda\lib\site-packages\tensorflow\python\ops\resource_variable_ops.py:435: colocate_with (from tensorflow.python.framework.ops) is deprecated and will be removed in a future version.
Instructions for updating:
Colocations handled automatically by placer.
WARNING:tensorflow:From D:\software\Anaconda\anaconda\lib\site-packages\tensorflow\python\keras\layers\core.py:143: calling dropout (from tensorflow.python.ops.nn_ops) with keep_prob is deprecated and will be removed in a future version.
Instructions for updating:
Please use `rate` instead of `keep_prob`. Rate should be set to `rate = 1 - keep_prob`.
模型架构
model.summary()
_________________________________________________________________
Layer (type)                 Output Shape              Param #
=================================================================
conv2d (Conv2D)              (None, 48, 48, 64)        640
_________________________________________________________________
batch_normalization_v1 (Batc (None, 48, 48, 64)        256
_________________________________________________________________
activation (Activation)      (None, 48, 48, 64)        0
_________________________________________________________________
max_pooling2d (MaxPooling2D) (None, 24, 24, 64)        0
_________________________________________________________________
dropout (Dropout)            (None, 24, 24, 64)        0
_________________________________________________________________
conv2d_1 (Conv2D)            (None, 24, 24, 128)       204928
_________________________________________________________________
batch_normalization_v1_1 (Ba (None, 24, 24, 128)       512
_________________________________________________________________
activation_1 (Activation)    (None, 24, 24, 128)       0
_________________________________________________________________
max_pooling2d_1 (MaxPooling2 (None, 12, 12, 128)       0
_________________________________________________________________
dropout_1 (Dropout)          (None, 12, 12, 128)       0
_________________________________________________________________
conv2d_2 (Conv2D)            (None, 12, 12, 512)       590336
_________________________________________________________________
batch_normalization_v1_2 (Ba (None, 12, 12, 512)       2048
_________________________________________________________________
activation_2 (Activation)    (None, 12, 12, 512)       0
_________________________________________________________________
max_pooling2d_2 (MaxPooling2 (None, 6, 6, 512)         0
_________________________________________________________________
dropout_2 (Dropout)          (None, 6, 6, 512)         0
_________________________________________________________________
conv2d_3 (Conv2D)            (None, 6, 6, 512)         2359808
_________________________________________________________________
batch_normalization_v1_3 (Ba (None, 6, 6, 512)         2048
_________________________________________________________________
activation_3 (Activation)    (None, 6, 6, 512)         0
_________________________________________________________________
max_pooling2d_3 (MaxPooling2 (None, 3, 3, 512)         0
_________________________________________________________________
dropout_3 (Dropout)          (None, 3, 3, 512)         0
_________________________________________________________________
flatten (Flatten)            (None, 4608)              0
_________________________________________________________________
dense (Dense)                (None, 256)               1179904
_________________________________________________________________
batch_normalization_v1_4 (Ba (None, 256)               1024
_________________________________________________________________
activation_4 (Activation)    (None, 256)               0
_________________________________________________________________
dropout_4 (Dropout)          (None, 256)               0
_________________________________________________________________
dense_1 (Dense)              (None, 512)               131584
_________________________________________________________________
batch_normalization_v1_5 (Ba (None, 512)               2048
_________________________________________________________________
activation_5 (Activation)    (None, 512)               0
_________________________________________________________________
dropout_5 (Dropout)          (None, 512)               0
_________________________________________________________________
dense_2 (Dense)              (None, 7)                 3591
=================================================================
Total params: 4,478,727
Trainable params: 4,474,759
Non-trainable params: 3,968
_________________________________________________________________
模型训练
from tensorflow.keras.callbacks import ModelCheckpoint
epochs = 5
checkpoint = ModelCheckpoint("face_model.h5",monitor="val_acc",verbose=1,save_best_only=True,mode="max")
callbacks_list = [checkpoint]
history = model.fit_generator(generator=train_generator,
                              steps_per_epoch=train_generator.n,
                              epochs=epochs,
                              validation_data=validation_generator,
                              validation_steps=validation_generator.n,
                              callbacks=callbacks_list)
WARNING:tensorflow:From D:\software\Anaconda\anaconda\lib\site-packages\tensorflow\python\ops\math_ops.py:3066: to_int32 (from tensorflow.python.ops.math_ops) is deprecated and will be removed in a future version.
Instructions for updating:
Use tf.cast instead.
Epoch 1/5
28708/28709 [============================>.] - ETA: 0s - loss: 0.6304 - acc: 0.7638
Epoch 00001: val_acc improved from -inf to 0.64360, saving model to model_weights.h5
# 将模型结构序列化为JSON
model_json = model.to_json()
with open("face_model.json","w") as json_file:
    json_file.write(model_json)
分析结果
# 绘制训练和验证集上损失和准确率的演变
import matplotlib.pyplot as plt
%matplotlib inline

plt.figure(figsize=(14,3))
plt.subplot(1, 2, 1)
plt.suptitle('Optimizer : Adam', fontsize=10)
plt.ylabel('Loss', fontsize=16)
plt.plot(history.history['loss'], color='b', label='Training Loss')
plt.plot(history.history['val_loss'], color='r', label='Validation Loss')
plt.legend(loc='upper right')

plt.subplot(1, 2, 2)
plt.ylabel('Accuracy', fontsize=16)
plt.plot(history.history['acc'], color='b', label='Training Accuracy')
plt.plot(history.history['val_acc'], color='r', label='Validation Accuracy')
plt.legend(loc='lower right')
plt.show()
绘制confusion matrix(混淆矩阵),了解模型如何对图像进行分类
# 显示预测的混淆矩阵
# 计算预测
predictions = model.predict_generator(generator=validation_generator)
y_pred = [np.argmax(probas) for probas in predictions]
y_test = validation_generator.classes
class_names = validation_generator.class_indices.keys()

from sklearn.metrics import confusion_matrix
import itertools
def plot_confusion_matrix(cm,classes,title="Confusion matrix",cmap=plt.cm.Blues):
    cm = cm.astype("float") / cm.sum(axis=1)[:,np.newaxis]
    plt.figure(figsize=(10,10))
    plt.imshow(cm,interpolation="nearest",cmap=cmap)
    plt.title(title)
    plt.colorbar()
    tick_marks = np.arange(len(classes))
    plt.xticks(tick_marks,classes,rotation=45)
    plt.yticks(tick_marks,classes)
    fmt = ".2f"
    thresh = cm.max() / 2.
    for i,j in itertools.product(range(cm.shape[0]),range(cm.shape[1])):
        plt.text(j,i,format(cm[i,j],fmt),
                 horizontalalignment="center",
                 color="white" if cm[i,j] > thresh else "black")
        plt.ylabel("True label")
        plt.xlabel("Predicted label")
        plt.tight_layout()
# 计算混淆矩阵
cnf_matrix = confusion_matrix(y_test,y_pred)
np.set_printoptions(precision=2)
plt.figure()
plot_confusion_matrix(cnf_matrix,classes=class_names,title="Normalized confusion matrix")
plt.show()
<Figure size 432x288 with 0 Axes>

三、实时预测
创建一个model.py文件,将为我们提供先前训练模型的预测:
from keras.models import model_from_json
import numpy as np

# 创建FacialExpressionModel类
# 功能:提供先前训练模型的预测
class FacialExpressionModel(object):

    EMOTIONS_LIST = ["Angry", "Disgust",
                     "Fear", "Happy",
                     "Sad", "Surprise",
                     "Neutral"]

    def __init__(self, model_json_file, model_weights_file):
        # 从JSON文件中加载模型
        with open(model_json_file, "r") as json_file:
            loaded_model_json = json_file.read()
            self.loaded_model = model_from_json(loaded_model_json)

        # 将权重加载到新模型中
        self.loaded_model.load_weights(model_weights_file)
        self.loaded_model._make_predict_function()
        #print("Model loaded from disk")
        #self.loaded_model.summary()

    def predict_emotion(self, img):
        self.preds = self.loaded_model.predict(img)

        return FacialExpressionModel.EMOTIONS_LIST[np.argmax(self.preds)]
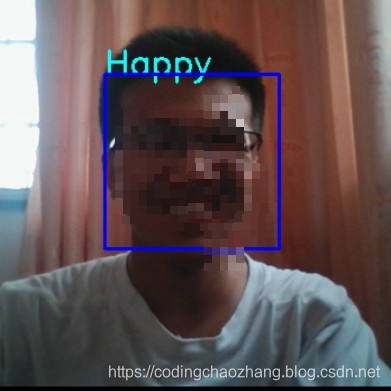
接下来,创建一个camera.py文件
-
从我们的网络摄像头获取图像流
-
使用 OpenCV 检测面并添加边界框
-
将面转换为灰度,重新缩放它们并将它们发送到我们预先训练的神经网络
-
从我们的神经网络获取预测并将标签添加到网络摄像头图像
-
返回最终的图像流
import cv2
from model import FacialExpressionModel
import numpy as np

facec = cv2.CascadeClassifier('haarcascade_frontalface_default.xml')
model = FacialExpressionModel("face_model.json", "face_model.h5")
font = cv2.FONT_HERSHEY_SIMPLEX

class VideoCamera(object):
    def __init__(self):
        self.video = cv2.VideoCapture(0)

    def __del__(self):
        self.video.release()

    # 返回相机帧以及边界框和预测

    def get_frame(self):
        _, fr = self.video.read()
        gray_fr = cv2.cvtColor(fr, cv2.COLOR_BGR2GRAY)
        faces = facec.detectMultiScale(gray_fr, 1.3, 5)
        for (x, y, w, h) in faces:
            fc = gray_fr[y:y+h, x:x+w]

            roi = cv2.resize(fc, (48, 48))
            pred = model.predict_emotion(roi[np.newaxis, :, :, np.newaxis])

            cv2.putText(fr, pred, (x, y), font, 1, (255, 255, 0), 2)
            cv2.rectangle(fr,(x,y),(x+w,y+h),(255,0,0),2)
        _, jpeg = cv2.imencode('.jpg', fr)
        return jpeg.tobytes()
最后,我们的主要脚本将创建一个 Flask 应用程序,将我们的图像预测呈现到网页中。
from flask import Flask, render_template, Response
from camera import VideoCamera

app = Flask(__name__)

@app.route('/')
def index():
    return render_template('index.html')

def gen(camera):
    while True:
        frame = camera.get_frame()
        yield (b'--frame\r\n'
               b'Content-Type: image/jpeg\r\n\r\n' + frame + b'\r\n\r\n')

@app.route('/video_feed')
def video_feed():
    return Response(gen(VideoCamera()),
                    mimetype='multipart/x-mixed-replace; boundary=frame')

if __name__ == '__main__':
    app.run(host='0.0.0.0', debug=True)
结果展示
附上源码地址github
