1. jdbcTemplate
初始化环境
application.yml:
spring:
  datasource:
    driver-class-name: com.mysql.jdbc.Driver
    #serverTimezone=UTC是解决时区配置
    url: jdbc:mysql://localhost:3306/study?serverTimezone=UTC&useUnicode=true&characterEncoding=utf-8
    username: root
    password: ******
首先就是配置数据库驱动,指定数据库的url以及登录密码,注意此处因为用的connector包是8.0.2版本,所以需要再配置的url中指定时区,即serverTimezone,否则会报错。
用jdbc模版完成查询
package com.mao.controller;

import org.springframework.beans.factory.annotation.Autowired;
import org.springframework.jdbc.core.JdbcTemplate;
import org.springframework.jdbc.support.rowset.SqlRowSet;
import org.springframework.web.bind.annotation.PathVariable;
import org.springframework.web.bind.annotation.RequestMapping;
import org.springframework.web.bind.annotation.RestController;

@RestController
public class JDBCController {

    @Autowired
    private JdbcTemplate jdbcTemplate;

    @RequestMapping("/queryUser")
    public String queryUser(int id){
        String sql = "select * from user where id = "+id;
        SqlRowSet sqlRowSet = jdbcTemplate.queryForRowSet(sql);
        System.out.println(sqlRowSet);
        return "query-ok";
    }
}
因为spring已经对jdbc具体的操作进行了封装,所以直接用jdbcTemplate调用对应的方法就可实现指定的操作了。
2.druid
DRUID连接池
阿里巴巴开源的连接池,结合了DBCP,C3P0的优势,同时加入了日志监控。
maven地址:
<!-- https://mvnrepository.com/artifact/com.alibaba/druid -->
        <dependency>
            <groupId>com.alibaba</groupId>
            <artifactId>druid</artifactId>
            <version>1.1.21</version>
        </dependency>
在application中指定数据源:
spring:
  datasource:
    url: jdbc:mysql://localhost:3306/mybatis?serverTimezone=UTC&useUnicode=true&characterEncoding=utf-8
    driver-class-name: com.mysql.jdbc.Driver
    username: root
    password: myz7758258
    type: com.alibaba.druid.pool.DruidDataSource
其中的type就是指定你使用的数据源,用来代替原来默认的hikuriDataSource。接下来就可以在其下面配置参数,如最大连接数,指定日志等。
druid的使用
因为spirngboot内置了servlet容器,所以我们不再使用web.xml去配置一些组件,而是自己去写config类,而很多druid的配置可以在配置类中实现,如:
package com.mao.config;

import com.alibaba.druid.pool.DruidDataSource;
import com.alibaba.druid.support.http.StatViewServlet;
import org.springframework.boot.context.properties.ConfigurationProperties;
import org.springframework.boot.web.servlet.ServletRegistrationBean;
import org.springframework.context.annotation.Bean;
import org.springframework.context.annotation.Configuration;

import java.util.HashMap;

@Configuration
public class DruidConfig {

    //通过这样的方式把它注入给application.yml中配置的spring.datasource.DruidDataSource
    @ConfigurationProperties(prefix = "spring.datasource")
    @Bean
    public DruidDataSource druidDataSource(){
        return new DruidDataSource();
    }

    //后台监控:相当于web.xml
    @Bean
    public ServletRegistrationBean statViewServlet(){
        ServletRegistrationBean<StatViewServlet> bean = new ServletRegistrationBean<>(new StatViewServlet(), "/druid/*");

        //后台需要有人登陆,账号密码配置
        HashMap<String, String> initParamters = new HashMap<>();
        //增加配置
        initParamters.put("loginUsername","admin");//登陆key固定是loginUsername和loginPassword;
        initParamters.put("loginPassword","123456");

        //允许谁可以访问
        initParamters.put("allow","");

        //禁止谁能访问
        initParamters.put("tongqing","192.168.11.123");//禁止该ip访问

        bean.setInitParameters(initParamters);//设置初始化参数
        return bean;
    }
}
用上述代码写了一个后台监控功能,我们去请求localhost:8080/druid,就到了登陆界面:
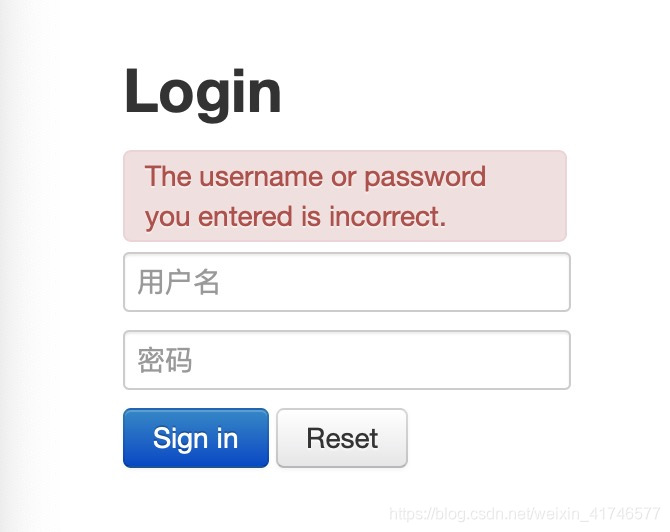
而使用代码中写好的账号密码就能够登陆了,这时候就可以显示每一次sql的使用情况了:

3.mybatis
springboot-mybatis使用
<!-- https://mvnrepository.com/artifact/org.mybatis.spring.boot/mybatis-spring-boot-starter -->
        <dependency>
            <groupId>org.mybatis.spring.boot</groupId>
            <artifactId>mybatis-spring-boot-starter</artifactId>
            <version>2.1.1</version>
        </dependency>
上为maven包
接下来的大体结构如下:
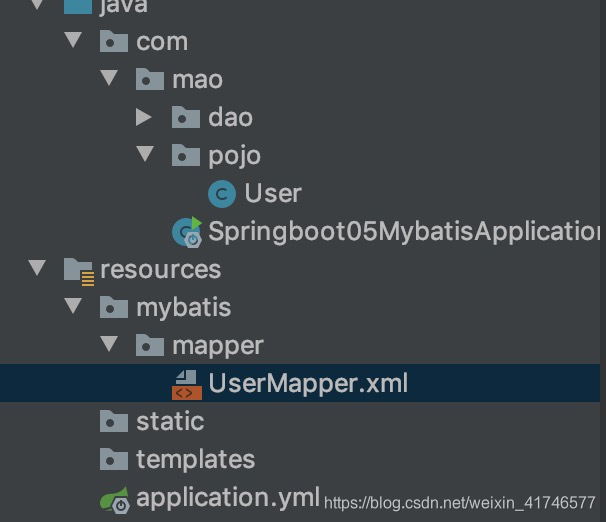
其实注意在dao层中的接口需要使用@Mapper注解表示该类是mybatis的一个mapper,而@Repository则表明这是spring注入的一个类。
在启动类中使用MapperScan()则可以指定要扫描的包,将其注入mybatis中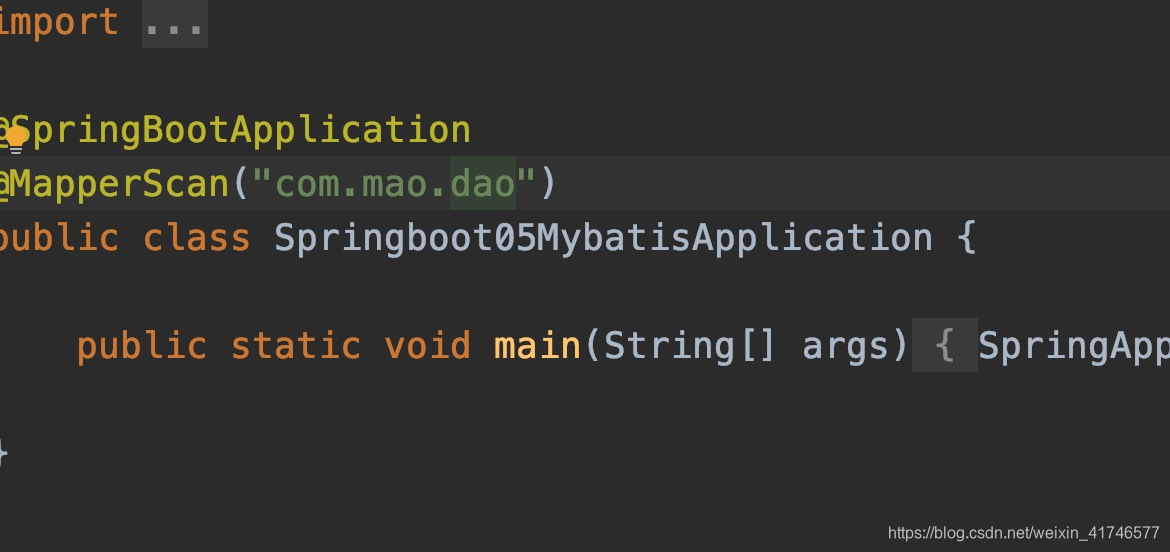
在yml中配置一下mybatis相关的配置即可,如图:

