我们接着上一节从源码研究一下html-webpack-plugin插件,感兴趣的童鞋可以看一下我上一篇文章 webpack源码解析一
文章开始先上一下源码:html-webpack-plugin源码地址,不废话,我们开车咯~~
首先安装:
yarn add html-webpack-plugin
配置webpack.config.js:
	plugins: [
		new HtmlPlugin({
			title: 'webpack demo',
			template: './index.html'
		})
	],
因为我是直接在webpack的源码工程项目,所以我就直接执行打包脚本了
执行打包命令():
./bin/webpack.js
我们可以看到报错了:
TypeError: Cannot add property htmlWebpackPluginAlterChunks, object is not extensible
    at compiler.hooks.compilation.tap.compilation (/Users/yinqingyang/ThirdProject/webpack/webpack/node_modules/html-webpack-plugin/index.js:59:56)
想必小伙伴都认识这个错误,当某个对象用了Object.freeze方法后,我们再对这个对象做扩展的时候就会报这个错误
本次demo我们用的webpack的源码版本号是:5.0.0-beta.9,html-webpack-plugin的版本号是:3.2.0
所以html-webpack-plugin还不是完全兼容webpack5.0.0-beta.9,为了测试,我们修改一下webpack的源码:
lib/Compilation.js
class Compilation {
	/**
	 * Creates an instance of Compilation.
	 * @param {Compiler} compiler the compiler which created the compilation
	 */
	constructor(compiler) {
		const getNormalModuleLoader = () => deprecatedNormalModuleLoaderHook(this);
		this.hooks = {
		}
我们直接去掉了对this.hooks的Object.freeze操作
我们继续执行打包脚本:
./bin/webpack.js
又报错了(哈哈,看来html-webpack-plugin想要兼容webpack5.0还需要改一波代码呀,我们做个好心人帮它改改把):
TypeError: this.cache.get is not a function
    at asyncLib.forEach (/Users/yinqingyang/ThirdProject/webpack/webpack/lib/Compilation.js:2337:18)
    at arrayEach (/Users/yinqingyang/ThirdProject/webpack/webpack/node_modules/neo-async/async.js:2405:9)
html-webpack-plugin/lib/compiler.js:
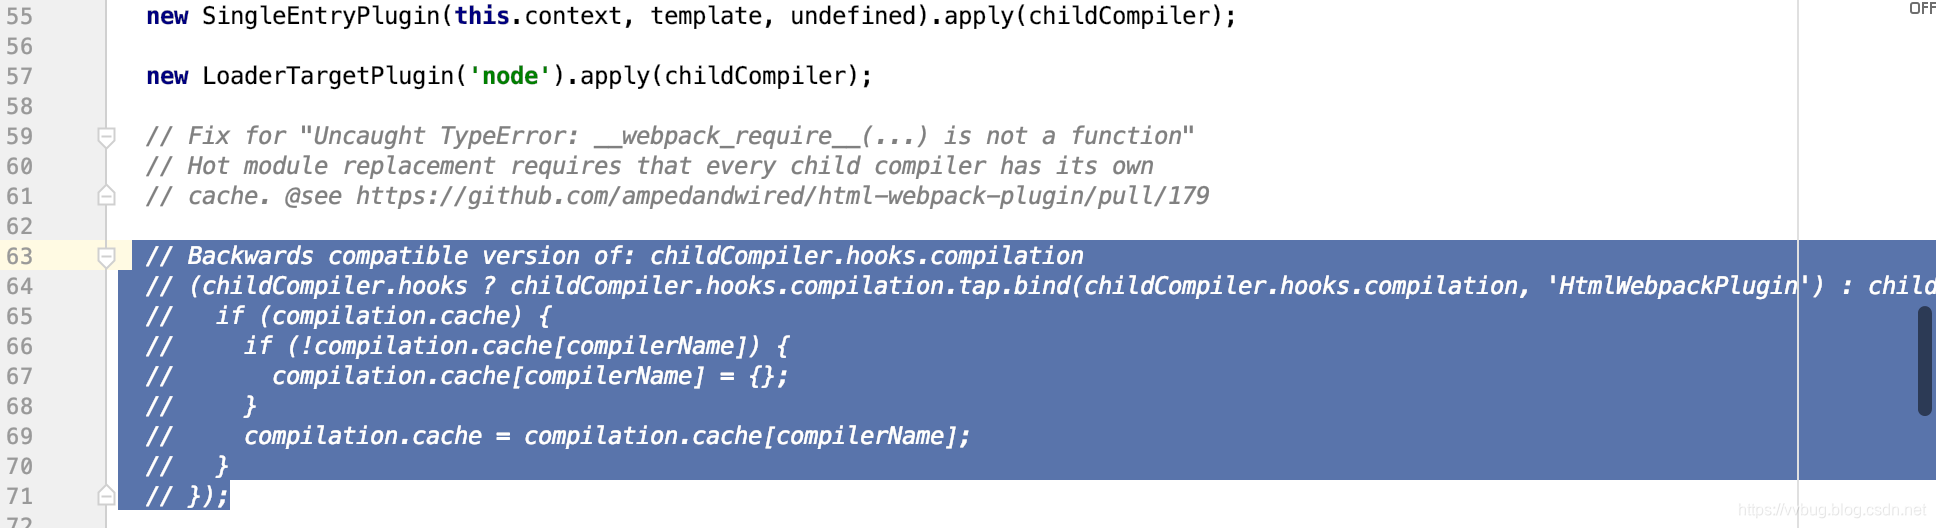
可以看到,我们注释掉了一段代码~
我们再次运行打包脚本:
./bin/webpack.js
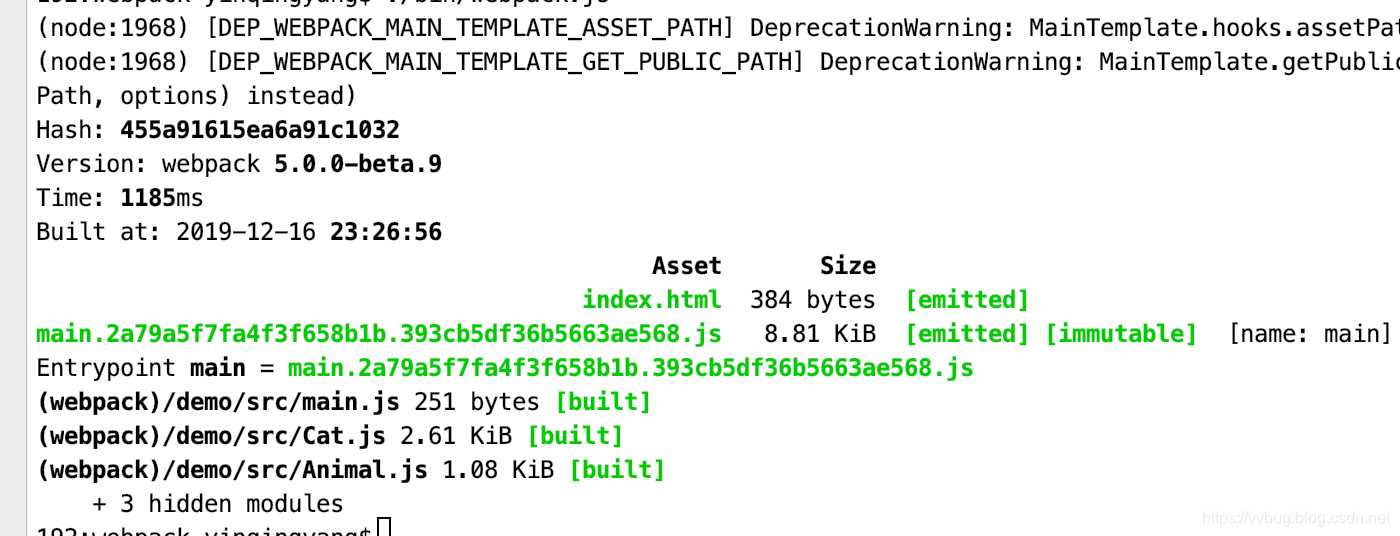

可以看到,我们打包过程已经ok了,也自动生成了index.html文件
下面我们正式走一遍html-webpack-plugin的源码,在分析源码之前我们先理一下我们的思路,通过上一节 webpack源码解析一我们知道,想要解析目标文件得有对应的loader加载器,比如webpack内置的js、json加载器(上一节有介绍,我就不重复介绍了),同样! 想要加载我们的html文件的话也要有对应的htmlloader才行,然后加载完html文件后,我们肯定得对加载的文件做处理,比如我们写在index.html中的<%=htmlWebpackPlugin.options.title%>跟<%=htmlWebpackPlugin.options.author%>:
  <meta charset="UTF-8">
		<title><%=htmlWebpackPlugin.options.title%></title>
    <meta name="author" content="<%=htmlWebpackPlugin.options.author%>">
然后当我们配置在webpack.config.js的时候:
plugins: [
		new HtmlPlugin({
			title: 'webpack demo',
			template: './demo/index.html',
			author: 'yasin'
		})
	],
我们最后打包看到index.html:
<!DOCTYPE html>
<html lang="en">
<head>
    <meta charset="UTF-8">
		<title>webpack demo</title>
    <meta name="author" content="yasin">
</head>
<body>
	<div id="container"></div>
	<noscript>we're sorry but webpack demo doesn't work properly without javascript enabled. please enable it to continue</noscript>
<script type="text/javascript" src="main.js"></script></body>
</html>
可以看到,我们设置的变量被自动替换了~
好啦! 我们从webpack编译开始分析html-webpack-plugin~
webpack.config.js配置插件
/**
 * @author YASIN
 * @version [React-Native V01, 2019/12/11]
 * @date 2019/12/11
 * @description webpack.config
 */
const path = require("path");
const HtmlPlugin = require("html-webpack-plugin");
module.exports = {
	entry: "./demo/src/main.js",
	output: {
		path: path.resolve(__dirname, "./demo/dist"),
	},
	module: {
		rules: [
			{
				test: /\.js$/,
				use: {
					loader: "babel-loader",
					options: {
						presets: [
							"@babel/env"
						]
					}
				},
				exclude: /node_modules/
			}
		]
	},
	plugins: [
		new HtmlPlugin({
			title: 'webpack demo',
			template: './demo/index.html',
			author: 'yasin'
		})
	],
	mode: "development"
};
执行脚本后webpack就会创建一个Compiler对象,然后执行所有的插件(webpack流程不是很熟的童鞋可以看我上一篇文章)
lib/webpack.js
const createCompiler = options => {
	options = new WebpackOptionsDefaulter().process(options);
	const compiler = new Compiler(options.context);
	//执行所有的插件
	if (Array.isArray(options.plugins)) {
		for (const plugin of options.plugins) {
			if (typeof plugin === "function") {
				plugin.call(compiler, compiler);
			} else {
				plugin.apply(compiler);
			}
		}
	}
};
html-webpack-plugin/index.js:
apply (compiler) {
    //获取带有loader的文件全路径
    this.options.template = this.getFullTemplatePath(this.options.template, compiler.context);
    ....
  }
   getFullTemplatePath (template, context) {
    // If the template doesn't use a loader use the lodash template loader
    if (template.indexOf('!') === -1) {
      template = require.resolve('./lib/loader.js') + '!' + path.resolve(context, template);
    }
    // Resolve template path
    return template.replace(
      /([!])([^/\\][^!?]+|[^/\\!?])($|\?[^!?\n]+$)/,
      (match, prefix, filepath, postfix) => prefix + path.resolve(filepath) + postfix);
  }
首先第一行就很关键, this.getFullTemplatePath这个方法返回的是“获取带有loader的文件全路径”,什么叫“带有loader的文件全路径”?有什么用呢?
比如我们加载的是index.html文件,然后调用了getFullTemplatePath方法后返回的是:
html-webpack-plugin/lib/loader.js!index.html
“!”符号前面的表示“加载器”,“!”符号后面表示需要加载的文件,那到底是不是这样呢?其实上一节中我们也是带过了一下,并没有解释完全,好了,我们再走一遍webpack的loader。
lib/NormalModuleFactory.js:
	this.hooks.resolve.tapAsync(
			/** @type {TODO} */ ({
				name: "NormalModuleFactory",
				stage: 100
			}),
			(data, callback) => {
		const rawElements = requestWithoutMatchResource
					.slice(
						noPreAutoLoaders || noPrePostAutoLoaders ? 2 : noAutoLoaders ? 1 : 0
					)
					.split(/!+/);
				const unresolvedResource = rawElements.pop();
				const elements = rawElements.map(identToLoaderRequest);
}
可以看到webpack的模块resolve获取模块的loader的时候是以“!”符号切割的,然后获取模块对应的loader加载器
好啦! 说完html-webpack-plugin的getFullTemplatePath方法后,我们继续往下走~
html-webpack-plugin/index.js:
apply (compiler) {
    this.options.template = this.getFullTemplatePath(this.options.template, compiler.context);
	// 注册一个compiler.hooks.make的钩子函数
    (compiler.hooks ? compiler.hooks.make.tapAsync.bind(compiler.hooks.make, 'HtmlWebpackPlugin') : compiler.plugin.bind(compiler, 'make'))((compilation, callback) => {
      // 开始编译模版html文件
      compilationPromise = childCompiler.compileTemplate(self.options.template, compiler.context, self.options.filename, compilation)
        .then(compilationResult => {
          // 获取编译结果
          callback();
          return compilationResult.content;
        });
    });
}
那么“compiler.hooks.make”是干什么呢?
lib/Compiler.js(上一节有解释):
	const params = this.newCompilationParams();
		this.hooks.beforeCompile.callAsync(params, err => {

			logger.time("make hook");
			//开始执行打包
			this.hooks.make.callAsync(compilation, err => {
当调用this.hooks.make的时候EntryPlugin开始根据入口文件信息开始打包操作~
从webpack的源码我们可以知道,我们自定的插件是先于默认的插件执行的,所以我们会在EntryPlugin开始前执行我们的make钩子函数,这个时候webpack处于一个打包前的状态。
html-webpack-plugin/lib/compiler.js:
module.exports.compileTemplate = function compileTemplate (template, context, outputFilename, compilation) {
//创建一个跟当前Compiler一样配置的Compiler(childCompiler)对象
const childCompiler = compilation.createChildCompiler(compilerName, outputOptions);
  childCompiler.context = context;
	// Compile and return a promise
  return new Promise((resolve, reject) => {
  	//开始执行childCompiler编译器的run操作(独立于主编译器外的编译器)
    childCompiler.runAsChild((err, entries, childCompilation) => {
        resolve({
          // Hash of the template entry point
          hash: entries[0].hash, //当前模块(index.html)的hash值
          // Output name
          outputName: outputName, //当前模块(index.html)的名称
          // Compiled code
          content: childCompilation.assets[outputName].source()//当前模块(index.html)编译过后的源码
        });
}
经过了html-webpack-plugin/lib/compiler.js的compileTemplate方法后,其实我们已经加载了我们的模版index.html文件,
最后在webpack生成打包文件之前,我们需要获取所有的打包文件,然后动态的添加到我们的index.html模版文件中。
html-webpack-plugin/index.js:
 apply (compiler) {
	    (compiler.hooks ? compiler.hooks.emit.tapAsync.bind(compiler.hooks.emit, 'HtmlWebpackPlugin') : compiler.plugin.bind(compiler, 'emit'))((compilation, callback) => {

	    }
}
可以看到,注册了一个“hooks.emit”钩子函数,那么“hooks.emit”钩子函数又是哪调用的呢?上一节有介绍的,当webpack编译完项目所有的模块后,然后就是输出打包文件,在生成打包文件前会调用“hooks.emit”钩子函数
lib/Compiler.js:
emitAssets(compilation, callback) {
		let outputPath;this.hooks.emit.callAsync(compilation, err => {
			if (err) return callback(err);
			outputPath = compilation.getPath(this.outputPath, {});
			mkdirp(this.outputFileSystem, outputPath, emitFiles);
		});
	}
那我们要在这个时候干什么呢?
1、我们需要设置在模版index.html的参数、设置favicon、把生成的assets(js、css)资源文件放入模版index.html代码
2、我们要把我们处理完毕后的html模块放到webpack的主加载器模块中去,当作webpack主加载器的assets资源文件
3、通知webpack可以生成打包文件了
1、我们需要设置在模版index.html的参数、设置favicon、把生成的assets(js、css)资源文件放入模版index.html代码
 /**
   * Evaluates the child compilation result
   * Returns a promise
   */
  evaluateCompilationResult (compilation, source) {
    if (!source) {
      return Promise.reject('The child compilation didn\'t provide a result');
    }

    //创建一个上下文环境
    const vmContext = vm.createContext(_.extend({HTML_WEBPACK_PLUGIN: true, require: require}, global));
    //用node的vm创建一个可执行代码环境
    const vmScript = new vm.Script(source, {filename: template});
    // Evaluate code and cast to string
    let newSource;
    try {
    //执行代码获取(构建index.html源码的方法)
      newSource = vmScript.runInContext(vmContext);
    } catch (e) {
      return Promise.reject(e);
    }
    if (typeof newSource === 'object' && newSource.__esModule && newSource.default) {
      newSource = newSource.default;
    }
    return typeof newSource === 'string' || typeof newSource === 'function'
      ? Promise.resolve(newSource)
      : Promise.reject('The loader "' + this.options.template + '" didn\'t return html.');
  }
那么我们这里说的源码指的是什么呢? 还记得我们一开始说的那个loader吗?
对的! 源码其实就是loader加载的
html-webpack-plugin/lib/loader.js:
const _ = require('lodash');
const loaderUtils = require('loader-utils');

module.exports = function (source) {
  if (this.cacheable) {
    this.cacheable();
  }
  const allLoadersButThisOne = this.loaders.filter(function (loader) {
    // Loader API changed from `loader.module` to `loader.normal` in Webpack 2.
    return (loader.module || loader.normal) !== module.exports;
  });
  // This loader shouldn't kick in if there is any other loader
  if (allLoadersButThisOne.length > 0) {
    return source;
  }
  // Skip .js files
  if (/\.js$/.test(this.resourcePath)) {
    return source;
  }

  // The following part renders the tempalte with lodash as aminimalistic loader
  //
  // Get templating options
  const options = this.query !== '' ? loaderUtils.parseQuery(this.query) : {};
  const template = _.template(source, _.defaults(options, { variable: 'data' }));
  // Require !!lodash - using !! will disable all loaders (e.g. babel)
  return 'var _ = require(' + loaderUtils.stringifyRequest(this, '!!' + require.resolve('lodash')) + ');' +
    'module.exports = function (templateParams) { with(templateParams) {' +
      // Execute the lodash template
      'return (' + template.source + ')();' +
    '}}';
};
这里用到了loadsh的template方法去加载模版代码的,也就是我们在index.html中设置的:
<%=htmlWebpackPlugin.options.title%>
<%=htmlWebpackPlugin.options.author%>
loadsh的template方法我就不做解释了,小伙伴自己去看loadsh的文档。
通过loader加载之后我们获取到的源码:
return 'var _ = require(' + loaderUtils.stringifyRequest(this, '!!' + require.resolve('lodash')) + ');' +
    'module.exports = function (templateParams) { with(templateParams) {' +
      // Execute the lodash template
      'return (' + template.source + ')();' +
    '}}';
我们可以简单的看到我们的index.html文件经过loader之后变成了node里面的一个模块,然后是以commonjs的方式,通过传入的templateParams建议一个当前this环境,然后获取templateParams里面的属性,所以我们才能在index.html中用“htmlWebpackPlugin.options.title”这种表达式。
html-webpack-plugin/index.js:
 /**
   * 把webpack的所以assets插入到html文件中
   */
  generateHtmlTags (assets) {
    // Turn script files into script tags
    const scripts = assets.js.map(scriptPath => ({
      tagName: 'script',
      closeTag: true,
      attributes: {
        type: 'text/javascript',
        src: scriptPath
      }
    }));
    // Make tags self-closing in case of xhtml
    const selfClosingTag = !!this.options.xhtml;
    // Turn css files into link tags
    const styles = assets.css.map(stylePath => ({
      tagName: 'link',
      selfClosingTag: selfClosingTag,
      voidTag: true,
      attributes: {
        href: stylePath,
        rel: 'stylesheet'
      }
    }));
    // Injection targets
    let head = this.getMetaTags();
    let body = [];

    // If there is a favicon present, add it to the head
    if (assets.favicon) {
      head.push({
        tagName: 'link',
        selfClosingTag: selfClosingTag,
        voidTag: true,
        attributes: {
          rel: 'shortcut icon',
          href: assets.favicon
        }
      });
    }
    // Add styles to the head
    head = head.concat(styles);
    // Add scripts to body or head
    if (this.options.inject === 'head') {
      head = head.concat(scripts);
    } else {
      body = body.concat(scripts);
    }
    return {head: head, body: body};
  }
2、我们要把我们处理完毕后的html模块放到webpack的主加载器模块中去,当作webpack主加载器的assets资源文件
html-webpack-plugin/index.js:
 .then(html => {
          // Replace the compilation result with the evaluated html code
          compilation.assets[self.childCompilationOutputName] = {
            source: () => html,
            size: () => html.length
          };
        })
3、通知webpack可以生成打包文件了
  // Let webpack continue with it
        .then(() => {
          callback();
        });
好啦! html-webpack-plugin所有流程跟源码我们就分析完毕了
之后还会把webpack的分包、优化等等插件分析一波
欢迎志同道合的童鞋一起学习,一起进步,欢迎入群!!
晚安~~
