版权声明:尊重原创! https://blog.csdn.net/weixin_42675488/article/details/86716088
| 阅读结构 | |
|---|---|
| 1、webpack的基本操作 | |
| 2、html-webpack-plugin —— 生成页面 插件使用 | |
| 3、devServer 开发服务器的使用方法 | |
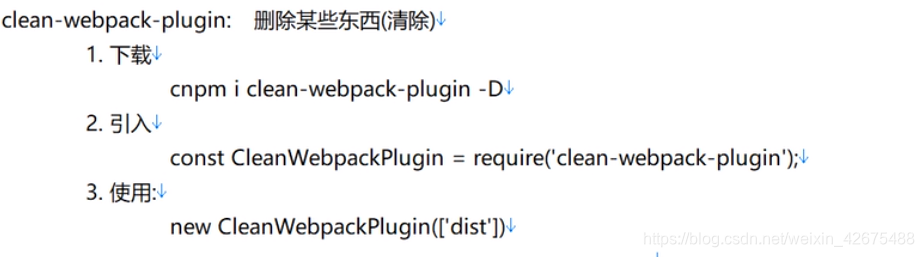
| 4、clean-webpack-plugin 删除dist文件 |
1、第一步新建src文件夹,为本地的项目,包括 js、css、html 等;
2、第二步新建 webpack.config.js 文件,里面写上入口和出口配置等;
3、第三步打开cmd命令窗口,输入npm init -y生成依赖配置文件package.json(工程目录),在scripts中改变打包方式(webpack);
报错注意:
1、可能需要本地安装webpack,如 cnpm i webpack -D 或者 npm;
2、安装 cnpm i webpack-cli -D;
1、var path = require(‘path’); - 为node系统模块,其path要为绝对路径;filename 为固定写法,是所要输出的文件名称;
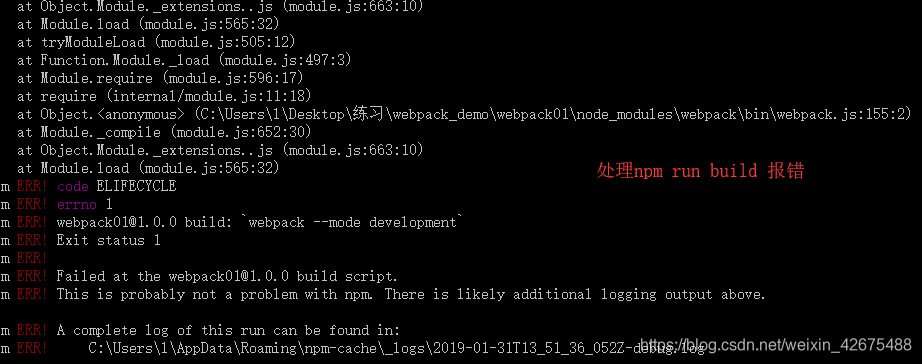
2、解决: 运行npm run webpack命令报错问题, webpack 替换为 webpack-cli 问题解决
// webpack.config.js文件
const path = require('path');

module.exports = {
    entry: {
        index: './src/js/index.js'
    },
    output: {
        path:path.resolve(__dirname,'./dist'), //打包输出的目录
        filename: 'js/bundle.js' //打包输出的文件名
    }
};

//package.json文件
{
  "name": "webpack01",
  "version": "1.0.0",
  "description": "",
  "main": "webpack.config.js",
  "scripts": {
    "build": "webpack --mode development"
  },
  "keywords": [],
  "author": "",
  "license": "ISC",
  "dependencies": {
    "webpack": "^4.29.0"
  }
}
1、entry — 支持多文件打包,以数组的形式,如:
entry: [
‘./src/js/index.js’,’./src/js/index2.js’
]
其打包的顺序为从左到右依次执行打包;
2、多入口 多出口配置:(entry)
entry: {
      index: './src/js/index.js',
      index2: './src/js/index2.js'
},
output: {
      path: path.resolve(__dirname,'dist'),
      filename: 'js/[name].bundle.js'
}
变量 [name] 对应的是entry中的名称
| webpack的作用 | |
|---|---|
| 1、打包(把多个文件夹打包成一个js文件,减少服务器压力、带宽等); | |
| 2、转化(例如less、sass、ts等),需要loader; | |
| 3、优化(spa越来越盛行,且前端项目负责度越来越高,webpack可以对项目进行优化); | |
| —— | |
| webpack的构成: | entry(入口文件)、output(出口文件)、loaders(转化器)、plugins(插件)、devServer(开发服务器) |
1、html-webpack-plugin —— 生成页面 插件使用
| 步骤 | |
|---|---|
| 1、安装 | npm i html-webpack-plugin -D |
| 2、引入 | const HtmlWebpackPlugin = require(‘html-webpack-plugin’) |
| 3、使用(配置) | plugin:[] |
| — | |
| filename: - 生成的html文件名,可以带子目录,编译后的文件名 | template: — html模板地址 |
| chunks: - 多页面引入js |
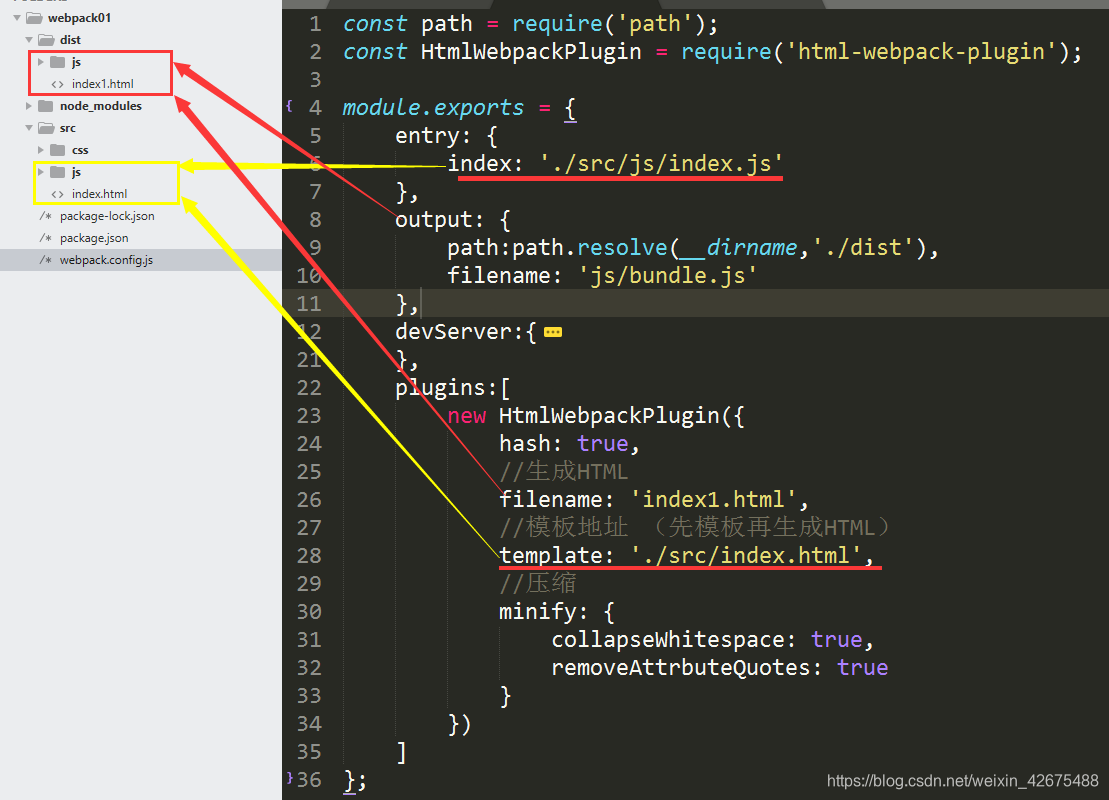
plugins:[
//初始化插件
    new HtmlWebpackPlugin({
        hash: true,  //清除文件缓存
        chunks: ['index2'],  //单独引用index2.js
        filename: 'index1.html', //在多个页面时方便确认,所在位置是相对于entry中的js,path中的位置要写对(output)
        template: './src/index.html',
        minify: {
            collapseWhitespace: true,
            removeAttrbuteQuotes: true
        }
    })
]
2、devServer 开发服务器:
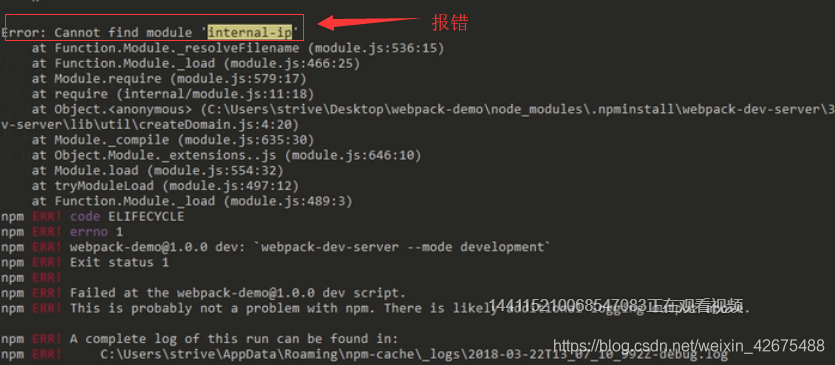
webpack-dev-server —— 可能会依赖 internal-ip 插件
const path = require('path');
const HtmlWebpackPlugin = require('html-webpack-plugin');
module.exports = {
entry: {
index: './src/js/index.js'
},
output: {
//输出文件的目录
path:path.resolve(__dirname,'./dist'),
filename: 'js/[name].bundle.js',
//解析文件的目录
publicPath: '/assets/'
},
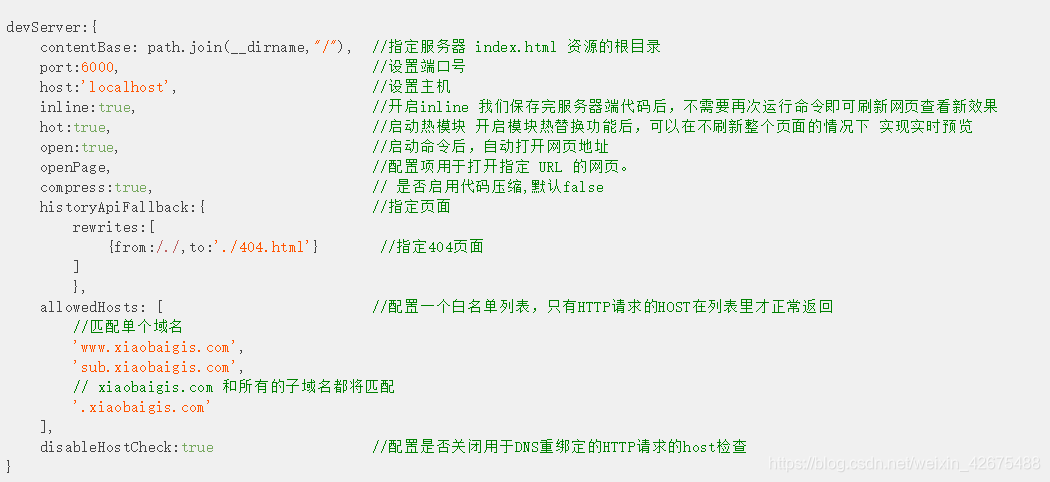
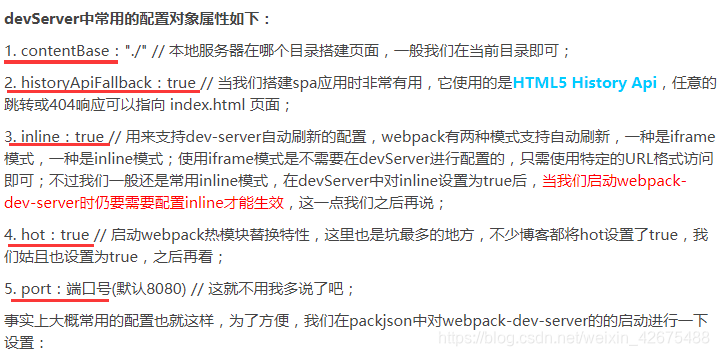
devServer:{
//设置服务器访问的基本目录
contentBase: path.resolve(__dirname,'dist'),
//设置服务器的ip地址
host: 'localhost',
//设置端口
port: 8080,
//自动打开浏览器
open: true
},
plugins:[
new HtmlWebpackPlugin({
//entry中要引用的js
chunks: ['index'],
//清除缓存
hash: true,
//生成HTML,及地址 output中filename地址要写对
filename: 'index1.html',
//模板地址 (先模板再生成HTML)
template: './src/index.html',
//压缩
minify: {
collapseWhitespace: true,
removeAttrbuteQuotes: true
}
})
]
};
//package.json文件
"scripts": {
"build": "webpack --mode development",
"dev": "webpack-dev-server --mode development --progress --open chrome"
},
//dev —— 支持自动刷新
build(webpack)— 输出一个真实的文件;
dev(webpack-dev-serve)— 输出的文件只存在于内存中,不输出一个真实的文件(他没有dist文件也能运行),打开一个 —— 服务器的根目录就是我们工程的目录;
devServer报错: