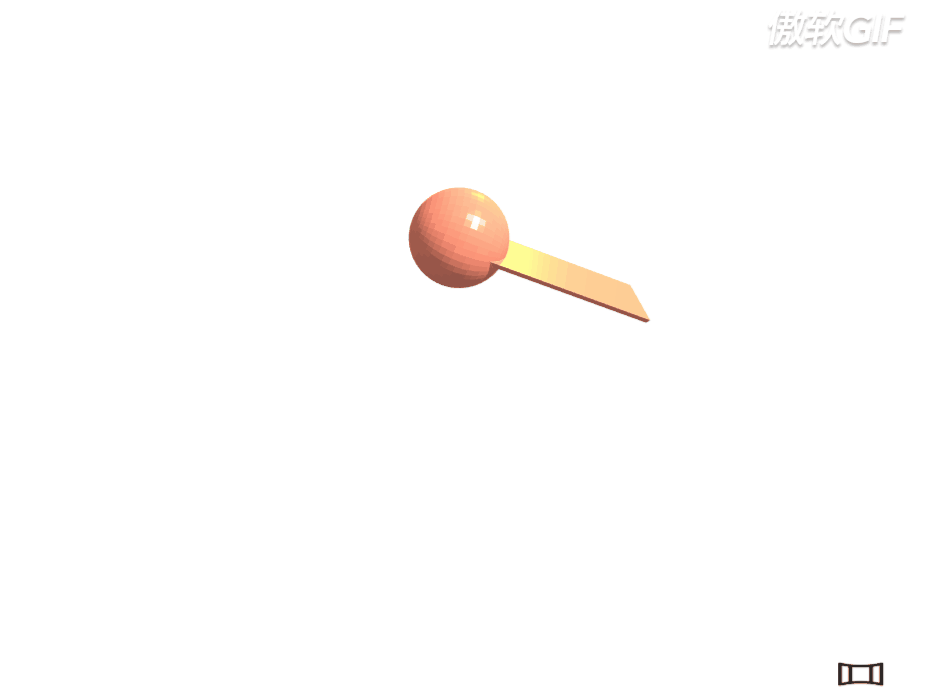
效果图:
要求是要能支持VR眼镜观看,就是要能分屏
没有系统的去学three.js,只是为了实现效果。
以下代码只需要更换stl文件就可以。
var scene = new THREE.Scene();//场景容器
		var camera = new THREE.PerspectiveCamera(75, window.innerWidth / window.innerHeight, 0.1, 1000);//设置相机,(fov 可视角度,aspect 为width/height,通常设置为canvas元素的高宽比,near近端距离,far远端距离)。只有离相机的距离大于near值,小于far值,且在相机的可视角度之内,才能被相机投影到。
		camera.position.z = 8;//相机位置,数值越大越远,越小越近
		var renderer = new THREE.WebGLRenderer({//创建渲染器,用来将物体渲染到屏幕上
			antialias: true, //antialias:true/false 是否开启反锯齿
			alpha: true //alpha:true/false 是否可以设置背景色透明
		});
		var VrRender = new THREE.StereoEffect(renderer);//VR分屏
		//VrRender.setEyeSeparation(0);设置两眼的间距
		renderer.setViewport(0, 0, window.innerWidth, window.innerHeight);//调整渲染视角
		renderer.gammaInput = true;//纹理和颜色都会预乘gamma。 默认值是false,大概就是调整一些因为比例缩放而导致的视觉bug
		renderer.gammaOutput = true;
		renderer.shadowMap.enabled = true;//在场景中使用阴影贴图,想了解:https://blog.csdn.net/linuxheik/article/details/53842266
		var light = new THREE.AmbientLight(0x404040); //实例环境光源,了解:https://blog.csdn.net/qq_30100043/article/details/77203329
		scene.add(light);//向场景添加灯光
整段代码
js文件官网下载就好,我也有上传了github,需要可以私聊
<!DOCTYPE html>
<html lang="zh">
	<head>
		<meta charset="UTF-8">
		<meta name="viewport" content="width=device-width, user-scalable=no, initial-scale=1.0, maximum-scale=1.0, minimum-scale=1.0">
		<meta http-equiv="X-UA-Compatible" content="ie=edge">
		<title>双屏显示案例</title>
		<style type="text/css">
			body {
				margin: 0;
			}

			canvas {
				width: 100%;
				height: 100%
			}
			#img{position: absolute;width: 45px;height: 30px;bottom: 30px;right: 50px;z-index: 10;cursor: pointer;}
		</style>
	</head>
	<body>
		<img src="img/panorama_512px_1169773_easyicon.net.png" id="img" />
	</body>
	<script src="js/three.js-master/build/three.js"></script>
	<script src="js/three.js-master/examples/js/effects/StereoEffect.js"></script>
	<script src="js/three.js-dev/examples/js/vr/WebVR.js"></script>
	<script src="js/STLLoader.js"></script>
	<script>
		var scene = new THREE.Scene();//场景容器
		var camera = new THREE.PerspectiveCamera(75, window.innerWidth / window.innerHeight, 0.1, 1000);//设置相机,(fov 可视角度,aspect 为width/height,通常设置为canvas元素的高宽比,near近端距离,far远端距离)。只有离相机的距离大于near值,小于far值,且在相机的可视角度之内,才能被相机投影到。
		camera.position.z = 8;//相机位置,数值越大越远,越小越近
		var renderer = new THREE.WebGLRenderer({//创建渲染器,用来将物体渲染到屏幕上
			antialias: true, //antialias:true/false 是否开启反锯齿
			alpha: true //alpha:true/false 是否可以设置背景色透明
		});
		var VrRender = new THREE.StereoEffect(renderer);//VR分屏
		//VrRender.setEyeSeparation(0);设置两眼的间距
		renderer.setViewport(0, 0, window.innerWidth, window.innerHeight);//调整渲染视角
		renderer.gammaInput = true;//纹理和颜色都会预乘gamma。 默认值是false,大概就是调整一些因为比例缩放而导致的视觉bug
		renderer.gammaOutput = true;
		renderer.shadowMap.enabled = true;//在场景中使用阴影贴图,想了解:https://blog.csdn.net/linuxheik/article/details/53842266
		var light = new THREE.AmbientLight(0x404040); //实例环境光源,了解:https://blog.csdn.net/qq_30100043/article/details/77203329
		scene.add(light);//向场景添加灯光
		var itsVr=false;//这是我设置的,点击vr分屏效果,可以用ve眼睛看
		function vrStart(){
			itsVr=!itsVr;
		}
		var animate = function() {
			requestAnimationFrame(animate);

			mesh.rotation.y += 0.01; //动画转向,速度0.01
			mesh.rotation.x += 0.01; //动画转向
			//mesh.rotation.z+= 0.01;
			if (mesh.rotation.y > Math.PI * 2) {
				mesh.rotation.y -= Math.PI * 2;
			}
			if(itsVr){
				VrRender.setSize(window.innerWidth, window.innerHeight);//设置渲染场景尺寸
				VrRender.render(scene, camera);
			}else{
				renderer.setSize(window.innerWidth, window.innerHeight);//设置渲染场景尺寸
				renderer.render(scene, camera);
			}

		};
		document.body.appendChild(renderer.domElement);
		loader = new THREE.STLLoader();
		loader.load('stl/colored.stl', function(geometry) {
			var material = new THREE.MeshPhongMaterial({
				ambient: 0xff5533,
				color: 0xff5533,
				specular: 0x111111,
				shininess: 200
			});
			console.log(geometry);
			mesh = new THREE.Mesh(geometry, material);
			mesh.position.set(0, 0, 0); //设置模型的位置
			mesh.rotation.set(-Math.PI / 2, 0, 0);
			mesh.scale.set(1, 1, 1);
			mesh.castShadow = true;
			mesh.receiveShadow = true;
			scene.add(mesh);

			animate();
		});
		scene.add(new THREE.HemisphereLight(0x443333, 0x111122));

		function addShadowedLight(x, y, z, color, intensity) {

			var directionalLight = new THREE.DirectionalLight(color, intensity);
			directionalLight.position.set(x, y, z);
			scene.add(directionalLight);

			directionalLight.castShadow = true;

			var d = 1;
			directionalLight.shadow.camera.left = -d;
			directionalLight.shadow.camera.right = d;
			directionalLight.shadow.camera.top = d;
			directionalLight.shadow.camera.bottom = -d;
			directionalLight.shadow.camera.near = 1;
			directionalLight.shadow.camera.far = 4;
			directionalLight.shadow.bias = -0.002;
		}
		addShadowedLight(1, 1, 1, 0xffffff, 1.35);
		addShadowedLight(0.5, 1, -1, 0xffaa00, 1);
		document.getElementsByTagName("img")[0].addEventListener('click',vrStart);
	</script>
</html>
