1 pom文件引入
<dependency>
<groupId>org.springframework.boot</groupId>
<artifactId>spring-boot-starter-cache</artifactId>
</dependency>
2新建ehcache.xml 文件
<?xml version="1.0" encoding="UTF-8"?>
<ehcache xmlns:xsi="http://www.w3.org/2001/XMLSchema-instance"
	xsi:noNamespaceSchemaLocation="http://ehcache.org/ehcache.xsd"
	updateCheck="false">
	<diskStore path="java.io.tmpdir/Tmp_EhCache" />

	<!-- 默认配置 -->
	<defaultCache maxElementsInMemory="5000" eternal="false"
		timeToIdleSeconds="120" timeToLiveSeconds="120"
		memoryStoreEvictionPolicy="LRU" overflowToDisk="false" />

	<cache name="baseCache" maxElementsInMemory="10000"
		maxElementsOnDisk="100000" />

</ehcache>
配置信息介绍
-
name:缓存名称
-
maxElementsInMemory:缓存最大个数。
-
eternal:对象是否永久有效,一但设置了,timeout将不起作用。
-
timeToIdleSeconds:设置对象在失效前的允许闲置时间(单位:秒)。仅当eternal=false对象不是永久有效时使用,可选属性,默认值是0,也就是可闲置时间无穷大。
-
timeToLiveSeconds:设置对象在失效前允许存活时间(单位:秒)。最大时间介于创建时间和失效时间之间。仅当eternal=false对象不是永久有效时使用,默认是0.,也就是对象存活时间无穷大。
-
overflowToDisk:当内存中对象数量达到maxElementsInMemory时,Ehcache将会对象写到磁盘中。
-
diskSpoolBufferSizeMB:这个参数设置DiskStore(磁盘缓存)的缓存区大小。默认是30MB。每个Cache都应该有自己的一个缓冲区。
-
maxElementsOnDisk:硬盘最大缓存个数
-
diskPersistent:是否缓存虚拟机重启期数据 Whether the disk store persists between
restarts of the Virtual Machine. The default value is false. -
diskExpiryThreadIntervalSeconds:磁盘失效线程运行时间间隔,默认是120秒。
-
memoryStoreEvictionPolicy:当达到maxElementsInMemory限制时,Ehcache将会根据指定的策略去清理内存。默认策略是LRU(最近最少使用)。你可以设置为FIFO(先进先出)或是LFU(较少使用)。
-
clearOnFlush:内存数量最大时是否清除。
3 代码使用Cacheable
@CacheConfig(cacheNames = "baseCache")
public interface UserMapper {
	@Select("select * from users where name=#{name}")
	@Cacheable
	UserEntity findName(@Param("name") String name);
}
4清除缓存
@Autowired
private CacheManager cacheManager;
@RequestMapping("/remoKey")
public void remoKey() {
	cacheManager.getCache("baseCache").clear();
}
5 启动加入缓存
@EnableCaching // 开启缓存注解
6 使用Redis集成缓存
application.properties文件
## Redis 配置
## Redis数据库索引(默认为0)
spring.redis.database=0
## Redis服务器地址
spring.redis.host=127.0.0.1
## Redis服务器连接端口
spring.redis.port=6379
## Redis服务器连接密码(默认为空)
spring.redis.password=
## 连接池最大连接数(使用负值表示没有限制)
spring.redis.pool.max-active=8
## 连接池最大阻塞等待时间(使用负值表示没有限制)
spring.redis.pool.max-wait=-1
## 连接池中的最大空闲连接
spring.redis.pool.max-idle=8
## 连接池中的最小空闲连接
spring.redis.pool.min-idle=0
## 连接超时时间(毫秒)
spring.redis.timeout=1200
实体类一定要使实现序列化接口!
实体类一定要使实现序列化接口!
实体类一定要使实现序列化接口!
Serializable
public class User implements Serializable{}
Service方法:关键实现类
public User findUserById(int id) {
        String key = "user_" + id;

        ValueOperations<String, User> operations = redisTemplate.opsForValue();

        boolean hasKey = redisTemplate.hasKey(key);
        if (hasKey) {
            User user = operations.get(key);
            System.out.println("==========从缓存中获得数据=========");
            System.out.println(user.getUserName());
            System.out.println("==============================");
            return user;
        } else {
            User user = userDao.findUserById(id);
            System.out.println("==========从数据表中获得数据=========");
            System.out.println(user.getUserName());
            System.out.println("==============================");

            // 写入缓存
            //掩码自己看,key,value......
            operations.set(key, user, 5, TimeUnit.HOURS);
            return user;
        }

    }
    /**
     * 更新用户策略:因为数据要求一致性比较高,先更新数据表,成功之后,删除原来的缓存,再更新缓存
     */
    public int updateUser(User user) {
        ValueOperations<String, User> operations = redisTemplate.opsForValue();
        int result = userDao.updateUser(user);
        if (result != 0) {
            String key = "user_" + user.getUid();
            boolean haskey = redisTemplate.hasKey(key);
            if (haskey) {
                redisTemplate.delete(key);
                System.out.println("删除缓存中的key=========>" + key);
            }
            // 再将更新后的数据加入缓存
            User userNew = userDao.findUserById(user.getUid());
            if (userNew != null) {
                operations.set(key, userNew, 3, TimeUnit.HOURS);
            }
        }
        return result;
    }
查询时间测试
    /**
     * 获取用户策略:先从缓存中获取用户,没有则取数据表中 数据,再将数据写入缓存
     */
    public User findUserById(int id) {
        String key = "user_" + id;

        ValueOperations<String, User> operations = redisTemplate.opsForValue();

        boolean hasKey = redisTemplate.hasKey(key);
        if (hasKey) {
            long start = System.currentTimeMillis();
            User user = operations.get(key);
            System.out.println("==========从缓存中获得数据=========");
            System.out.println(user.getUserName());
            System.out.println("==============================");
            long end = System.currentTimeMillis();
            System.out.println("查询redis花费的时间是:" + (end - start)+"s");
            return user;
        } else {
            long start = System.currentTimeMillis();
            User user = userDao.findUserById(id);
            System.out.println("==========从数据表中获得数据=========");
            System.out.println(user.getUserName());
            System.out.println("==============================");

            // 写入缓存
            operations.set(key, user, 5, TimeUnit.HOURS);
            long end = System.currentTimeMillis();
            System.out.println("查询mysql花费的时间是:" + (end - start)+"s");
            return user;
        }

    }
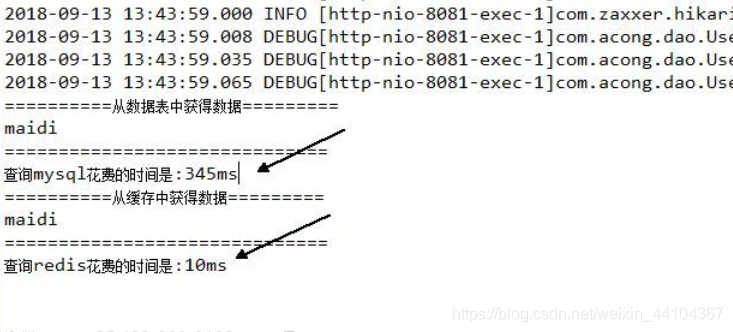
时间显而易见,redis查询快至少30倍!