1.Spring Boot 使用 Cache
我们知道一个程序的瓶颈在于数据库,我们也知道内存的速度是远大于硬盘的速度的。当我们需要重复地获取相同的数据的时候,我们一次又一次的请求数据库或远程服务,导致大量的时间耗费在数据库查询或者远程方法调用上,导致程序性能的恶化,这便是数据缓存要解决的问题。
1.1 Spring 缓存支持
Spring 定义了 org.springframework.cache.CacheManager 和 org.springframework.cache.Cache 接口用来统一不同的缓存的技术。其中,CacheManager 是 Spring 提供的各种缓存技术抽象接口, Cache 接口包含缓存的各种操作(增加,删除,获得缓存,我们一般不会直接和此接口打交道)。
1.2 Spring 支持的 CacheManager
针对不同的缓存技术,需要实现不同的 CacheManage ,Spring 定义了如下所示的 CacheManager 实现。
| CacheManager | 描述 |
|---|---|
| SimpleCacheManager | 使用简单的 Collection 来存储缓存,主要用来测试用途 |
| ConcurrentMapCacheManager | 使用 ConcurrentMap 来存储缓存 |
| NoOpCacheManager | 仅测试用途,不会实际存储缓存 |
| EhCacheManager | 使用 EhCache 作为缓存技术 |
| GuavaCacheManager | 使用 Google Guava 的 GuavaCache 作为缓存技术 |
| HazelcastCacheManager | 使用 Hazelcast 作为缓存技术 |
| JCacheCacheManager | 支持 JCache(JSR-107)标准的实现作为缓存技术,如 Apache Commons JCS |
| RedisCacheManager | 使用 Redis 作为缓存技术 |
1.3 声明式缓存
Spring 提供了4个注解来声明缓存规则。这四个注解如下:
| 注解 | 解释 |
|---|---|
| @Cacheable | 在方法执行前 Spring 先查看缓存中是否有数据,如果有数据,则直接返回缓存数据;如果没有,调用方法并将方法返回值放进缓存 |
| @CachePut | 一定会调用方法,并将方法返回值放到缓存中,@CachePut 的属性和 @Cacheable 保持一致 |
| @CacheEvict | 将一条或者多条数据从换从中删除 |
| @Caching | 可以通过 @Caching 注解组合多个注解策略放在一个方法上 |
@Cacheable,@CachePut,@CacheEvict 都有 value 属性,指定的是要使用的缓存名称;key 属性指定的是数据在缓存中的存储的键。
1.4 开启声明式缓存支持
开启声明式缓存支持十分简单,只需在配置类上使用 @EnableCaching 注解即可,如:
@SpringBootApplication
@EnableCaching
public class SpringBootDemoMybatiesApplication {
    public static void main(String[] args) {
        SpringApplication.run(SpringBootDemoMybatiesApplication.class, args);
    }
}
1.5 Spring Boot 的支持
在 Spring 中使用缓存技术的关键是配置 CacheManager,而 Spring Boot 为我们自动配置了多个 CacheManager 的实现。
在不做任何额外的配置的情况下,默认使用的是 SimpleCacheConfiguration,即使用 ConcurrentMapCacheManager。 Spring Boot 支持以 “spring.cache” 为前缀的属性来配置缓存。
配置 cache 属性,用 application.xml 和 application.yml 都可以。这里我使用的是更简洁的 application.yml。
spring:
    cache:
      type: #可选 generic,ehcache,hazelcast,infinispan,jcache,redis,guava,simple,none
      cache-names: # 程序启动时创建缓存名称
      ehcache:
        config: # ehcache 配置文件地址
      infinispan:
        config: # infinispan 配置文件地址
      jcache:
        config: # jcache 配置文件地址
        provider: # 当多个 jcache 实现在类路径中的时候,指定 jcache 实现
      caffeine:
        spec: # guava specs
1.6 添加依赖
- 如果新创建项目则在 Core 中选择 Cache 依赖即可。
- 如果在已开发中的项目中使用在 pom.xml 中添加如下依赖:
        <dependency>
            <groupId>org.springframework.boot</groupId>
            <artifactId>spring-boot-starter-cache</artifactId>
        </dependency>
1.7 实战
    // 如果没有设置 key 值,则方法参数默认为缓存的 key 值
    @Cacheable(value = "user")
    @Override
    public Object getById(Long id) {

        UserDO userDO1 = userDOMapper.selectByPrimaryKey(id);
        System.out.println(userDO1);

        return userDO1;
    }

    // 如果方法参数是对象,可以使用 '#' 来选择对象的那个属性值来充当 key
    @CachePut(value = "user", key = "#userDO.id")
    @Override
    public Object save(UserDO userDO) {
        userDOMapper.insertSelective(userDO);
        return userDO;
    }

    // 删除缓存中数据 key 还是方法参数值
    @CacheEvict(value = "user")
    @Override
    public Object delete(Long id) {

        return userDOMapper.deleteByPrimaryKey(id);
    }
1.8 扩展
Spring 缓存默认使用的是 ConcurrentMap 来缓存数据的,重启项目的时候可能缓存就消失了。有时我们希望缓存也可以持久化,在项目重启的时候照样可以使用原来的缓存数据。这里我们使用 redis 来持久化缓存数据。
1.8.1 整合 redis
Spring Boot 整合 redis :https://blog.csdn.net/lnview/article/details/80777144
1.8.2 配置文件
spring:
    cache:
      type: redis #设置 redis 缓存
      redis:
        time-to-live: 3600s #设置有效期 3600秒
        cache-null-values: false #value 值是否可以为 null(如果是 false,value 为 null 的时候报错)


    redis:
      host: 127.0.0.1
      database: 0
      password: 123456789
      port: 6379
      jedis:
        pool:
          max-idle: 8
          min-idle: 0
          max-active: 8
1.8.3 实战
还是用上面的实战例子,来让我们看看 redis 中存储的内容。
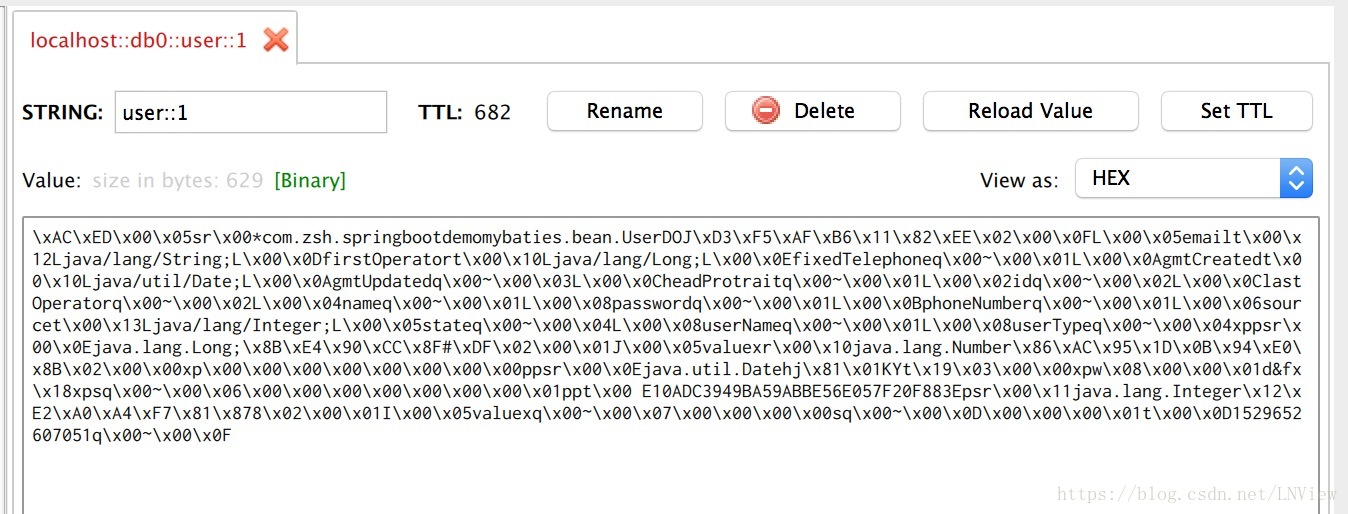
缓存的 key 会获取在方法注解上设置的 value,并自动添加 :: 符号。value 的缓存格式是默认的二进制缓存(优点是反序列化时不需要提供类型信息(class),但缺点是序列化后的结果非常庞大,是JSON格式的5倍左右)。
这时我们可以自定义序列化 redis 序列化方式。这里我们使用 alibaba 的 fastjson 序列化方式
添加依赖:
        <dependency>
            <groupId>com.alibaba</groupId>
            <artifactId>fastjson</artifactId>
            <version>1.2.32</version>
        </dependency>
自定义序列化类:
public class FastJsonRedisSerializer<T> implements RedisSerializer<T> {

    public static final Charset DEFAULT_CHARSET = Charset.forName("UTF-8");

    private Class<T> clazz;

    public FastJsonRedisSerializer(Class<T> clazz) {
        super();
        this.clazz = clazz;
    }

    @Override
    public byte[] serialize(T t) {
        if (t == null) {
            return new byte[0];
        }
        return JSON.toJSONString(t, SerializerFeature.WriteClassName).getBytes(DEFAULT_CHARSET);
    }

    @Override
    public T deserialize(byte[] bytes) {
        if (bytes == null || bytes.length <= 0) {
            return null;
        }
        String str = new String(bytes, DEFAULT_CHARSET);
        return JSON.parseObject(str, clazz);
    }

}
配置 Redis 序列化方式:
@Configuration
public class RedisConfig extends CachingConfigurerSupport {

    /**
     *  设置 redis 数据默认过期时间
     *  设置@cacheable 序列化方式
     * @return
     */
    @Bean
    public RedisCacheConfiguration redisCacheConfiguration(){
        FastJsonRedisSerializer<Object> fastJsonRedisSerializer = new FastJsonRedisSerializer<>(Object.class);
        ParserConfig.getGlobalInstance().addAccept("com.zsh.");
        RedisCacheConfiguration configuration = RedisCacheConfiguration.defaultCacheConfig();
        configuration = configuration.serializeValuesWith(RedisSerializationContext.SerializationPair.fromSerializer(fastJsonRedisSerializer)).entryTtl(Duration.ofDays(30));
        return configuration;
    }


    /**
     * 设置 redisTemplate 的序列化设置
     *
     * @param redisConnectionFactory
     * @return
     */
    @Bean
    public RedisTemplate<Object, Object> redisTemplate(RedisConnectionFactory redisConnectionFactory) {
        // 1.创建 redisTemplate 模版
        RedisTemplate<Object, Object> template = new RedisTemplate<>();
        // 2.关联 redisConnectionFactory
        template.setConnectionFactory(redisConnectionFactory);
        // 3.创建 序列化类
        FastJsonRedisSerializer fastJsonRedisSerializer = new FastJsonRedisSerializer(Object.class);
        // 全局开启AutoType,不建议使用
        // ParserConfig.getGlobalInstance().setAutoTypeSupport(true);
        // 建议使用这种方式,小范围指定白名单
        ParserConfig.getGlobalInstance().addAccept("com.zsh.");
        ObjectMapper om = new ObjectMapper();
        // 4.设置可见度
        om.setVisibility(PropertyAccessor.ALL, JsonAutoDetect.Visibility.ANY);
        // 5.启动默认的类型
        om.enableDefaultTyping(ObjectMapper.DefaultTyping.NON_FINAL);
        // 6.设置 value 的转化格式和 key 的转化格式
        template.setValueSerializer(fastJsonRedisSerializer);
        template.setKeySerializer(new StringRedisSerializer());
        template.afterPropertiesSet();
        return template;
    }

}
再来看看我们 redis 中存储的数据:
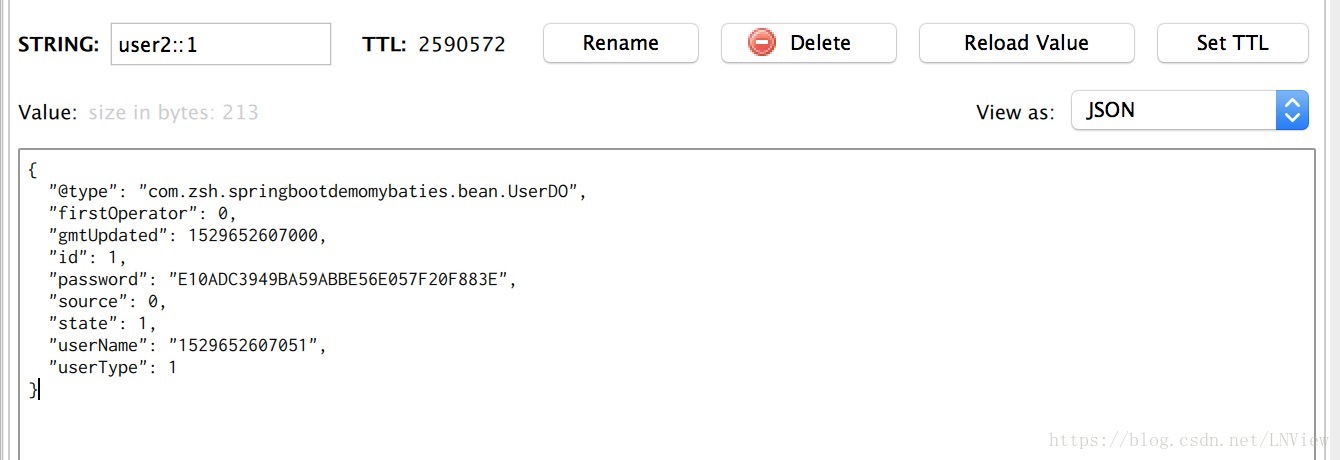
又可以直观的看出我们存储的数据了。
若博客中有错误或者说的不好,请勿介意,仅代表个人想法。
csdn博客:https://blog.csdn.net/LNView
本文地址:https://blog.csdn.net/LNView/article/details/80785099
有问题或者喜欢的欢迎评论。
转载请注明出处!!!!!!
参考资料:
《Spring Boot 实战》
https://www.jianshu.com/p/23f2c4c92093?utm_source=oschina-app