这里是一个学习过程笔记的汇总:Spring Boot学习汇总
缓存,我们应该已经很熟悉了。那么今天就来学习一下Spring Boot中怎么使用缓存。
1、说起缓存,先来了解下JSR107
首先什么是JSR?
JSR是Java Specification Requests 的缩写 ,Java规范请求,故名思议提交Java规范,大家一同遵守这个规范的话,会让大家‘沟通’起来更加轻松。
什么是JSR107?
JSR107就是如何使用缓存的规范。
JSR107都有哪些内容?
可以看一下JSR107官网
核心API:
- CachingProvider:定义了建立,配置,得到,管理和控制0个或多个CacheManager,一个应用在运行时可能访问0个或者多个CachingProvider。
-
CacheManager:它定义了建立,配置,得到,管理和控制0个或多个有着唯一名字的Cache ,一个CacheManager被包含在单一的CachingProvider。
-
Cache:Cache是一个Map类型的数据结构,用来存储基于键的数据,很多方面都像java.util.Map数据类型。一个Cache 存在在单一的CacheManager。
-
Entry:Entry是一个存在在Cache的键值对。
-
ExpiryPolicy:不是所有的数据都一直存在缓存中不改变的,为缓存的数据添加过期的策略会让你的缓存更加灵活和高效。
相应的关系可以参考下图:

2、Spring Boot的缓存机制
2.1、创建项目
参考上一篇文章,Spring Boot整合mybatis,快速创建一个Spring Boot项目(除web, mysql, mybatis之外多添加一个cache模块),如下:

创建好之后,看一下pom文件,会看到引入了cache模块:
项目结构:

2.2、完善项目结构并测试
这个项目我们不使用mapper配置文件,我们基于mapper注解的方式进行访问。
创建表user,并插入两条数据:
CREATE TABLE `user` (
  `id` bigint(20) NOT NULL AUTO_INCREMENT,
  `age` int(4) NOT NULL,
  `name` varchar(20) COLLATE utf8mb4_unicode_ci NOT NULL,
  PRIMARY KEY (`id`)
) ENGINE=InnoDB AUTO_INCREMENT=1 DEFAULT CHARSET=utf8mb4 COLLATE=utf8mb4_unicode_ci
实体类User:
package com.example.cache.domain;

import org.springframework.stereotype.Component;

import java.io.Serializable;

/**
 * @author pavel
 * @date 2018/11/19 0019
 */
@Component
public class User implements Serializable {

    private static final long serialVersionUID = -1274433079373420955L;

    private Long id;
    private Integer age;
    private String name;

    public User() {

    }

    public User(Long id, Integer age, String name) {
        this.id = id;
        this.age = age;
        this.name = name;
    }

    public Long getId() {
        return id;
    }

    public void setId(Long id) {
        this.id = id;
    }

    public Integer getAge() {
        return age;
    }

    public void setAge(Integer age) {
        this.age = age;
    }

    public String getName() {
        return name;
    }

    public void setName(String name) {
        this.name = name;
    }

    @Override
    public String toString() {
        return "User{" +
                "id=" + id +
                ", age=" + age +
                ", name='" + name + '\'' +
                '}';
    }
}
mapper接口:
package com.example.cache.mapper;

import com.example.cache.domain.User;
import org.apache.ibatis.annotations.*;

/**
 * 基于注解的mapper配置
 * @author pavel
 * @date 2018/11/19 0019
 */
@Mapper
public interface UserMapper {

    @Select("select * from user where id = #{id}")
    User getUser(Long id);

    @Update("update user set name = #{name},age = #{age} where id = #{id}")
    void updateUser(User user);

    @Delete("delete from user where id = #{id}")
    void deleteUser(Long id);

    @Insert("insert into user(age,name) values(#{age},#{name}) ")
    void insertUser(User user);


}
service:
package com.example.cache.service;

import com.example.cache.domain.User;
import com.example.cache.mapper.UserMapper;
import org.springframework.beans.factory.annotation.Autowired;
import org.springframework.cache.annotation.Cacheable;
import org.springframework.stereotype.Service;

/**
 * @author pavel
 * @date 2018/11/22 0022
 */
@Service
public class UserService {

    @Autowired
    private UserMapper userMapper;

    public User getUser(Long id) {
        System.out.println("查询" + id + "号员工");
        return userMapper.getUser(id);
    }
}
启动类上添加mapper的包扫描:
package com.example.cache;

import org.mybatis.spring.annotation.MapperScan;
import org.springframework.boot.SpringApplication;
import org.springframework.boot.autoconfigure.SpringBootApplication;

@SpringBootApplication
@MapperScan("com.example.cache.mapper")
public class SpringBootCacheApplication {

    public static void main(String[] args) {
        SpringApplication.run(SpringBootCacheApplication.class, args);
    }
}
主配置文件中的数据库连接配置:
### database ###
spring.datasource.url=jdbc:mysql://localhost:3306/springboot_test?characterEncoding=utf-8&useSSL=false&serverTimezone=GMT%2B8
spring.datasource.username=root
spring.datasource.password=yjx941001
spring.datasource.driver-class-name=com.mysql.jdbc.Driver

### 控制台打印sql ###
logging.level.com.example.cache.mapper = debug
controller:
package com.example.cache.controller;

import com.example.cache.domain.User;
import com.example.cache.service.UserService;
import org.springframework.beans.factory.annotation.Autowired;
import org.springframework.web.bind.annotation.GetMapping;
import org.springframework.web.bind.annotation.PathVariable;
import org.springframework.web.bind.annotation.RequestParam;
import org.springframework.web.bind.annotation.RestController;

/**
 * @author pavel
 * @date 2018/11/19 0019
 */
@RestController
public class UserController {

    @Autowired
    private UserService userService;

    @GetMapping("/user/{id}")
    public User getUser(@PathVariable("id") Long id) {
        User user = userService.getUser(id);
        System.out.println("查询结果: " + user);
        return user;
    }
}
启动项目,浏览器请求:http://localhost:8080/user/1

控制台:

浏览器再次请求:http://localhost:8080/user/1

可以发现"查询1号员工"字样会打印两次,说明第二次访问再次调用了查询方法,访问数据库,此时没有任何缓存机制。
2.3、加入缓存机制
修改启动类,添加@EnableCaching注解,开启缓存机制:
package com.example.cache;

import org.mybatis.spring.annotation.MapperScan;
import org.springframework.boot.SpringApplication;
import org.springframework.boot.autoconfigure.SpringBootApplication;
import org.springframework.cache.annotation.EnableCaching;

@SpringBootApplication
@EnableCaching
@MapperScan("com.example.cache.mapper")
public class SpringBootCacheApplication {
    public static void main(String[] args) {
        SpringApplication.run(SpringBootCacheApplication.class, args);
    }
}
修改service,给getUser方法加上@Cacheable注解(下面再详细介绍这个注解的作用),如下:
package com.example.cache.service;

import com.example.cache.domain.User;
import com.example.cache.mapper.UserMapper;
import org.springframework.beans.factory.annotation.Autowired;
import org.springframework.cache.annotation.Cacheable;
import org.springframework.stereotype.Service;

/**
 * @author pavel
 * @date 2018/11/22 0022
 */
@Service
public class UserService {

    @Autowired
    private UserMapper userMapper;

    @Cacheable(cacheNames = "user")
    public User getUser(Long id) {
        System.out.println("查询" + id + "号员工");
        return userMapper.getUser(id);
    }
}
重启,然后请求http://localhost:8080/user/1,控制台输出:

再次请求:

看控制台输出,第一次请求,打印出“查询1号员工”字样、查询sql以及查询结果,但第二次请求,只打印了查询结果,并没有“查询1号员工”字样以及查询sql,说明我们配置的缓存是生效的,第二次请求是直接从缓存中获取user对象。
3、工作原理及运行流程
3.1、工作原理
缓存我们引入了cache模块, 还是之前讲到过的Spring Boot自动配置原理,有一系类的xxxAutoConfiguration配置类,那么肯定会有cache相关的自动配置,即:CacheAutoConfiguration,所以我们就进去看一下。

看到会给容器导入一个CacheConfigurationImportSelector选择器,debug看一下:

这里就是导入的所有的缓存配置。但不是都生效,又兴趣的话可以每一个点进去看一下,看在什么情况下那个配置才会生效。
可以在配置文件中配置: debug=true
然后看到控制台输出中,默认是 SimpleCacheConfiguration会生效。所以我们就之间去看这个缓存配置类:

如上图,可以看出,这个配置类,就是给容器注册了一个CacheManager:ConcurrentMapCacheManager
我们再看下这个ConcurrentMapCacheManager:
![]()
实现了CacheManager接口,那么就有了关于Cache相关的操作方法,比如getCache()

我们请求http://localhost:8080/user/1,dubug运行一下看

所以说,ConcurrentMapCacheManager的作用是创建和获取ConcurrentMapCache类型的缓存组件。
我们继续看,怎么创建的Cache,如下,直接new ConcurrentMapCache();

再往下走,进到ConcurrentMapCache类,这个就是缓存组件类,

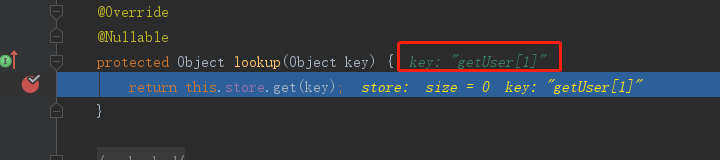
类中有两个方法,put(Object key, @Nullable Object value) 以及lookup(Object key)方法,如下:

我们可以debug看一下,重启,浏览器访问 http://localhost:8080/user/1
可见,key的值就是1,

lookup()方法返回值为null,说明缓存中没有这个对象,再往下走,就进入到了getUser()方法进行查询,然后再进到put()方法,将查询结果以key-value的方式存到缓存中,key是请求参数1,而value就是查询结果-User对象:

下面再次请求,http://localhost:8080/user/1

进入到lookup()方法,可以看到,this.store中有值,key是1,value是一个User对象,正是上一步访问后存入到缓存中的User对象,所以,再次访问就能够直接从缓存中获取到值了。
缓存的工作原理就是这个样子了,可以自己debug一步一步的看。
3.2、运行流程
@Cacheable的运行流程:
(1) 该注解时作用于方法之上的,在方法运行之前,会先去查询Cache(缓存组件),按照cacheNames/value指定的名字获取,(cacheManager先获取相应的缓存),第一次获取缓存如果没有Cache组件会自动创建。
(2) 去Cache中查找缓存的内容,使用一个key,key默认值就是方法的参数。
key是按照某种策略生成的;默认是使用keyGenerator接口的实现类SimpleKeyGenerator生成;
SimpleKeyGenerator的生成key的默认策略(debug一步一步可以看到的):
如果没有参数: key = new SimpleKey()
如果有一个参数:key = 参数的值
如果有多个参数:key = new SimpleKey(params)
(3) 没有查到缓存就调用目标方法 (也就是上面例子中的getUser()方法)
(4) 将目标方法返回的结果放到缓存中
4、@Cacheable注解详解。
注解@Cacheable的相关属性:
cacheNames/value: 指定缓存组件的名字;将结果放到哪个缓存组件中,可以用数组的形式指定多个缓存组件
key:缓存数据使用的key, 默认使用的是方法参数的值 id-方法返回值
keyGenerator: key的生成器,可以自己指定key的生成器的组件id
key/keyGenerator:二选一使用
cacheManager:指定缓存管理器, 或者指定cacheResovler指定获取解析器
condition: 指定符合条件的情况下才缓存
unless: 否定缓存,当unless指定的条件为true时,方法的返回值不回被缓存。
sync:是否使用异步模式
接下来一个一个来尝试:
cacheNames:我们在上面的例子已经使用到了,用value是一样的效果,都是给缓存组件指定一个名字。
key: 缓存数据使用的key,不设置的话默认是使用方法参数,上面已经说过了。
我们还可以自己设置key的值,利用SpEL表达式,那么缓存中可以写的SpEL如下图所示:

下面就来自己定义一个key的值,比如我想将key设置为:方法名[参数值],则如下拼接,根据上图看到,#root.methodName就是方法名,#id就是参数值:

重启项目,然后访问 http://localhost:8080/user/1
可以看到,生成的key就是我们自己设置的:方法名[参数值]
keyGenerator: 这个就是一个key生成器,自己写一个就是,如下:
package com.example.cache.config;

import org.springframework.cache.interceptor.KeyGenerator;

import java.lang.reflect.Method;
import java.util.Arrays;

/**
 * @author pavel
 * @date 2018/11/22 0022
 */
@Configuration
public class MyCacheConfig {

    @Bean("myKeyGenerator")
    public KeyGenerator keyGenerator() {
        return new KeyGenerator() {
            @Override
            public Object generate(Object target, Method method, Object... params) {
                return method.getName() + "[" + Arrays.asList(params).toString() + "]";
            }
        };
    }
}
然后在方法上指定keyGenerator:

重启项目,访问http://localhost:8080/user/1

如上图,生成的key为:getUser()[ [1] ],多一层[]是Arrays.asList()产生的。
cacheManager: 指定缓存管理器,这个后面我们使用多个缓存管理器时再讨论。
condition: 指定符合条件的情况下才缓存;比如我指定当参数id大于1的时候才缓存:condition = "#id>1",如下:

重启,然后连续两次访问:http://localhost:8080/user/1,结果如下:

可以看到,连续两次请求,获取id为1 的用户,都会调用方法发送sql语句查询,第一次的查询结果并没有被缓存,
那么再看连续两次请求获取id为2的用户,http://localhost:8080/user/2 控制台输出如下:

可见,第一次请求的结果进行的缓存。
unless: 否定缓存,当unless指定的条件为true,方法的返回值就不会被缓存。例如:unless = "#id == 2", 当参数id为2时就不进行缓存。

重启,然后连续两次请求 http://localhost:8080/user/2

控制台两次请求都调用方法并发送sql进行查询。
再连续两次请求 http://localhost:8080/user/1

只是第一次请求调用了方法并发送sql进行查询。
sync:是否使用异步模式。sync=true
看源码,默认是false,使用异步模式就不支持unless了,这个就自己试一下吧。如下:

5、@Cacheput注解
作用:修改数据库数据,并同步更新缓存。 这就避免了更新了数据库的数据(数据已加入缓存)后再次查询还是查到更新前的数据。
运行时机:
1、先调用目标方法
2、将目标方法的结果缓存起来
下面就来使用一下这个注解。给上面的UserService中增加一个updateUser方法,方法上使用@Cacheput注解,并返回修改后的User对象, 如下:
package com.example.cache.service;

import com.example.cache.domain.User;
import com.example.cache.mapper.UserMapper;
import org.springframework.beans.factory.annotation.Autowired;
import org.springframework.cache.annotation.CachePut;
import org.springframework.cache.annotation.Cacheable;
import org.springframework.stereotype.Service;

/**
 * @author pavel
 * @date 2018/11/22 0022
 */
@Service
public class UserService {

    @Autowired
    private UserMapper userMapper;

    @Cacheable(cacheNames = "user")
    public User getUser(Long id) {
        System.out.println("查询" + id + "号员工");
        return userMapper.getUser(id);
    }


    @CachePut
    public User updateUser(User user) {
        System.out.println("更新" + user.getId() + "号员工");
        userMapper.updateUser(user);
        return user;
    }
}
UserController中增加updateUser方法:
package com.example.cache.controller;

import com.example.cache.domain.User;
import com.example.cache.service.UserService;
import org.springframework.beans.factory.annotation.Autowired;
import org.springframework.web.bind.annotation.GetMapping;
import org.springframework.web.bind.annotation.PathVariable;
import org.springframework.web.bind.annotation.RestController;

/**
 * @author pavel
 * @date 2018/11/19 0019
 */
@RestController
public class UserController {

    @Autowired
    private UserService userService;

    @GetMapping("/user/{id}")
    public User getUser(@PathVariable("id") Long id) {
        User user = userService.getUser(id);
        System.out.println("查询结果: " + user);
        return user;
    }

    @GetMapping("/user")
    public User updateUser(User user) {
        User u = userService.updateUser(user);
        System.out.println("更新后结果:" + u);
        return u;
    }
}
下面我们来测试一下,先说一下测试流程:
1、查询1号用户,查到的结果会放到缓存中:http://localhost:8080/user/1
2、再次查询1号用户,还是之前的结果
3、更新1号用户,http://localhost:8080/user?id=1&name=xinanxin&age=25
4、再次查询1号用户,那么,会不会查询数据库?返回的是更新前的用户还是更新后的用户?
启动项目,按照以上测试流程逐步进行,控制台输出结果如下:

上体可以看到,步骤3确实是更新了数据库,但是步骤4再次查询时,没有发送查询sql,但是查询结果确实更新前的数据,这是 怎么回事?难道@Cacheput没起作用?
回头看一下我们UserService中的两个方法,查询和更新,我们都没有设置缓存数据的key,所以都默认以参数为key,
那么上面步骤1执行之后,缓存中:key = id value = User对象
步骤3执行之后,缓存中:key = 传入的User对象 value = 返回的User对象
这下明白了吧,我们更新操作之后,返回的更新后的数据其实是存入到了缓存中,但是存入的key同样是一个User对象而不是id。
下面将updateUser()方法做下修改,设置key值为传入User对象的id或者是返回User对象的id:
   @CachePut(cacheNames = "user", key = "#user.id")    // 或者key = "#result.id"
    public User updateUser(User user) {
        System.out.println("更新" + user.getId() + "号员工");
        userMapper.updateUser(user);
        return user;
    }
这样修改之后,查询和更新的方法,key值都是User对象的id了。
再次测试以上四个步骤,此时数据库中id为1的数据是:【name=xinanxin, age=25】,将其修改为【name=curry, age=31】
控制台输出如下:

可以看到,步骤4查询出来的就是修改后的user对象了。有兴趣的话,可以debug一步步的看一下源码,是怎么进行缓存中数据更新的。
6、@CacheEvict注解
作用:缓存清除。一般用在删除的方法上,删除数据后,进行缓存清除
相关属性:
key: 指定要清除的数据
allEntries: 默认是false,若设置为true,则清除该Cache中的所有缓存数据。
beforeInvocation: 默认是false, 代表缓存的清除是在方法调用之后进行的,如果方法出现异常,则缓存不会被清除,若设置为true,则代表缓存的清除是在方法调用之前进行的,不论该方法的执行是否会出现异常,缓存都会被清除。
这个注解,案例就不详细写了啊,可以参考上面的查询和修改,写上一个delete方法测试。
7、@Caching注解
作用:定义复杂的缓存规则。是一个组合注解,里面可以包括以上介绍的三个注解。如下:

我们同样来写一个案例,使用一下这个注解.
在UserMapper接口增加方法,getUser=ByName()
    @Select("select * from user where name = #{name}")
    User getUserByName(String name);
在UserService中增加方法,getUserByUserName():
  @Caching(
            cacheable = {
                    @Cacheable(cacheNames = "user")
            },
            put = {
                    @CachePut(cacheNames = "user", key = "#result.id"),
                    @CachePut(cacheNames = "user", key = "#result.age")
            }
    )
    public User getUserByName(String name) {
        System.out.println("通过name查找User");
        return userMapper.getUserByName(name);
    }
在这个方法上,加上了@Caching注解,里面包含了caccheable和put,cacheable给缓存中添加的数据key为name,value为User对象, put给缓存添加的数据key是 id和 age,value为User对象。
等于说,调用了这个方法之后,再根据id,age去查询,就不用查询数据库了,直接从缓存中取。
但是根据name查询,还是会发送sql进行数据库查询,因为使用了@CachePut注解,使用这个注解每次都会调用方法。
在UserController中增加getUserByUserName()
    @GetMapping("/user/find-by-name")
    public User getUserByName(@RequestParam("name") String name) {
        User user = userService.getUserByName(name);
        System.out.println("getUserByName()查询结果: " + user);
        return user;
    }
下面来测试一下,测试流程:
1、根据name访问 http://localhost:8080/user/find-by-name?name=pavel
2、根据id访问 http://localhost:8080/user/1(可以自己写个根据age访问,这里省略)
3、再根据name访问 http://localhost:8080/user/find-by-name?name=pavel
重启,然后依次执行上面步骤,控制台输出如下:

通过控制台输出可以看到,步骤1通过name查询,发送sql查询,步骤2再通过id查询(或者是自己写的通过age查询),都不会发送sql查数据库,而是直接从缓存中取的,步骤3再次通过name查询时,还是发送了sql查询,说明加上@CachePut后,每次调用都会查询数据库。
8、@CacheConfig注解
这是全局缓存配置,作用在类上面,对整个类生效。看下这个注解都有哪些内容:

可以设置缓存名称,key生成器,缓存管理器,以及缓存解析器
比如在上面讲@Caching注解的案例中,我们将缓存数据都添加到了名为user的Cache中,所以我们配置了三次 cacheNames = "user",这样很繁琐,那么可以在类上面使用@CacheConfig(cacheNames = "user") 来简化,如下:
package com.example.cache.service;

import com.example.cache.domain.User;
import com.example.cache.mapper.UserMapper;
import org.springframework.beans.factory.annotation.Autowired;
import org.springframework.cache.annotation.*;
import org.springframework.stereotype.Service;

/**
 * @author pavel
 * @date 2018/11/22 0022
 */
@Service
@CacheConfig(cacheNames = "user")
public class UserService {

    @Autowired
    private UserMapper userMapper;

    @Cacheable()
    public User getUser(Long id) {
        System.out.println("查询" + id + "号员工");
        return userMapper.getUser(id);
    }


    @CachePut(key = "#user.id")    // 或者key = "#result.id"
    public User updateUser(User user) {
        System.out.println("更新" + user.getId() + "号员工");
        userMapper.updateUser(user);
        return user;
    }

    @CacheEvict()
    public void deleteUser(Long id) {
        System.out.println("删除"+ id + "号员工");
        userMapper.deleteUser(id);
    }

    @Caching(
            cacheable = {
                    @Cacheable()
            },
            put = {
                    @CachePut(key = "#result.id"),
                    @CachePut(key = "#result.age")
            }
    )
    public User getUserByName(String name) {
        System.out.println("通过name查找User");
        return userMapper.getUserByName(name);
    }
}
这样,效果是一样的,可以自己尝试一下。
好了,我关于Spring Boot的缓存相关内容的学习就是如上这些了,以后再深入学习的再补充过来。
希望对刚研究这块的小伙伴能有一点点帮助。
