化学信息学中的模型构建
- 将分子转换为特征向量(编码)
- 描述特征向量与目标分子特性(映射)之间的关系
K最近邻(kNN,k-NearestNeighbor)
- 将数据集放置在特征空间中(学习)
- 根据k个相邻数据点的值确定新点的值(预测)
- 当k = 1时:它被归类为“红色”以及最接近的红点。
- 当k = 3时,最接近的三个点是红色2蓝色1,并以多数票被归类为“红色”。
- 当k = 5时:最接近的五个点是红色2蓝色3,并且按多数票被分类为“蓝色”。
以这种方式更改k的值会更改结果,因此k值是k最近邻方法中最重要的参数。
导入库
from rdkit import rdBase, Chem
from rdkit.Chem import AllChem, Draw, PandasTools, Descriptors

import matplotlib as mpl
import matplotlib.pyplot as plt
import seaborn as sns
import pandas as pd
import numpy as np
载入数据
df = pd.read_csv('smiles_cas_N6512.smi', sep='\t', header=None)
df.columns = ['smiles', 'CAS_NO', 'activity']
len(df)
构造MOL对象
PandasTools.AddMoleculeColumnToFrame(frame=df, smilesCol='smiles')数据预处理
df['MOL'] = df.ROMol.map(lambda x: False if x == None else True)
del_index = df[ df.MOL == False ].index
df2 = df.drop(del_index)
len(df2) # 6506
len(df2[df2.activity == 0]), len(df2[df2.activity == 1])
分子量和活性分布直方图
df2['mw'] = df2.ROMol.map(Descriptors.MolWt)
sns.violinplot(x='activity', y='mw', data=df2)
准备指纹作为输入向量
morgan_fp = []
for mol in df2.ROMol:
    fp = [i for i in AllChem.GetMorganFingerprintAsBitVect(mol, 2, 2048)]
    morgan_fp.append(fp)
morgan_fp = np.array(morgan_fp)
morgan_fp.shape # (6506, 2048)
## MACCS Keys
maccskeys = []
for mol in df2.ROMol:
    maccskey = [i for i in AllChem.GetMACCSKeysFingerprint(mol)]
    maccskeys.append(maccskey)
maccskeys = np.array(maccskeys)
maccskeys.shape # (6506, 167)

target = df2.activity
target.shape # (6506,)
使用scikit-learn建立模型
训练数据和测试数据
机器学习模型的目的是使未知数据具有良好的准确性。如果使用所拥有的所有数据构建模型,则将使用特定于该数据的信息构建模型,并且未知数据的准确性将降低。这种“ 过度拟合称为(过拟合)”。
数据集划分
from sklearn.model_selection import train_test_split
X_train, X_test, y_train, y_test = train_test_split(morgan_fp, target, random_state=0)
X_train.shape, X_test.shape, y_train.shape, y_test.shape
KNN
from sklearn.neighbors import KNeighborsClassifier
morgan_train_acc = []
morgan_test_acc = []
for i in range(1,11):
    knn = KNeighborsClassifier(n_neighbors=i)
    knn.fit(X_train, y_train)
    train_acc = knn.score(X_train, y_train)
    test_acc = knn.score(X_test, y_test)
    print('test accuracy with k={}: {:.3f}'.format(i, test_acc))
    morgan_train_acc.append(train_acc)
    morgan_test_acc.append(test_acc)
test accuracy with k=1: 0.750
test accuracy with k=2: 0.739
test accuracy with k=3: 0.783
test accuracy with k=4: 0.768
test accuracy with k=5: 0.787
test accuracy with k=6: 0.773
test accuracy with k=7: 0.779
test accuracy with k=8: 0.773
test accuracy with k=9: 0.776
test accuracy with k=10: 0.772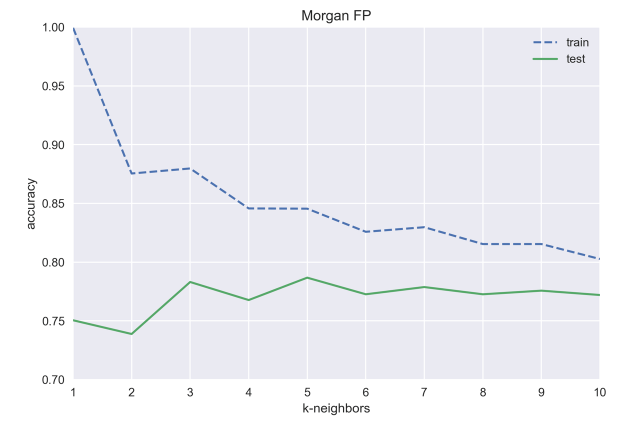
X2_train, X2_test, y2_train, y2_test = train_test_split(maccskeys, target, random_state=0)
maccs_train_acc = []
maccs_test_acc = []
for i in range(1,11):
    knn = KNeighborsClassifier(n_neighbors=i)
    knn.fit(X2_train, y2_train)
    train_acc = knn.score(X2_train, y2_train)
    test_acc = knn.score(X2_test, y2_test)
    print('test accuracy with k={}: {:.3f}'.format(i, test_acc))
    maccs_train_acc.append(train_acc)
    maccs_test_acc.append(test_acc)
test accuracy with k=1: 0.768
test accuracy with k=2: 0.763
test accuracy with k=3: 0.781
test accuracy with k=4: 0.774
test accuracy with k=5: 0.773
test accuracy with k=6: 0.774
test accuracy with k=7: 0.778
test accuracy with k=8: 0.779
test accuracy with k=9: 0.780
test accuracy with k=10: 0.778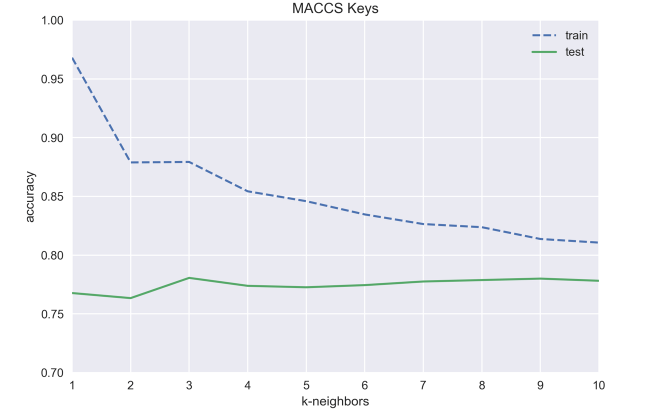
Morgan指纹和MACCS密钥经过验证,两种情况下,准确性仅为0.8。
因为k最近邻方法就像指纹
- 大量功能(数百个或更多)
- 许多功能为零(稀疏数据)
因为它不适用于此类数据。另外,随着特征数量的增加,测试集的预测变得非常缓慢。
参考资料
[1] Hansen K , Mika S , Schroeter T , et al. Benchmark Data Set for in Silico Prediction of Ames Mutagenicity[J]. Journal of Chemical Information and Modeling, 2009, 49(9):2077-2081.
