准备2台机器,3个ip
node01   192.168.1.10  #节点1
node02   192.168.1.11   #节点2
#准备一个IP,作为虚拟ip
vip      192.168.1.88
建立互通并安装软件
#关闭两台防火墙
systemctl disable firewalld
systemctl stop firewalld
#在/etc/selinux/config中把enforcing设为disable
enforcing=disable
#在node01,和node02中建立修改hosts
192.168.1.10 node01
192.168.1.11 node02
root@node01:~#ssh-keygen #一直回车
root@node01:~#ssh-copy-id node01 #建立自己互通1、输入yes 2、输入node1的密码
root@node01:~#ssh-copy-id node02 #建立node02的互通1、输入yes 2、输入node2的密码
#在node02上重复上面操作
#建立crmshyum源
root@node01:~#vi /etc/yum.repos.d/crm.repo
name=Stable High Availability/Clustering packages (CentOS_CentOS-7)
type=rpm-md
baseurl=http://download.opensuse.org/repositories/network:/ha-clustering:/Stable/CentOS_CentOS-7/
gpgcheck=1
gpgkey=http://download.opensuse.org/repositories/network:/ha-clustering:/Stable/CentOS_CentOS-7/repodata/repomd.xml.key
enabled=1
root@node01:~# yum install -y corosync pacemaker crmsh
#两台机器同样操作
至此安装完毕修改/corosync.conf
root@node01:~#vi /etc/corosync/corosync.conf
totem {
        version: 2
        crypto_cipher: none
        crypto_hash: none

        interface {
                ringnumber: 0
                bindnetaddr: 192.168.1.0
                mcastaddr: 239.255.1.1
                mcastport: 5405
                ttl: 1
        }
}

logging {

        fileline: off
        to_stderr: no
        to_logfile: yes
        logfile: /var/log/cluster/corosync.log
        to_syslog: yes
        debug: off
        timestamp: on
        logger_subsys {
                subsys: QUORUM
                debug: off
        }
}

quorum {
        provider: corosync_votequorum
        two_node: 1
}
nodelist{
        node{
                ring0_addr:192.168.1.10
                nodeid: 1
        }

        node{
                ring0_addr:192.168.1.11
                nodeid:2
        }

}
service {
        ver: 0
        name: pacemaker
}
#同步node02代码如下
root@node01:~# scp /ect/corosync/corosync.conf node02:/etc/corosync
corosync配置完毕,启动corosync
root@node01:~# systemctl start corosync
root@node01:~# systemctl enable corosync
root@node01:~# systemctl start pacemaker
root@node01:~# systemctl enable packmaker
node02同样操作
root@node02:~# systemctl start corosync
root@node02:~# systemctl enable corosync
root@node02:~# systemctl start pacemaker
root@node02:~# systemctl enable packmaker
查看一下corosync状态
root@node01:~#crm_mon
为两个节点安装httpd
root@node01:~#yum install httpd -y
root@node01:~#systemctl start httpd
root@node01:~#echo '<h1>192.168.1.10<h1>' > /etc/www/html/index.html
root@node01:~#curl 192.168.1.10
<h1>192.168.1.10</h1>
root@node02:~#yum install httpd -y
root@node02:~#systemctl start httpd
root@node02:~#echo '<h1>192.168.1.11<h1>' > /etc/www/html/index.html
root@node02:~#curl 192.168.1.11
<h1>192.168.1.11</h1>
配置站点
可在configure里面直接输入edit,可直接编辑此配置文件
root@node01:~#crm_mon 此命令可查看corosync状态
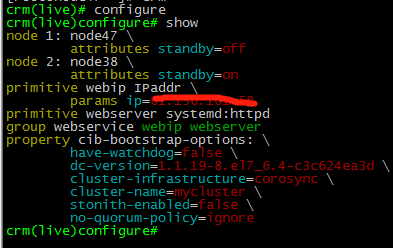
primitive webip ocf:heartbeat:IPaddr params ip=192.168.1.88#添加虚拟ip primitive webserver systemd:httpd #添加容器 group webservice webip webserver #建立一个组,把上面的两个放进去 如果需要删除上面的内容。 请先到crm(live)#node里面执行stop webserver或者webservice或者webip然后再到configure里面delete webserver或者webservice或者webip standby node02#手工设置一个掉线节点 online node02#上线一个节点 具体可以参考crm命令的使用。 你还可以用pcs进去集群管理
就写到这里吧,以后有时间再补充