Unity3D下配置Photon服务器应用并测试:
工具:Unity 5.6.4f1、Photon_v4-0-29-11263、VS2015
一、准备工作
1、安装PhotonServer服务器:https://www.photonengine.com/en-US/sdks#onpremiseserver (Photon-OnPremise-Server-SDK_v4-0-29-11263版本,下载需要帐号,自己注册)。
2、安装完成后开启测试,开启MmoDemo节点进行测试,v4版本已经默认取消default节点。
注意!注意!注意!:开启节点测试前注意关闭酷狗音乐播放器!!!(酷狗会占用Photon的端口....被坑了好久.....日志信息也不好使...爱音乐有错??(笑哭))
3、测试没问题即可。
二、创建自己的Photon应用并部署到服务器

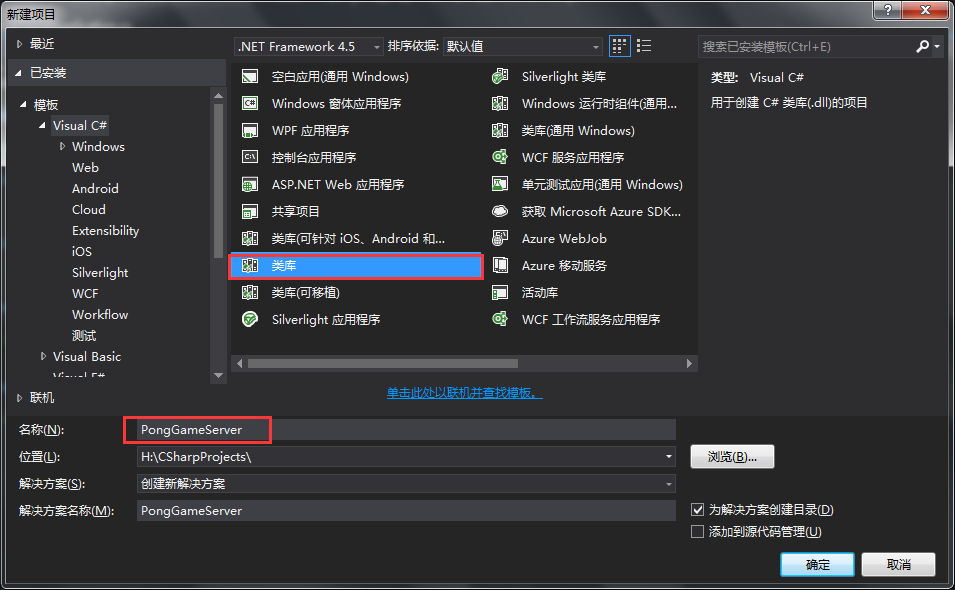
1、在VS2015中新建VS类库项目,项目名为服务器名字(我的为:PongGameServer)
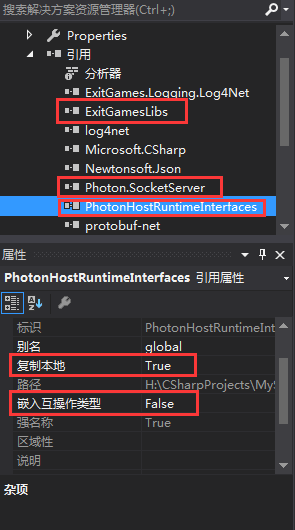
2、引入Photon的三个类库文件:在解压目录下的lib文件夹下

注意引入后文件的复制本地属性要设置为True,如果为False,则设置嵌入互操作类型为False即可更改为True
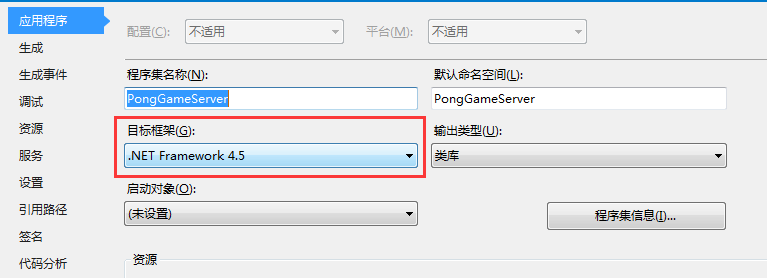
3、更改项目应用程序目标框架为.Net Framework4.5,框架版本低会报错
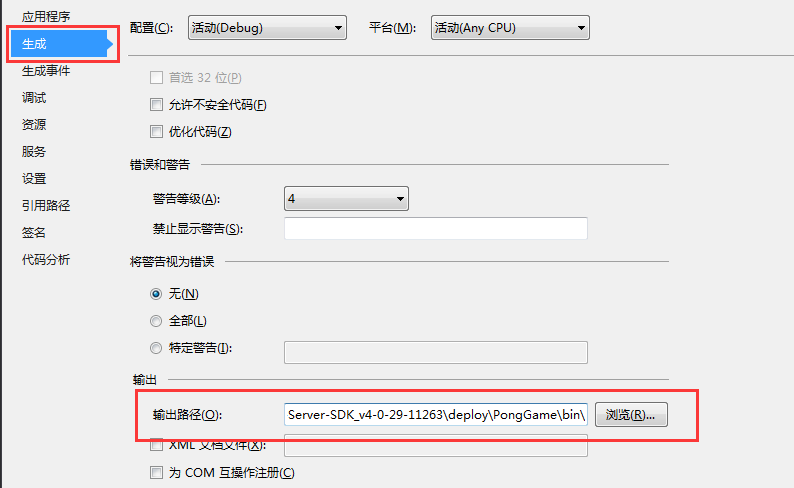
4、在Photon目录deploy文件夹下创建对应的服务器文件夹,文件夹内再创建bin文件夹,存放生成的类库文件

5、更改项目的输出路径为上一步创建的bin文件夹目录
6、生成,测试以上操作是否正确(即bin目录下是否正确生成编译后的类库文件)
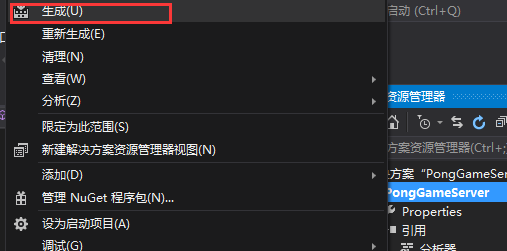
生成以下文件即可

7、PongGameServer.cs文件
 1 using Photon.SocketServer;
 2
 3 namespace PongGameServer
 4 {
 5     public class PongGameApplication : ApplicationBase  //继承接口,重写继承方法,注释不必要的异常抛出代码
 6     {
 7         protected override PeerBase CreatePeer(InitRequest initRequest)
 8         {
 9             PongGamePeer pongGamePeer = new PongGamePeer(initRequest);  //创建自己的Peer类对象并返回
10             return pongGamePeer;
11         }
12
13         protected override void Setup()
14         {
15             //throw new NotImplementedException();
16         }
17
18         protected override void TearDown()
19         {
20             //throw new NotImplementedException();
21         }
22     }
23 }
8、新建PongGamePeer类,PongGamePeer.cs文件
 1 using Photon.SocketServer;
 2 using PhotonHostRuntimeInterfaces;
 3
 4 namespace PongGameServer
 5 {
 6     //构建自己的Peer类,继承PeerBase类即可,注释不必要的异常抛出代码
 7     class PongGamePeer:PeerBase
 8     {
 9         public PongGamePeer(InitRequest initRequest) : base(initRequest)
10         {
11         }
12
13         public PongGamePeer(IRpcProtocol protocol, IPhotonPeer unmanagedPeer) : base(protocol, unmanagedPeer)
14         {
15         }
16
17         protected override void OnOperationRequest(OperationRequest operationRequest, SendParameters sendParameters)
18         {
19             //throw new NotImplementedException();
20         }
21
22         protected override void OnDisconnect(DisconnectReason reasonCode, string reasonDetail)
23         {
24             //throw new NotImplementedException();
25         }
26     }
27 }
9、打开PhotonServer.config文件,添加服务器的相关配置信息(配置文件在解压文件的对应操作平台的文件夹下,我的在bin_Win64下)
在配置文件末尾添加如下应用节点配置(每个节点的作用就不赘述了,可以查阅相关资料了解):
 1 <!-- ************自建服务器节点************ -->
 2     <MyGameServer
 3         MaxMessageSize="512000"
 4         MaxQueuedDataPerPeer="512000"
 5         PerPeerMaxReliableDataInTransit="51200"
 6         PerPeerTransmitRateLimitKBSec="256"
 7         PerPeerTransmitRatePeriodMilliseconds="200"
 8         MinimumTimeout="5000"
 9         MaximumTimeout="30000"
10         DisplayName="MyGame Server"
11         >
12
13         <!-- 0.0.0.0 opens listeners on all available IPs. Machines with multiple IPs should define the correct one here. -->
14         <!-- Port 5055 is Photon's default for UDP connections. -->
15         <UDPListeners>
16             <UDPListener
17                 IPAddress="0.0.0.0"
18                 Port="5055"
19                 OverrideApplication="PongGameServer">
20             </UDPListener>
21         </UDPListeners>
22
23         <!-- 0.0.0.0 opens listeners on all available IPs. Machines with multiple IPs should define the correct one here. -->
24         <!-- Port 4530 is Photon's default for TCP connecttions. -->
25         <!-- A Policy application is defined in case that policy requests are sent to this listener (known bug of some some flash clients) -->
26         <TCPListeners>
27             <TCPListener
28                 IPAddress="0.0.0.0"
29                 Port="4530"
30                 PolicyFile="Policy\assets\socket-policy.xml"
31                 InactivityTimeout="10000"
32                 OverrideApplication="PongGameServer"
33                 >
34             </TCPListener>
35         </TCPListeners>
36
37         <!-- Policy request listener for Unity and Flash (port 843) and Silverlight (port 943)  -->
38         <PolicyFileListeners>
39           <!-- multiple Listeners allowed for different ports -->
40           <PolicyFileListener
41             IPAddress="0.0.0.0"
42             Port="843"
43             PolicyFile="Policy\assets\socket-policy.xml"
44             InactivityTimeout="10000">
45           </PolicyFileListener>
46           <PolicyFileListener
47             IPAddress="0.0.0.0"
48             Port="943"
49             PolicyFile="Policy\assets\socket-policy-silverlight.xml"
50             InactivityTimeout="10000">
51           </PolicyFileListener>
52         </PolicyFileListeners>
53
54         <!-- WebSocket (and Flash-Fallback) compatible listener -->
55         <WebSocketListeners>
56             <WebSocketListener
57                 IPAddress="0.0.0.0"
58                 Port="9090"
59                 DisableNagle="true"
60                 InactivityTimeout="10000"
61                 OverrideApplication="PongGameServer">
62             </WebSocketListener>
63         </WebSocketListeners>
64
65         <!-- Defines the Photon Runtime Assembly to use. -->
66         <Runtime
67             Assembly="PhotonHostRuntime, Culture=neutral"
68             Type="PhotonHostRuntime.PhotonDomainManager"
69             UnhandledExceptionPolicy="Ignore">
70         </Runtime>
71
72
73         <!-- Defines which applications are loaded on start and which of them is used by default. Make sure the default application is defined. -->
74         <!-- Application-folders must be located in the same folder as the bin_win32 folders. The BaseDirectory must include a "bin" folder. -->
75         <Applications Default="PongGameServer">
76
77             <!-- PongGame Application -->
78             <Application
79                 Name="PongGameServer"
80                 BaseDirectory="PongGame"
81                 Assembly="PongGameServer"
82                 Type="PongGameServer.PongGameApplication"
83                 ForceAutoRestart="true"
84                 WatchFiles="dll;config"
85                 ExcludeFiles="log4net.config">
86             </Application>
87             <!-- CounterPublisher Application -->
88             <Application
89                 Name="CounterPublisher"
90                 BaseDirectory="CounterPublisher"
91                 Assembly="CounterPublisher"
92                 Type="Photon.CounterPublisher.Application"
93                 ForceAutoRestart="true"
94                 WatchFiles="dll;config"
95                 ExcludeFiles="log4net.config">
96             </Application>
97         </Applications>
98     </MyGameServer>
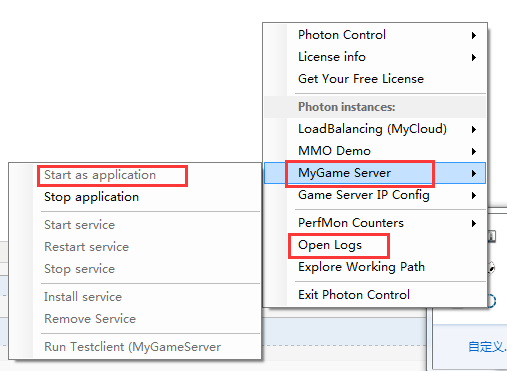
10、重新开启Photon服务器软件,然后选择检测日志信息检查配置信息是否正确(我的已经开始,所以按钮是灰色的)
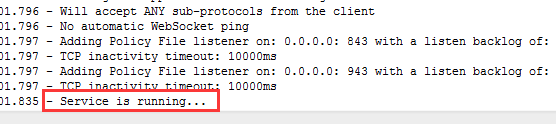
11、日志文件出现以下信息则说明服务器启动成功
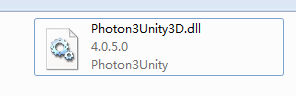
12、新建Unity项目,创建在Assets文件夹下创建Plugins文件夹,拷贝Photon-->lib-->Photon3Unity3D.dll库文件到Plugins文件夹下,unity会自动引用该文件夹下的库文件
13、创建任意游戏物体,在游戏物体上挂载GameServer.cs脚本,我们将在这个文件内处理连接服务器逻辑
14、GameServer.cs文件内容
 1 using System.Collections;
 2 using System.Collections.Generic;
 3 using UnityEngine;
 4 using ExitGames.Client.Photon;      //引入Photon库
 5
 6
 7 public class GameServer : MonoBehaviour, IPhotonPeerListener    //继承IPhotonPeerListener接口并实现接口
 8 { 9
10     public PhotonPeer peer;
11     private string Message="";
12
13     // Use this for initialization
14     void Start()
15     {
16         peer = new PhotonPeer(this,ConnectionProtocol.Udp);     //创建Peer对象
17         peer.Connect("localhost:5055","PongGameServer");        //连接服务器
18     }
19
20     // Update is called once per frame
21     void Update()
22     {
23         peer.Service();     //开启监听服务
24     }
25
26     public void DebugReturn(DebugLevel level, string message)
27     {
28         // throw new System.NotImplementedException();
29         Debug.Log("DebugReturn Message.");
30         Debug.Log(message);
31     }
32
33     public void OnEvent(EventData eventData)
34     {
35         // throw new System.NotImplementedException();
36         Debug.Log("OnEvent Message.");37
38     }
39
40     public void OnOperationResponse(OperationResponse operationResponse)
41     {
42         // throw new System.NotImplementedException();
43         Debug.Log("OnOperationResponse Message.");44
45     }
46
47     public void OnStatusChanged(StatusCode statusCode)
48     {
49         //根据服务器返回的连接状态码判断连接状态
50         switch (statusCode)
51         {
52             case StatusCode.Connect: { Debug.Log("连接服务器成功."); } break;
53             case StatusCode.Disconnect: { Debug.Log("连接服务器失败."); } break;
54             default: break;
55         }
56     }
57
58 }
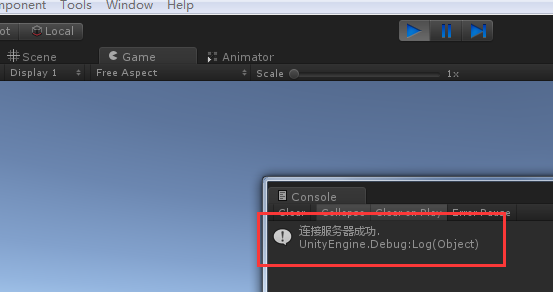
15、运行unity并查看后台log信息,出现如下信息即可
搭建测试完成!!
时间匆忙,写的不是很详细。有时间再补补......