1.Thymeleaf是什么?
Thymeleaf是一种用于Web和独立环境的现代服务器端的Java模板引擎。
Thymeleaf的主要目标是将优雅的自然模板带到开发工作流程中,并将HTML在浏览器中正确显示,并且可以作为静态原型,让开发团队能更容易地协作。Thymeleaf能够处理HTML,XML,JavaScript,CSS甚至纯文本。
Thymeleaf使用Spring框架的模块,与许多常见的工具集成在一起,并且可以插入自己的功能,是现代HTML5 JVM Web开发的理想选择,尽管Thymeleaf还有更多其它的功能。
Thymeleaf建立在自然模板的概念之上,以不影响模板作为设计原型的方式将其逻辑注入到模板文件中。 这改善了设计沟通,弥合了前端设计和开发人员之间的理解偏差。
Spring Boot提供了默认配置的模板引擎主要有以下几种:
- Thymeleaf
- FreeMarker
- Velocity
- Groovy
- Mustache
Spring Boot建议使用这些模板引擎,避免使用JSP,若一定要使用JSP将无法实现Spring Boot的多种特性,需要进行配置。
2.Thymeleaf的特点
(1)Thymeleaf 在有网络和无网络的环境下皆可运行,即它可以让美工在浏览器查看页面的静态效果,也可以让程序员在服务器查看带数据的动态页面效果。这是由于它支持 html 原型,然后在 html 标签里增加额外的属性来达到模板+数据的展示方式,这些标签属性就会在DOM(文档对象模型)上执行预先制定好的逻辑。浏览器解释 html 时会忽略未定义的标签属性,所以 thymeleaf 的模板可以静态地运行;当有数据返回到页面时,Thymeleaf 标签会动态地替换掉静态内容,使页面动态显示。
(2)Thymeleaf 开箱即用的特性。它提供标准和spring标准两种方言,可以直接套用模板实现JSTL、 OGNL表达式效果,避免每天套模板、改jstl、改标签的困扰。同时开发人员也可以扩展和创建自定义的方言。
(3)Thymeleaf 提供spring标准方言和一个与 SpringMVC 完美集成的可选模块,可以快速的实现表单绑定、属性编辑器、国际化等功能。
3.引入依赖
在Spring Boot中使用Thymeleaf,只需要引入下面依赖,并在默认的模板路径src/main/resources/templates下编写模板文件即可完成。
<dependency>
    <groupId>org.springframework.boot</groupId>
    <artifactId>spring-boot-starter-thymeleaf</artifactId>
</dependency>
非springboot项目使用如下依赖:
<dependency>
    <groupId>org.thymeleaf</groupId>
    <artifactId>thymeleaf</artifactId>
    <version>2.1.4</version>
</dependency>
4.配置Thymeleaf的视图解析器
#thymeleaf start

#使用html5标准
spring.thymeleaf.mode=HTML5

spring.thymeleaf.encoding=UTF-8


spring.thymeleaf.content-type=text/html

#开发时关闭缓存,不然没法看到实时页面
spring.thymeleaf.cache=false


#thymeleaf end
使用html5标准设置后thymeleaf对.html的内容要求很严格,实际项目中可能会有不太严格的HTML格式,建议增加下面字段:
spring.thymeleaf.mode = LEGACYHTML5
spring.thymeleaf.mode的默认值是HTML5,其实是一个很严格的检查,改为LEGACYHTML5可以得到一个可能更友好亲切的格式要求。
需要注意的是,LEGACYHTML5需要搭配一个额外的库NekoHTML才可用。
    <dependency>
           <groupId>net.sourceforge.nekohtml</groupId>
           <artifactId>nekohtml</artifactId>
           <version>1.9.22</version>
    </dependency>
5.示例——用Thymeleaf渲染一个页面
(1)Controller类
 1 @RestController
 2 public class HelloController {
 3     public EsBlogRepository esBlogRepository;
 4     @RequestMapping("/blogs")
 5     public String listBlogs(Model model){
 6         //按照文章状态查询博文列表
 7         List<EsBlog> blogList = esBlogRepository.findByBlogStatus(1);
 8         //加入属性,用来在模板中读取
 9         model.addAttribute("blogs",blogList);
10         //return 模板文件的名称,对应src/mani/resources/templates/blogs.html
11         return "blogs";
12     }
13 }
(2)html5
<!DOCTYPE html>
<html>
<head lang="en">
    <meta charset="UTF-8" />
    <title></title>
</head>
<body>
    <div class="card mb-4" th:each="blog : ${blogList}">
        <div class="card-block">
        <h2 class="card-title">
            <span>
            <a href="/u/waylau" title="waylau" th:href="'/u/' + ${blog.username}"  th:title="${blog.username}">
                      <img src="/images/avatar-defualt.jpg" th:src="${blog.avatar} == null ? '/images/avatar-defualt.jpg' : ${blog.avatar}"  class="blog-avatar-50">
            </a>
        </span>
        <a href="/u/waylau/blogs/1" class="card-link" title="waylau"
                                    th:href="'/u/' + ${blog.username} + '/blogs/'+ ${blog.blogId}"  th:title="${blog.title}" th:text="${blog.title}">
                                    OAuth 2.0 认证的原理与实践
        </a>
    </h2>
    <p class="card-text" th:text="${blog.summary}">使用 OAuth 2.0 认证的的好处是显然易见的。你只需要用同一个账号密码,就能在各个网站进行访问,而免去了在每个网站都进行注册的繁琐过程。</p>
    <div class="card-text">
           <a href="/u/waylau" th:href="'/u/' + ${blog.username}" class="card-link" th:text=${blog.username}>waylau</a> 发表于 [[${#dates.format(blog.createTime, 'yyyy-MM-dd HH:mm')}]]
                     <i class="fa fa-eye" aria-hidden="true">[[${blog.readSize}]]</i>
             <i class="fa fa-heart-o" aria-hidden="true">[[${blog.voteSize}]]</i> <i class="fa fa-comment-o"
                                                                                      aria-hidden="true">[[${blog.commentSize}]]</i>
        </div>
    </div>
    </div>
</body>
</html>
如上页面,直接打开blogs页面只显示《OAuth 2.0 认证的原理与实践》一篇文章,但当启动程序后,访问http://localHost:8080/(可以自定义),则是显示Contller种blogList中所有的内容。
6.基础语法,参考:链接
(1)创建html
需要在html中添加:
<html xmlns:th="http://www.thymeleaf.org">
这样,下文才能正确使用th:*形式的标签
xmlns 属性可以在文档中定义一个或多个可供选择的命名空间。该属性可以放置在文档内任何元素的开始标签中。该属性的值类似于 URL,它定义了一个命名空间,浏览器会将此命名空间用于该属性所在元素内的所有内容。
(2)获取变量值${...}
<p th:text="'Hello!, ' + ${name} + '!'">吃了吗?</p>
(3)选择变量表达式*{...}
<div th:object="${session.user}">
    <p>Name: <span th:text="*{firstName}">Sebastian</span>.</p>
    <p>Surname: <span th:text="*{lastName}">Pepper</span>.</p>
    <p>Nationality: <span th:text={nationality}">Saturn</span>.</p>
</div>
等价于
<div>
    <p>Name: <span th:text="${session.user.firstName}">Sebastian</span>.</p>
    <p>Surname: <span th:text="${session.user.lastName}">Pepper</span>.</p>
    <p>Nationality: <span th:text="${session.user.nationality}">Saturn</span>.</p>
</div>
p里面的原有的值只是为了给前端开发时做展示用的.这样的话很好的做到了前后端分离。
这也是Thymeleaf非常好的一个特性:在无网络的情况下也能运行,也就是完全可以前端先写出页面,模拟数据展现效果,后端人员再拿此模板修改即可。
(4)链接表达式: @{…}
用来配合link、src、href使用的语法,类似的标签有: th:href 和 th:src
<!-- Will produce 'http://localhost:8080/gtvg/order/details?orderId=3' (plus rewriting) -->

<a href="details.html" th:href="@{http://localhost:8080/gtvg/order/details(orderId=${o.id})}">view</a>
<!-- Will produce '/gtvg/order/details?orderId=3' (plus rewriting) -->

<a href="details.html" th:href="@{/order/details(orderId=${o.id})}">view</a>

<a href="details.html" th:href="@{order/{orderId}/details(orderId=${o.id})}">Content路径,默认访问static下的order文件夹</a>
(5)文本替换
<span th:text="'Welcome to our application, ' + ${user.name} + '!'">

<!-只能包含表达式变量,而不能有条件判断等->

<span th:text="|Welcome to our application, ${user.name}!|">
(6)运算符
数学运算
- 二元操作:+, - , * , / , %
- 一元操作: - (负)
逻辑运算
- 一元 : and or
- 二元 : !,not
比较运算(为避免转义尴尬,可以使用括号中的英文进行比较运算!)
- 比较:> , < , >= , <= ( gt , lt , ge , le )
- 等于:== , != ( eq , ne )
条件运算
- If-then: (if) ? (then)
- If-then-else: (if) ? (then) : (else)
- Default: (value) ?: (defaultvalue)
'User is of type ' + (${user.isAdmin()} ? 'Administrator' : (${user.type} ?: 'Unknown'))
(7)条件
if/unless
使用 th:if 和 th:unless 属性进行条件判断,th:unless 与 th:if 恰好相反,只有表达式中的条件不成立,才会显示其内容。
<a th:href="@{/login}" th:unless=${session.user != null}>Login</a>
switch
<div th:switch="${user.role}">
  <p th:case="'admin'">User is an administrator</p>
  <p th:case="#{roles.manager}">User is a manager</p>
  <p th:case="*">User is some other thing</p>
</div>
(8)循环
通过th:each,示例中有使用到。
7.常用标签
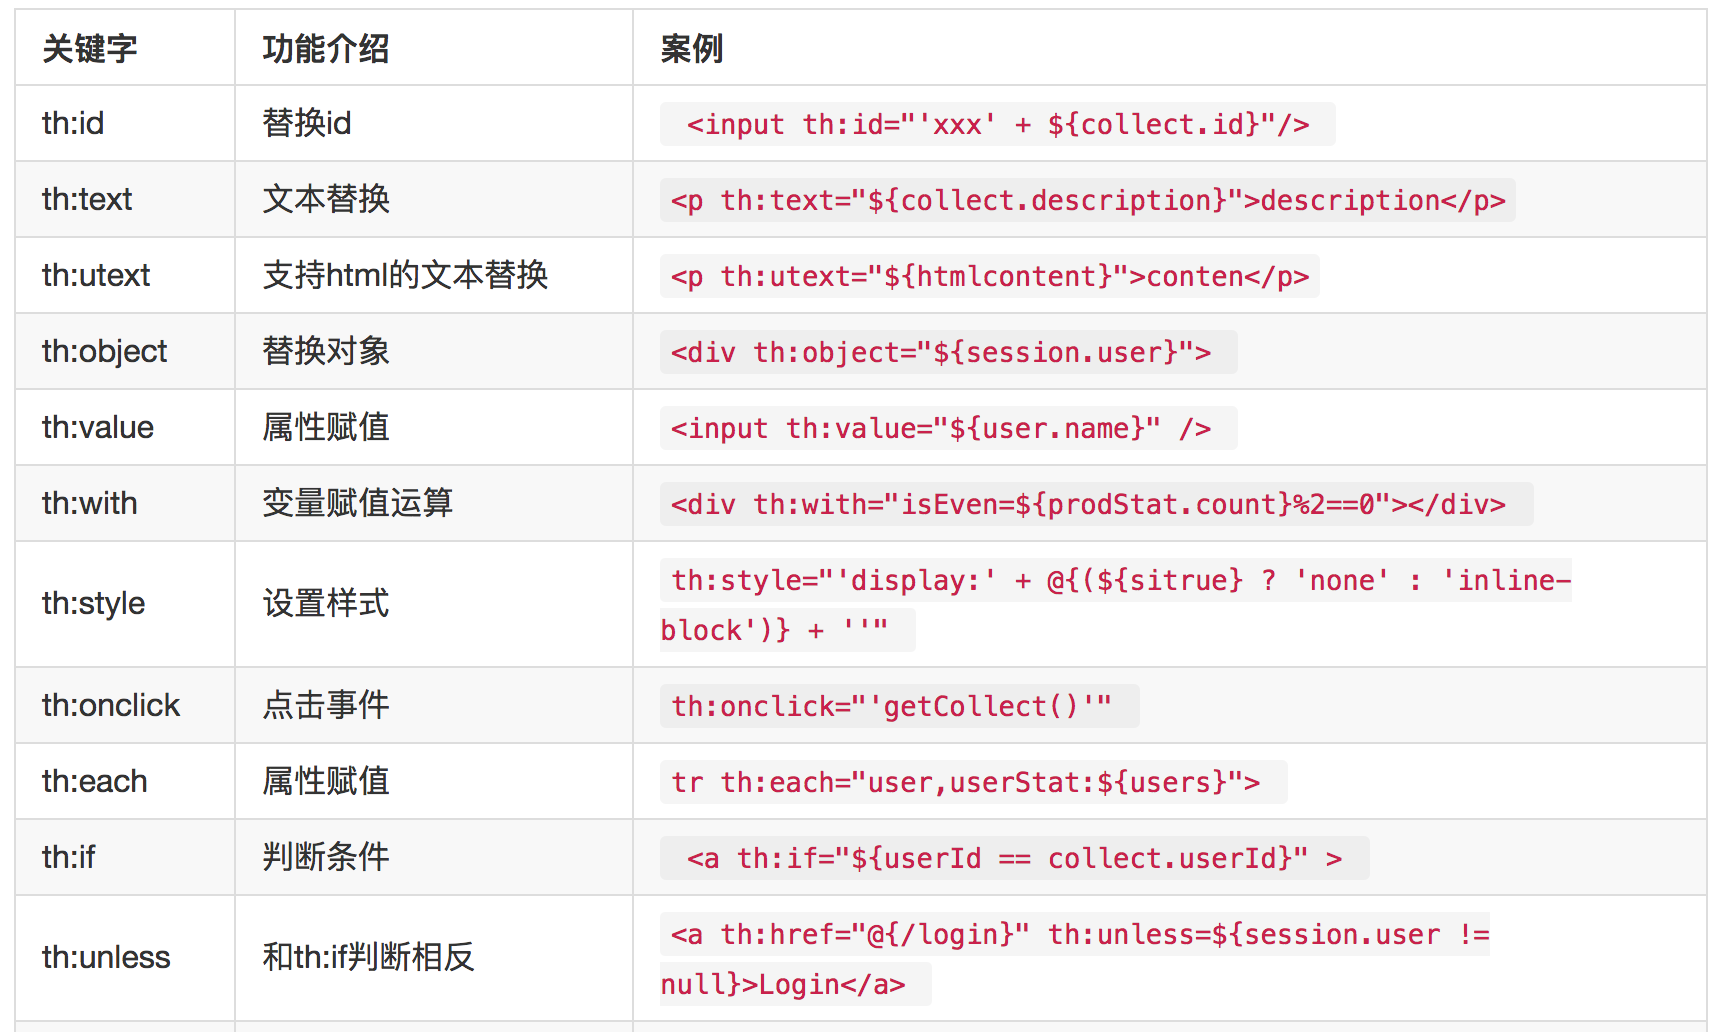
// 类似于th:object和th:field等进行表单参数绑定还是很有用的!使用与注意事项,参见:这里
参考文章:
2019-06-07