模板引擎
JSP、Velocity、Freemarker、Thymeleaf

1、引入thymeleaf;
		<dependency>
			<groupId>org.springframework.boot</groupId>
			<artifactId>spring-boot-starter-thymeleaf</artifactId>
          	2.1.6
		</dependency>
切换thymeleaf版本
<properties>
		<thymeleaf.version>3.0.9.RELEASE</thymeleaf.version>
		<!-- 布局功能的支持程序  thymeleaf3主程序  layout2以上版本 -->
		<!-- thymeleaf2   layout1-->
		<thymeleaf-layout-dialect.version>2.2.2</thymeleaf-layout-dialect.version>
  </properties>
2、Thymeleaf使用

只要我们把HTML页面放在classpath:/templates/,thymeleaf就能自动渲染;
使用:
1、导入thymeleaf的名称空间
![]()
2、使用thymeleaf语法;

3、语法规则
1)、th:text;改变当前元素里面的文本内容;
th:任意html属性;来替换原生属性的值

2)、表达式?


HelloController.java
package com.dym.controller;

import org.springframework.stereotype.Controller;
import org.springframework.web.bind.annotation.RequestMapping;
import org.springframework.web.bind.annotation.RequestParam;
import org.springframework.web.bind.annotation.ResponseBody;

import java.util.Arrays;
import java.util.Map;

@Controller
public class HelloController {

    @ResponseBody
    @RequestMapping("/hello")
    public  String hello(){
        return "Hello World";
    }

    //查出用户数据,在页面展示
    @RequestMapping("/success")
    public String success(Map<String,Object> map){
        map.put("hello","<h1>你好</h1>");
        map.put("users",Arrays.asList("zhangsan","lisi","wangwu"));
        return "success";
    }

}
success.html
<!DOCTYPE html>
<html lang="en" xmlns:th="http://www.thymeleaf.org">
<head>
<meta charset="UTF-8">
<title>Title</title>
</head>
<body>
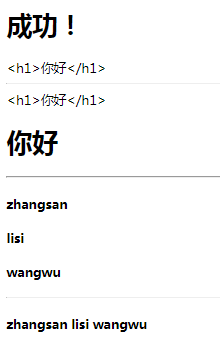
<h1>成功!</h1>
<!--th:text 将div里面的文本内容设置为 -->
<div id="div01" class="myDiv" th:id="${hello}" th:class="${hello}" th:text="${hello}">这是显示欢迎信息</div>
<hr/>
<div th:text="${hello}"></div>
<div th:utext="${hello}"></div>
<hr/>
<!-- th:each每次遍历都会生成当前这个标签: 3个h4 -->
<h4 th:text="${user}" th:each="user:${users}"></h4>
<hr/>
<h4>
<span th:each="user:${users}"> [[${user}]] </span>
</h4>
</body>
</html>