Thymeleaf入门
主要介绍什么是Thymeleaf以及Spring Boot如何集成使用Thymeleaf模板,最后介绍Spring Boot支持的Thymeleaf的一些常用的配置参数。
Thymeleaf简介
Thymeleaf是一款非常优秀的服务器端页面模板引擎,适用于Web和独立环境,具有丰富的标签语言和函数,能够处理HTML、XML、JavaScript甚至文本。
Thymeleaf相较于其他模板引擎更加优雅。它强调自然模板化(允许模板成为工作原型,而Velocity、FreeMarker模板不允许这样做),所以它的语法更干净,更符合当前Web开发的趋势。
1. Thymeleaf的实现机制
模板的诞生是为了将显示与数据分离,模板技术多种多样,本质是将模板文件和数据通过模板引擎生成最终的HTML代码。
Thymeleaf亦是如此。Thymeleaf将其逻辑注入模板控件中,而不会影响模板设计原型,所以可以在浏览器中正确显示HTML页面和数据,也可以在无后台时静态显示。由于Thymeleaf模板后缀为.html,可以直接在浏览器中打开,预览非常方便。这样改善了设计人员与开发人员的沟通,弥合了设计人员和开发团队之间的差距,从而可以在开发团队中实现更强大的协作。
2. Thymeleaf的优点
Thymeleaf与Velocity、FreeMarker等模板引擎类似,可以完全替代JSP。与其他的模板引擎相比,Thymeleaf具有如下优点:
1)动静结合:Thymeleaf页面采用模板+数据的展示方式,既可以展示静态页面,也可以展示数据返回到页面后的动态效果。这是因为Thymeleaf支持HTML原型,可以在HTML原型上添加额外的属性,浏览器在解释HTML时会忽视未定义的属性,当定义的属性带数据时就会动态替换静态内容,实现页面动态展示。
2)开箱即用:Thymeleaf提供标准方言和Spring方言,可以直接套用模板实现JSTL、OGNL表达式效果,避免套模板、改JSTL、改标签的困扰。同时,开发人员也可以扩展和创建自定义的方言。
3)多方言支持:Thymeleaf提供spring标准方言和一个与Spring MVC完美集成的可选模块,可以快速地实现表单绑定、属性编辑器、国际化等功能。
4)与Spring Boot完美整合:Spring Boot提供了Thymeleaf的默认配置,并且为Thymeleaf设置了视图解析器,可以像操作JSP一样来操作Thymeleaf。代码几乎没有任何区别,仅在模板语法上有所区别。
Spring Boot官方推荐使用Thymeleaf作为前端页面模板,Spring Boot 2.0中默认使用Thymeleaf 3.0。同时Spring Boot也为Thymeleaf提供了spring-boot-starter-thymeleaf组件(集成了Thymeleaf模板引擎),还支持Thymeleaf自动装配,可以开箱即用。
Spring Boot使用Thymeleaf
Spring Boot对Thymeleaf提供了非常完整的支持,使得我们使用Thymeleaf非常简单,只需要引入spring-boot-starter-thymeleaf依赖库即可。下面通过一个简单的例子来演示Spring Boot是如何集成Thymeleaf的。
步骤01 添加Thymeleaf依赖。
修改项目的pom.xml文件,添加spring-boot-starter-thymeleaf依赖配置:
<dependency>
    <groupId>org.springframework.boot</groupId>
    <artifactId>spring-boot-starter-thymeleaf</artifactId>
</dependency>
在上面的示例中,在Spring Boot项目中除了需要引入spring-boot-starter-thymeleaf依赖库外,还需要引入spring-boot-starter-web和spring-boot-starter等组件。
步骤02 配置Thymeleaf参数。
如果需要对默认的Thymeleaf配置参数进行自定义,可直接在application.properties中配置修改:
#是否开启缓存,开发时可以设置为false,默认为true
spring.thymeleaf.cache=false
#模板文件位置
spring.thymeleaf.prefix=classpath:/templates/
# Content-Type配置
spring.thymeleaf.servlet.content-type=text/html
# 板文件后缀
spring.thymeleaf.suffix=.html
在上面的示例中,主要是配置Thymeleaf模板页面的存放位置。当然,也可以通过application.properties灵活地配置Thymeleaf的其他各项特性。其中,spring.thymeleaf.cache=false用于关闭Thymeleaf的缓存,不然在开发过程中修改页面不会生效,需要重启,生产环境可配置为true。
步骤03 创建Thymeleaf页面。
Thymeleaf模板后缀为.html,在resource\templates模板存放目录下创建hello.html页面,示例代码如下:
<!DOCTYPE html>
<html lang="en" xmlns:th="http://www.thymeleaf.org">
<head lang="en">
    <meta charset="UTF-8">
    <title>Title</title>
</head>
<body>
Thymeleaf模板引擎
<h1 th:text="${name}">Hello Thymeleaf</h1>
</body>
</html>
在上面的示例中,我们创建了hello.html页面。此页面可直接双击来运行,页面会显示出“Hello Thymeleaf”。
步骤04 创建后台控制器(Controller)。
在Controller目录中创建HelloController控制器并实现测试方法,示例代码如下:
@Controller
public class HelloController {


    @RequestMapping("/hello")
    public String hello(ModelMap map) {


        map.addAttribute("name","Hello Thymeleaf From Spring Boot");
        return "hello";
    }
}
在上面的示例中,使用@Controller注解返回页面和数据。返回具体的hello.html页面,需要与前端HTML的路径保持一致,同时返回数据name=Hello Thymeleaf。
步骤05 运行验证。
至此,准备工作已经完成。启动项目后,在浏览器中输入网址http://localhost:8080/hello,验证Thymeleaf配置是否成功,如图所示。
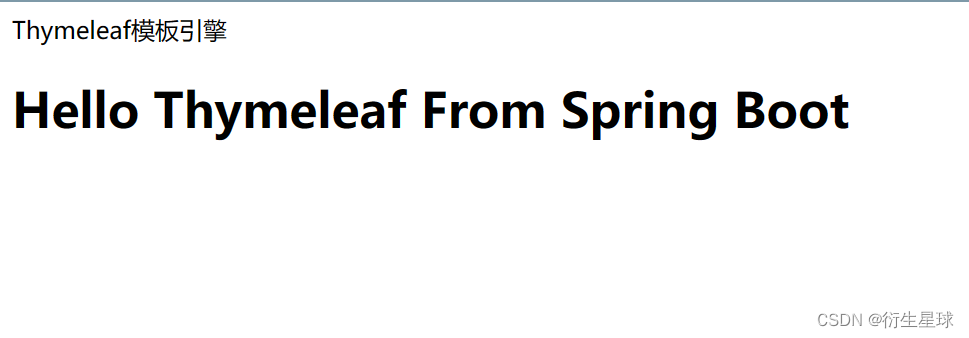
由图可知,成功返回hello.html页面,并且通过th:text="${name}"标签,页面的默认值已经成功地被后端传入的内容所替换。说明Thymeleaf已经成功整合到我们的Spring Boot项目中。
Thymeleaf使用非常简单,标签与Html基类似。但是,在使用Thymeleaf时还需要注意以下几个问题:
1)Thymeleaf模板页面必须在HTML标签中声明xmlns:th="http://www.thymeleaf.org/,表明页面使用的是Thymeleaf的语法,否则Thymeleaf的自定义标签没有提示。
2)在application.properties文件中配置的模板路径为classpath:/templates/,模板的存放路径在resource/templates目录下。
3)Spring Boot默认存放模板页面的路径在src/main/resources/templates或者src/main/view/templates,无论使用什么模板语言都一样,当然默认路径是可以自定义的,不过一般不推荐这样做。
4)Thymeleaf默认的页面文件后缀是.html,也可以改成其他后缀。
Thymeleaf常用的配置参数
Thymeleaf提供了很多可自定义的配置参数,只是这些Spring Boot都已经默认配置,如果需要自定义修改这些配置,可以通过application.properties配置文件灵活地配置Thymeleaf的各项特性。以下为Thymeleaf的配置和默认参数:
#THYMELEAF (ThymeleafAutoConfiguration)
#开启模板缓存(默认值: true )
spring.thymeleaf.cache=true
#检查模板是否存在,然后呈现
spring.thymeleaf.check-template=true
#检查模板位置是否正确(默认值:true )
spring.thymeleaf.check-template-location=true
#Content-Type的值(默认值: text/html)
spring.thymeleaf.content-type=text/html
#开启MVC Thymeleaf视图解析(默认值: true)
spring.thymeleaf.enabled=true
#模板编码
spring.thymeleaf.encoding=UTF-8
#要被排除在解析之外的视图名称列表,用逗号分隔
spring.thymeleaf.excluded-view-names=
#定义模板的模式(默认值: HTML5)
spring.thymeleaf.mode=HTML5
# 在构建URL时添加到视图名称前的前缀 (默认值: cLasspath:/templates/)
spring.thymeleaf.prefix=classpath:/templates/
# 在构建URL时添加到视图名称后的后缀(默认值: .html )
spring.thymeleaf.suffix=.html
# Thvmeleaf模板解析器在解析器链中的顺序,默认情况下,它排在第一位,顺序从1开始,只有在定义了额外的TempLateResolver Bean时才需要设置这个属性
spring.thymeleaf.template-resolver-order=
#可解析的视图名称列表,用逗号分隔
spring.thymeleaf.view-names=
上面的Thymeleaf的属性配置看起来很多,其实常用的就是之前介绍的配置项。其他的配置项在实际项目中可以根据实际使用情况来修改。