版权声明:本文为博主原创文章,未经博主允许不得转载。 https://blog.csdn.net/u010277446/article/details/88824932
一、概述
RabbitMQ是实现了高级消息队列协议(AMQP)的开源消息代理软件(亦称面向消息的中间件)。RabbitMQ服务器是用Erlang语言编写的,而集群和故障转移是构建在开放电信平台框架上的。所有主要的编程语言均有与代理接口通讯的客户端库。
二、环境准备
- spring boot项目工程
- RabbitMQ服务器中间件
RabbitMQ中间件的安装与配置可移步另一博文:RabbitMQ安装(debian)与配置
三、项目整合与实现
1.集成
- maven导入rabbitMQ
<!-- https://mvnrepository.com/artifact/org.springframework.boot/spring-boot-starter-amqp -->
<dependency>
	<groupId>org.springframework.boot</groupId>
	<artifactId>spring-boot-starter-amqp</artifactId>
	<version>2.1.3.RELEASE</version>
</dependency>
- application.propertie增加MQ配置信息
#rabbitmqt配置
spring.rabbitmq.host=23.xxx.xxx.xx
spring.rabbitmq.port=5672
spring.rabbitmq.username=admin
spring.rabbitmq.password=123456
spring.rabbitmq.publisher-confirms=true
spring.rabbitmq.virtual-host=/
- 创建配置类RabbitConfig
交换机、消息队列与路由的绑定关系都定义在此类
package com.mcrazy.apios.config;


import org.slf4j.Logger;
import org.slf4j.LoggerFactory;
import org.springframework.amqp.core.*;
import org.springframework.beans.factory.annotation.Value;
import org.springframework.context.annotation.Bean;
import org.springframework.context.annotation.Configuration;

@Configuration
public class RabbitConfig {
    private final Logger logger = LoggerFactory.getLogger(this.getClass());

    @Value("${spring.rabbitmq.host}")
    private String host;

    @Value("${spring.rabbitmq.port}")
    private int port;

    @Value("${spring.rabbitmq.username}")
    private String username;

    @Value("${spring.rabbitmq.password}")
    private String password;

    // 交换机
    public static final String EXCHANGE_A = "exchange_topic_a";
    public static final String EXCHANGE_B = "exchange_topic_b";

    // 消息队列
    public static final String QUEUE_TOPIC_A = "topic.message";
    public static final String QUEUE_TOPIC_B = "topic.messages";

    // 路由(topic规则)
    public static final String ROUTINGKEY_TOPIC_A = "topic.message"; //精确匹配
    public static final String ROUTINGKEY_TOPIC_B = "topic.#"; //通配匹配

    /**
     * 设置交换机类型
     FanoutExchange: 广播,将消息分发到所有的绑定队列
     HeadersExchange :通过添加键值对key-value匹配
     DirectExchange:按照路由Routingkey分发指定队列
     TopicExchange:topic主题模式,多关键字匹配
     */
    @Bean
    public TopicExchange exchange() {
        return new TopicExchange(EXCHANGE_A);
    }

    /**
     * 获取队列A
     * @return
     */
    @Bean
    public Queue queueMessage() {
        return new Queue(QUEUE_TOPIC_A, true); //true,队列持久
    }

	/**
     * 获取队列B
     * @return
     */
    @Bean
    public Queue queueMessages() {
        return new Queue(QUEUE_TOPIC_B, true); //true,队列持久
    }

    /**
     * 消息队列A(topic.messge)绑定到交换机上, 路由规则是topic.message
     * 一个交换机可以绑定多个消息队列,消息通过一个交换机,可以分发到不同的队列当中去。
     * @return
     */
    @Bean
    Binding bindingExchangeMessage(Queue queueMessage, TopicExchange exchange) {
        return BindingBuilder.bind(queueMessage).to(exchange).with(ROUTINGKEY_TOPIC_A);
    }

    /**
     * 消息队列B(topic.messges)绑定到交换机上, 路由规则是topic.#
     * 一个交换机可以绑定多个消息队列,消息通过一个交换机,可以分发到不同的队列当中去。
     * @return
     */
    @Bean
    Binding bindingExchangeMessages(Queue queueMessages, TopicExchange exchange) {
        return BindingBuilder.bind(queueMessages).to(exchange).with(ROUTINGKEY_TOPIC_B);
    }
}
2.生产者示例
创建生产者发布消息类:MQProducer.java。此处为了直观测试TopicExchange模式的精确匹配和通配模式,写了两个发布方法sendMsg、sendMsg2
package com.mcrazy.apios.controller.amqp;


import com.mcrazy.apios.config.RabbitConfig;
import com.mcrazy.apios.model.amqp.BaseMsgModel;
import org.slf4j.Logger;
import org.slf4j.LoggerFactory;
import org.springframework.amqp.core.AmqpTemplate;
import org.springframework.beans.factory.annotation.Autowired;
import org.springframework.stereotype.Component;


/**
 * 消息生产者
 * @author: chao
 * @time: 2019.3.11
 */
@Component
public class MQProducer {
    private final Logger logger = LoggerFactory.getLogger(this.getClass());

    @Autowired
    private AmqpTemplate amqpTemplate;

    /**
     * 发布topic.message匹配的消息
     * @param content
     */
    public void sendMsg(String content) {
        //把消息放入路由ROUTINGKEY_TOPIC_A(topic.message)对应的队列当中去,对应的是队列A
        BaseMsgModel baseMsgModel = new BaseMsgModel();
        baseMsgModel.setContent(content);
        baseMsgModel.setExchange(RabbitConfig.EXCHANGE_A);
        baseMsgModel.setRoutingkey("topic.message");
        try {
            this.amqpTemplate.convertAndSend(RabbitConfig.EXCHANGE_A, "topic.message", baseMsgModel);
        } catch (Exception e) {
            logger.info("发送消息列队失败");
        }
    }

    /**
     * 发布topic.#匹配的消息
     * @param content
     */
    public void sendMsg2(String content) {
        //把消息放入路由ROUTINGKEY_TOPIC_B(topic.#)才能匹配对应的队列当中去,对应的是队列A
        BaseMsgModel baseMsgModel = new BaseMsgModel();
        baseMsgModel.setContent(content);
        baseMsgModel.setExchange(RabbitConfig.EXCHANGE_A);
        baseMsgModel.setRoutingkey("topic.messages");
        try {
            this.amqpTemplate.convertAndSend(RabbitConfig.EXCHANGE_A, "topic.messages", baseMsgModel);
        } catch (Exception e) {
            logger.info("发送消息列队失败");
        }
    }
}
3.消费者示例(多消费者)
- 消费者A(订阅消息队列A,精确匹配的topic.message)
package com.mcrazy.apios.controller.amqp;

import com.mcrazy.apios.config.RabbitConfig;
import com.mcrazy.apios.model.amqp.BaseMsgModel;
import org.springframework.amqp.rabbit.annotation.RabbitHandler;
import org.springframework.amqp.rabbit.annotation.RabbitListener;
import org.springframework.stereotype.Component;

/**
 * 消息消费者A
 * @author: chao
 * @time: 2019.3.11
 */
@Component
@RabbitListener(queues = RabbitConfig.QUEUE_TOPIC_A)
public class MQReceiverA {
//    private final Logger logger = LoggerFactory.getLogger(this.getClass());

    @RabbitHandler
    public void process(BaseMsgModel msg) {
        System.out.println("接收处理队列A当中的消息: " + msg.toString());
    }
}
- 消费者B(订阅消息队列B,通配匹配的topic.#)
package com.mcrazy.apios.controller.amqp;

import com.mcrazy.apios.config.RabbitConfig;
import com.mcrazy.apios.model.amqp.BaseMsgModel;
import org.springframework.amqp.rabbit.annotation.RabbitHandler;
import org.springframework.amqp.rabbit.annotation.RabbitListener;
import org.springframework.stereotype.Component;

/**
 * 消息消费者B
 * @author: chao
 * @time: 2019.3.11
 */
@Component
@RabbitListener(queues = RabbitConfig.QUEUE_TOPIC_B)
public class MQReceiverB {
//    private final Logger logger = LoggerFactory.getLogger(this.getClass());

    @RabbitHandler
    public void process(BaseMsgModel msg) {
        System.out.println("接收处理队列B当中的消息: " + msg.toString());
    }
}
4.测试
提供两个接口调用,分别调用发送消息方法,发布不同topic查看效果
- 请求控制器
package com.mcrazy.apios.controller.amqp;

import com.mcrazy.apios.model.UserInfo;
import com.mcrazy.apios.service.UserInfoService;
import com.mcrazy.apios.util.httpresponse.HttpExceptionHandle;
import com.mcrazy.apios.util.httpresponse.Result;
import com.mcrazy.apios.util.httpresponse.ResultCodeEnum;
import com.mcrazy.apios.util.httpresponse.ResultUtil;
import org.springframework.beans.factory.annotation.Autowired;
import org.springframework.stereotype.Controller;
import org.springframework.web.bind.annotation.RequestMapping;
import org.springframework.web.bind.annotation.RequestMethod;
import org.springframework.web.bind.annotation.RequestParam;
import org.springframework.web.bind.annotation.RestController;

import javax.servlet.http.HttpServletRequest;
import javax.servlet.http.HttpServletResponse;

/**
* 消息队列发布控制器
* @author: chao
* @time: 2019.3.11
*/
@Controller
@RestController
@RequestMapping(value = "/amqp")
public class MQProducerController {
   @Autowired
   private HttpExceptionHandle httpExceptionHandle;

   @Autowired
   private MQProducer mqProducer;

   /**
    * @api: /apios/amqp/produce/
    * @method: POST
    * @desc: 发布消息队列
    */
   @RequestMapping(value = "/produce", method = RequestMethod.POST)
   public Result prodeceMsg(
           @RequestParam(required = true) String content
   ){

       Result result = null;
       try {
           mqProducer.sendMsg(content);
           result = ResultUtil.success();
       } catch (Exception e) {
           result = httpExceptionHandle.exceptionGet(e);
       }
       return  result;
   }

   /**
    * @api: /apios/amqp/produce2/
    * @method: POST
    * @desc: 发布消息队列
    */
   @RequestMapping(value = "/produce2", method = RequestMethod.POST)
   public Result prodeceMsg2(
           @RequestParam(required = true) String content
   ){

       Result result = null;
       try {
           mqProducer.sendMsg2(content);
           result = ResultUtil.success();
       } catch (Exception e) {
           result = httpExceptionHandle.exceptionGet(e);
       }
       return  result;
   }
}
- 发布topic.message规则消息时,消费者处理效果
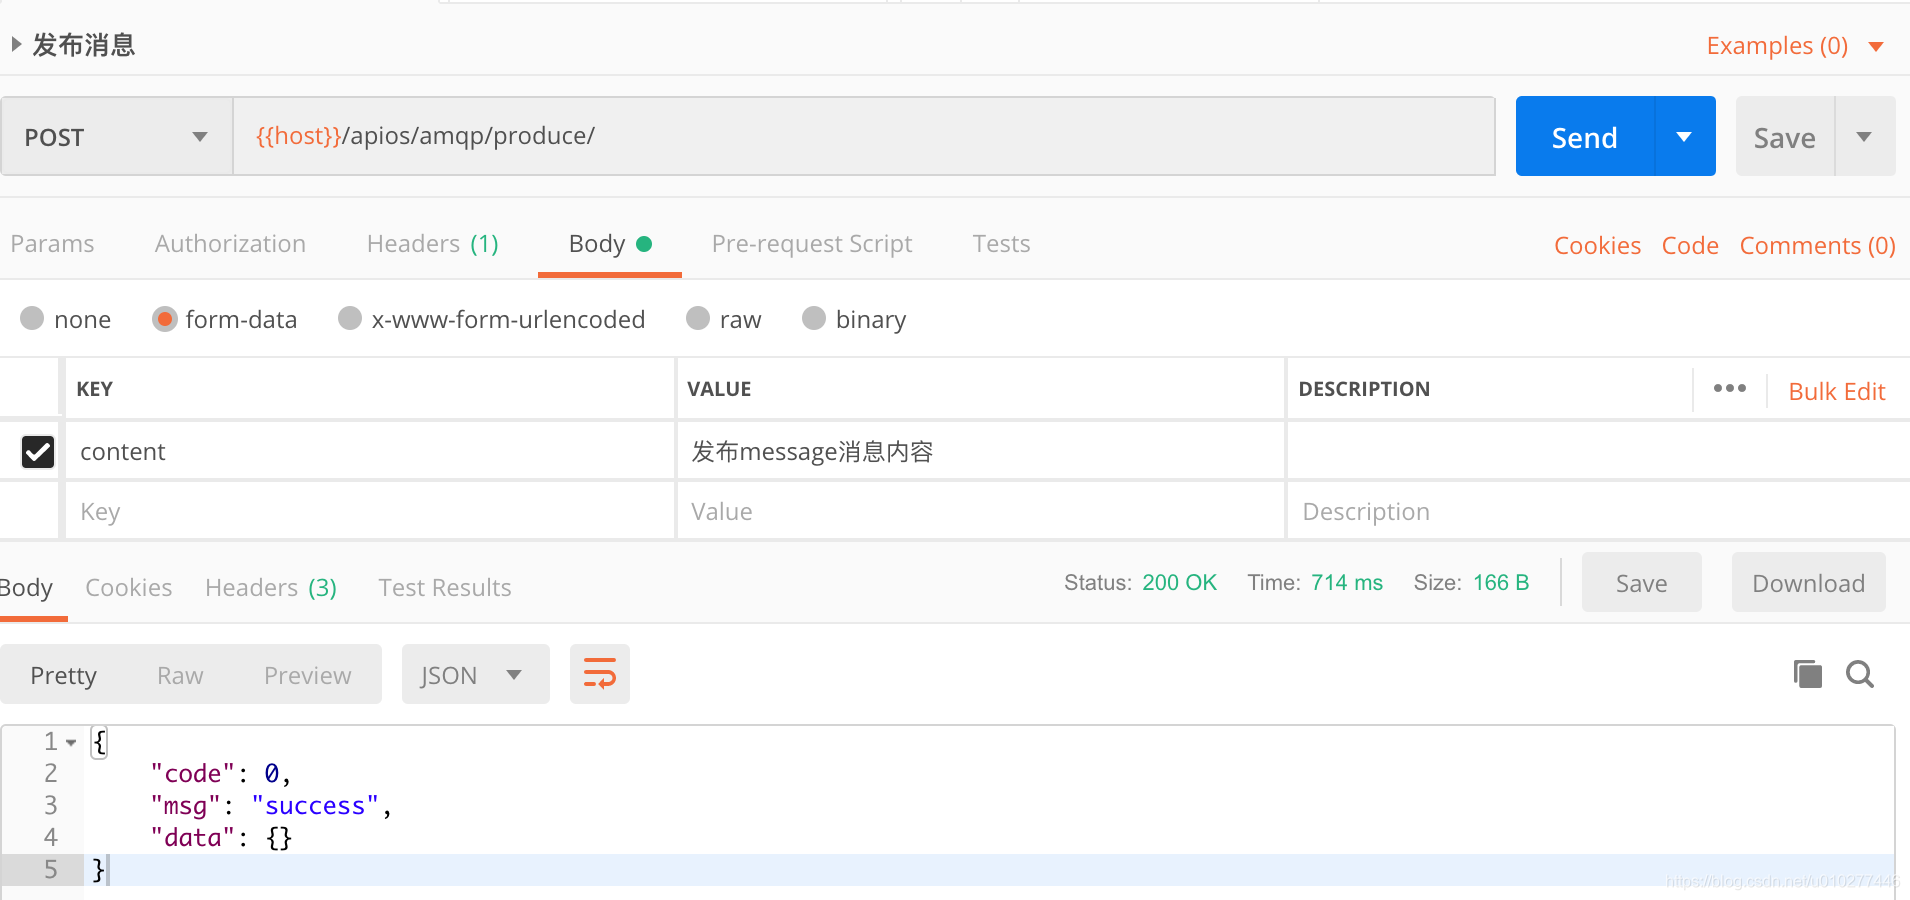
此处应该是两个消费者(A、B)都会收到,因为规则topic.message符合1.topic.message 2.topic.#
查看程序处理打印
- 发布topic.messages规则消息时,消费者处理效果
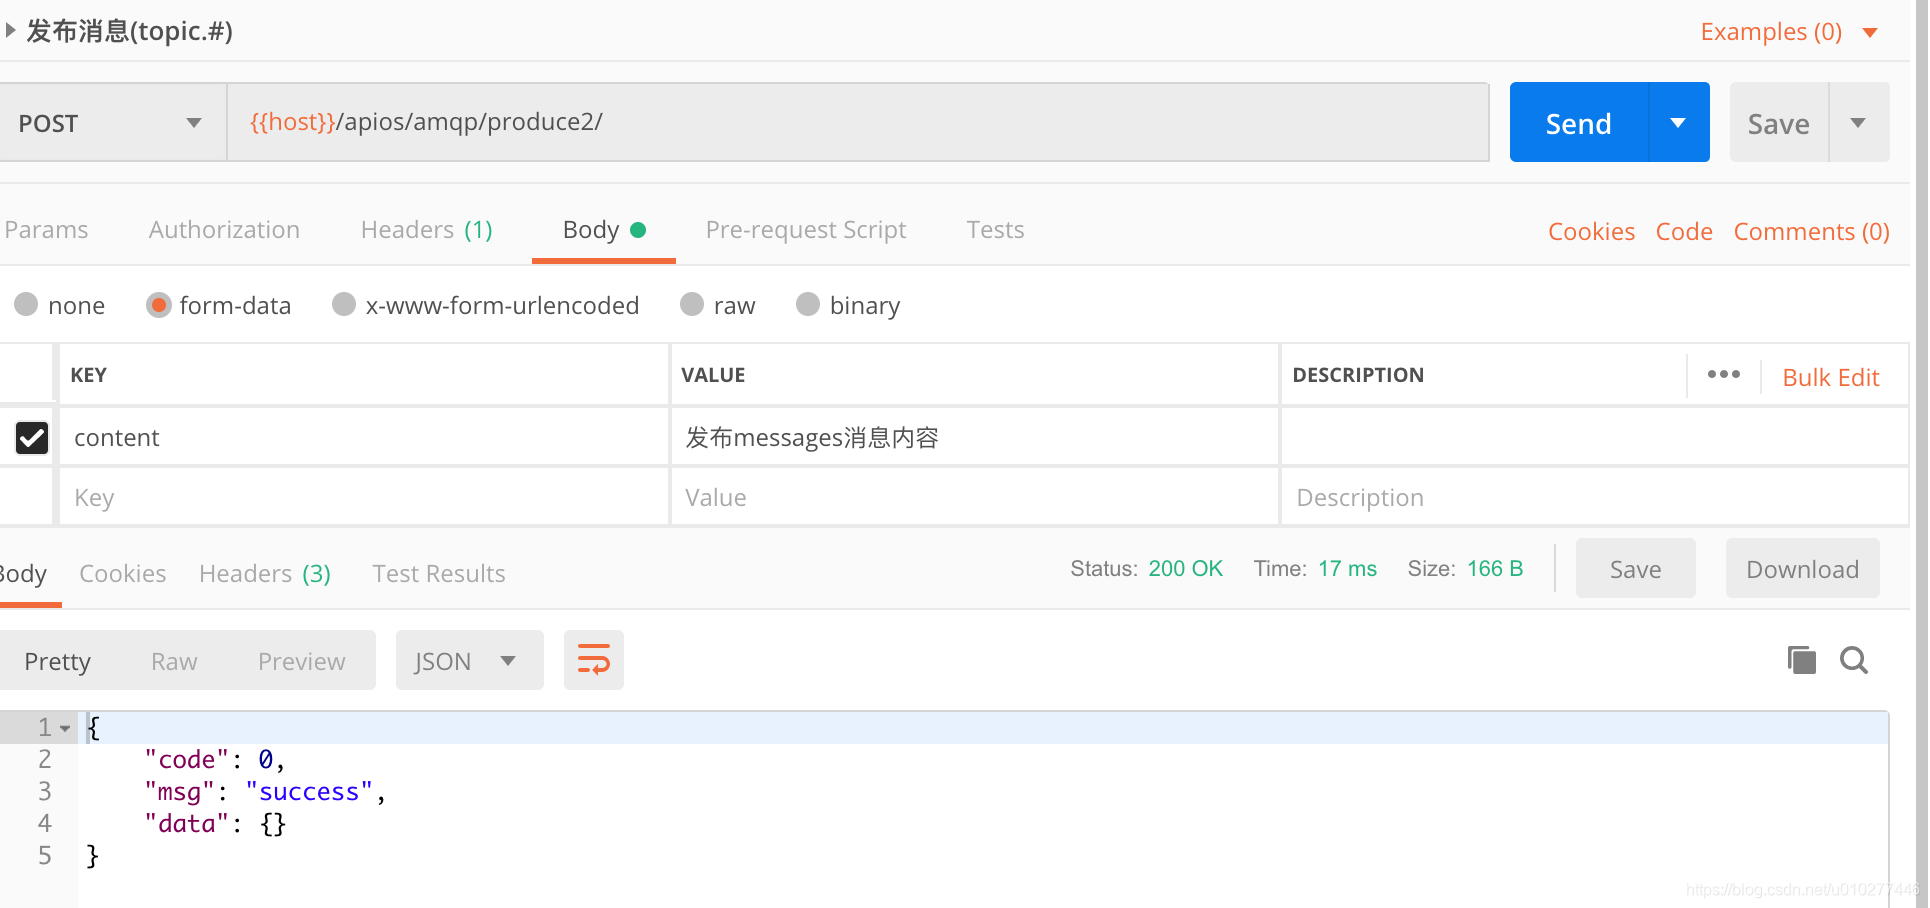
此处应该只有一个消费者(B)能收到,因为规则topic.messages符合1.topic.#
查看程序处理打印
