配置
步骤类似于DirectExchange,但是我们在定义bindingKey时会用模糊字符串,以便于匹配消息发送者发送消息时用的routingKey
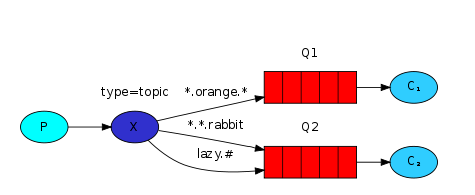
类似于上图,配置代码如下
package com.xquant.rabbitmq.send.mq;

import org.springframework.amqp.core.Binding;
import org.springframework.amqp.core.BindingBuilder;
import org.springframework.amqp.core.Queue;
import org.springframework.amqp.core.TopicExchange;
import org.springframework.amqp.rabbit.connection.CachingConnectionFactory;
import org.springframework.amqp.rabbit.connection.ConnectionFactory;
import org.springframework.amqp.rabbit.core.RabbitTemplate;
import org.springframework.context.annotation.Bean;
import org.springframework.context.annotation.Configuration;

/**
 * topic交换机模式
 *
 * @author chunhui.tan
 * @version 创建时间:2018年11月15日 上午9:12:20
 *
 */
@Configuration
public class TopicMqConfig {

	/**
	 * 交换机名称
	 */
	public static final String TOPIC_EXCHANGE_NAME = "topic_exchange";

	/**
	 * 定义bindingKey,模糊匹配
	 */
	public static final String BINGDING_KEY_TEST1 = "*.orange.*";

	public static final String BINGDING_KEY_TEST2 = "*.*.rabbit";

	public static final String BINGDING_KEY_TEST3 = "lazy.#";

	/**
	 * 两个queue名字
	 */
	public static final String QUEUE_TEST1 = "topic_queue1";

	public static final String QUEUE_TEST2 = "topic_queue2";

	/**
	 * 构建topic类型交换机
	 *
	 * @return
	 */
	@Bean
	public TopicExchange topicExchange() {
		return new TopicExchange(TOPIC_EXCHANGE_NAME, true, false);
	}

	/**
	 * 构建序列
	 *
	 * @return
	 */
	@Bean
	public Queue test1Queue() {
		// 支持持久化
		return new Queue(QUEUE_TEST1, true);
	}

	@Bean
	public Queue test2Queue() {
		// 支持持久化
		return new Queue(QUEUE_TEST2, true);
	}

	/**
	 * 绑定交交换机和队列
	 * topic_queue1的bindingKey为:*.orange.*
	 * topic_queue2的bindingKey有两个:*.*.rabbit和lazy.#
	 *
	 * @return
	 */
	@Bean
	public Binding test1Binding() {
		return BindingBuilder.bind(test1Queue()).to(topicExchange()).with(BINGDING_KEY_TEST1);
	}

	@Bean
	public Binding test2Binding() {
		return BindingBuilder.bind(test2Queue()).to(topicExchange()).with(BINGDING_KEY_TEST2);
	}

	@Bean
	public Binding test3Binding() {
		return BindingBuilder.bind(test2Queue()).to(topicExchange()).with(BINGDING_KEY_TEST3);
	}

	/**
	 * 配置
	 *
	 * @return
	 */
	@Bean
	public ConnectionFactory connectionFactory() {
		CachingConnectionFactory connectionFactory = new CachingConnectionFactory("127.0.0.1", 5672);
		connectionFactory.setUsername("admin");
		connectionFactory.setPassword("123456");
		return connectionFactory;
	}

	/**
	 * 实例化操作模板
	 *
	 * @param connectionFactory
	 * @return
	 */
	@Bean
	public RabbitTemplate rabbitTemplate(ConnectionFactory connectionFactory) {
		return new RabbitTemplate(connectionFactory);
	}
}
在上面的绑定关系中,如果我们发送的所有消息都是用来描述小动物的。发送的消息所携带的路由键是由三个单词所组成的,这三个单词被两个.分割开。路由键里的第一个单词描述的是动物的手脚的利索程度,第二个单词是动物的颜色,第三个是动物的种类
这三个绑定键被可以总结为:
topic_queue1 对所有的桔黄色动物都感兴趣。
topic_queue2 则是对所有的兔子和所有懒惰的动物感兴趣
生产者
为了方便测试,写在接口里面
/**
 * routingKey:quick.orange.rabbit
 *
 * @return
 */
@GetMapping("/sendMessage1")
public Object sendMessage1() {
	MessageProperties messageProperties = new MessageProperties();
	messageProperties.setContentEncoding("UTF-8");
	Message message = new Message("我是一个跑的飞快的橘黄色的兔子,谁会收到这条消息呢,".getBytes(), messageProperties);
	rabbitTemplate.send(TopicMqConfig.TOPIC_EXCHANGE_NAME, "quick.orange.rabbit", message);
	return "ok";
}

/**
 * routingKey:lazy.orange.elephant
 *
 * @return
 */
@GetMapping("/sendMessage2")
public Object sendMessage2() {
	MessageProperties messageProperties = new MessageProperties();
	messageProperties.setContentEncoding("UTF-8");
	Message message = new Message("我是一只橘黄色的懒惰大象,谁会收到这条消息呢,".getBytes(), messageProperties);
	rabbitTemplate.send(TopicMqConfig.TOPIC_EXCHANGE_NAME, "lazy.orange.elephant", message);
	return "ok";
}

/**
 * routingKey:lazy.read.mela.rabbit
 *
 * @return
 */
@GetMapping("/sendMessage3")
public Object sendMessage3() {
	MessageProperties messageProperties = new MessageProperties();
	messageProperties.setContentEncoding("UTF-8");
	Message message = new Message("我是一只懒惰的红色的公兔子,谁会收到这条消息呢".getBytes(), messageProperties);
	rabbitTemplate.send(TopicMqConfig.TOPIC_EXCHANGE_NAME, "lazy.read.mela.rabbit", message);
	return "ok";
}

/**
 * routingKey:orange
 *
 * @return
 */
@GetMapping("/sendMessage4")
public Object sendMessage4() {
	MessageProperties messageProperties = new MessageProperties();
	messageProperties.setContentEncoding("UTF-8");
	Message message = new Message("我是橘黄色的,谁会收到这条消息呢,".getBytes(), messageProperties);
	rabbitTemplate.send(TopicMqConfig.TOPIC_EXCHANGE_NAME, "orange", message);
	return "ok";
}

/**
 * routingKey:quick.orange.male.rabbit
 *
 * @return
 */
@GetMapping("/sendMessage5")
public Object sendMessage5() {
	MessageProperties messageProperties = new MessageProperties();
	messageProperties.setContentEncoding("UTF-8");
	Message message = new Message("我是橘黄色的跑的快的公兔子,谁会收到这条消息呢,".getBytes(), messageProperties);
	rabbitTemplate.send(TopicMqConfig.TOPIC_EXCHANGE_NAME, "quick.orange.male.rabbit", message);
	return "ok";
}
消费者
分别监听两个队列
/**
 * 监听test1队列
 *
 * @param message
 * @throws UnsupportedEncodingException
 */
@RabbitListener(queues = TopicMqConfig.QUEUE_TEST1)
public void consumeMessage1(Message message) throws UnsupportedEncodingException {
	System.out.println("这是监听QUEUE_TEST1得到的消息:======" + new String(message.getBody(), "utf-8"));
}

/**
 * 监听test1队列
 *
 * @param message
 * @throws UnsupportedEncodingException
 */
@RabbitListener(queues = TopicMqConfig.QUEUE_TEST2)
public void consumeMessage2(Message message) throws UnsupportedEncodingException {
	System.out.println("这是监听QUEUE_TEST2得到的消息:======" + new String(message.getBody(), "utf-8"));
}
测试
启动项目,查看rabbitMq的Web页面

绑定信息已经展示的很清楚了。
接下来我们依次访问接口
测试1
访问http://localhost:8080/sendMessage1接口,这时候会发送消息:“我是一个跑的飞快的橘黄色的兔子,谁会收到这条消息呢,”,routingKey为:“quick.orange.rabbit”,显然这会匹配到queue1和queue2,结果如下控制台打印:

测试2
访问http://localhost:8080/sendMessage2接口,这时候会发送消息:“我是一只橘黄色的懒惰大象,谁会收到这条消息呢,”,routingKey为:“lazy.orange.elephant”,这样的话也会同事匹配到queue1和queue2,结果如下控制台打印:

测试3
访问http://localhost:8080/sendMessage3接口,这时候会发送消息:“我是一只懒惰的红色的公兔子,谁会收到这条消息呢,”,routingKey为:“lazy.read.mela.rabbit”,这样的话只能匹配到queue2,因为queue2的其中一个bindingKey为:“lazy.#”,结果如下控制台打印:

测试4
访问http://localhost:8080/sendMessage4接口,这时候会发送消息:“我是橘黄色的,谁会收到这条消息呢,”,routingKey为:“orange”,这样是匹配不到任何queue的,消息直接丢失,结果如下控制台打印(无任何反应):

测试五
访问http://localhost:8080/sendMessage4接口,这时候会发送消息:“我是橘黄色的跑的快的公兔子,谁会收到这条消息呢,”,routingKey为:“quick.orange.male.rabbit”,这样是匹配不到任何queue的,消息直接丢失,结果如下控制台打印(无任何反应):

总结
topic这个规则是模糊匹配,可以通过通配符满足一部分规则就可以传送消息
发送到主题交换机(topic exchange)的消息不可以携带随意什么样子的路由键(routingKey),它的路由键必须是一个由.(英文的句号)分隔开的词语列表。这些单词随便是什么都可以,但是最好是跟携带它们的消息有关系的词汇。以下是几个推荐的例子:“stock.usd.nyse”, “nyse.vmw”, “quick.orange.rabbit”。词语的个数可以随意,但是不要超过255字节。
* (星号) 用来表示一个单词
# (井号) 用来表示任意数量(零个或多个)单词。
同时匹配一个队列的两个绑定,消息也只会给这个队列发一次。