目录
学习《Java和Android开发学习指南(第二版)》第43、44、45、46章——
第43章制作视频
有两种方法可以给自己的应用程序配备视频拍摄功能。第1种方法,也是较为容易的一种方法,是创建默认的意图并将其传递给startActivityForResult。第2种方法,是直接使用MediaRecorder。这个方法更难一些,但是它可以使用设备相机的全部功能。
43.1使用内建意图
1.如果要保存或处理捕获的视频,必须覆盖onActivityResult方法。系统通过传递3个参数来调用onActivityResult方法。第1个参数是requestCode,这是调用startActivityForResult方法的时候传入的请求代码;onActivityResult方法的第二个参数是一个结果代码;第三个参数包含了来自相机的数据。
2.代码清单43.1AndroidManifest.xml文件
<?xml version="1.0" encoding="utf-8"?>
<manifest xmlns:android="http://schemas.android.com/apk/res/android"
    package="com.example.videodemo"
    android:versionCode="1"
    android:versionName="1.0" >

    <uses-sdk
        android:minSdkVersion="16"
        android:targetSdkVersion="19" />

    <uses-feature android:name="android.hardware.camera"
        android:required="true" />

    <application
        android:allowBackup="true"
        android:icon="@drawable/ic_launcher"
        android:label="@string/app_name"
        android:theme="@style/AppTheme" >
        <activity
            android:name=".MainActivity"
            android:label="@string/app_name">
            <intent-filter>
                <action android:name="android.intent.action.MAIN" />
                <category android:name="android.intent.category.LAUNCHER" />
            </intent-filter>
        </activity>
    </application>
</manifest>
3.代码清单43.2 菜单文件(menu_main.xml)
<menu xmlns:android="http://schemas.android.com/apk/res/android">
    <item
        android:id="@+id/action_camera"
        android:orderInCategory="100"
        android:showAsAction="always"
        android:title="@string/action_camera"/>
</menu>
4.代码清单43.3 activity_main.xml文件
<FrameLayout xmlns:android="http://schemas.android.com/apk/res/android"
    android:layout_width="match_parent"
    android:layout_height="match_parent" >
    <VideoView
        android:id="@+id/videoView"
        android:layout_width="match_parent"
        android:layout_height="match_parent"
        android:layout_gravity="center">
    </VideoView>
</FrameLayout>
5.代码清单43.4MainActivity类
package com.example.videodemo;
import android.app.Activity;
import android.content.Intent;
import android.net.Uri;
import android.os.Bundle;
import android.provider.MediaStore;
import android.view.Menu;
import android.view.MenuItem;
import android.widget.MediaController;
import android.widget.Toast;
import android.widget.VideoView;

public class MainActivity extends Activity {
    private static final int REQUEST_CODE = 200;

    @Override
    protected void onCreate(Bundle savedInstanceState) {
        super.onCreate(savedInstanceState);
        setContentView(R.layout.activity_main);
    }

    @Override
    public boolean onCreateOptionsMenu(Menu menu) {
        getMenuInflater().inflate(R.menu.menu_main, menu);
        return true;
    }

    @Override
    public boolean onOptionsItemSelected(MenuItem item) {
        switch (item.getItemId()) {
            case R.id.action_camera:
                showCamera();
                return true;
            default:
                return super.onContextItemSelected(item);
        }
    }

    private void showCamera() {
        // cannot set the video file
        Intent intent = new Intent(
                MediaStore.ACTION_VIDEO_CAPTURE);
        // check if the device has a camera:
        if (intent.resolveActivity(getPackageManager()) != null) {
            startActivityForResult(intent, REQUEST_CODE);
        } else {
            Toast.makeText(this, "Opening camera failed",
                    Toast.LENGTH_LONG).show();
        }
    }

    @Override
    protected void onActivityResult(int requestCode,
                                    int resultCode, Intent data) {
        if (requestCode == REQUEST_CODE) {
            if (resultCode == RESULT_OK) {
                if (data != null) {
                    Uri uri = data.getData();
                    VideoView videoView = (VideoView)
                            findViewById(R.id.videoView);

                    videoView.setVideoURI(uri);
                    videoView.setMediaController(
                            new MediaController(this));
                    videoView.requestFocus();
                }
            } else if (resultCode == RESULT_CANCELED) {
                Toast.makeText(this, "Action cancelled",
                        Toast.LENGTH_LONG).show();
            } else {
                Toast.makeText(this, "Error", Toast.LENGTH_LONG)
                        .show();
            }
        }
    }
}
当用户离开相机的时候,会调用onActivityResult方法。如果结果代码是RESULT_OK并且data不为空,该方法会在data上调用getData方法,以得到一个指向视频位置的Uri。接下来,它找到VideoView微件并设置其videoURI属性,然后调用VideoView上的其他两个方法,即setMediaController和requestFocus。媒体控制器MediaController可以用来播放和停止视频,requestFocus()来为微件设置焦点。
| !真机测试VideoDemo |

在自己的安卓设备上调试:(1)图标;(2)主界面;(3)图书馆录制(4)保存到本地
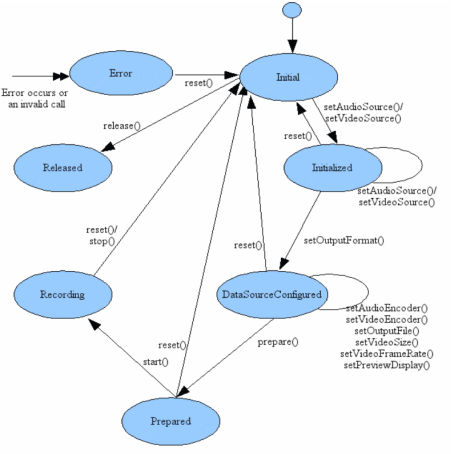
43.2MediaRecorder
MediaRecorder有三种状态,包括:Initialized状态、DataSourceConfigured状态和Prepared状态。状态图如下:
43.3使用MediaRecorder
VideoRecorder应用程序展示了如何使用MediaRecorder来录制一个视频。它拥有一个活动,其中包含了一个按钮和一个SurfaceView。按钮用来启动和停止录制,而SurfaceView用来显示相机看到了什么。
1.代码清单43.5布局文件(activity_main.xml)
<LinearLayout xmlns:android="http://schemas.android.com/apk/res/android"
    android:orientation="vertical"
    android:layout_width="fill_parent"
    android:layout_height="fill_parent">

    <Button
        android:id="@+id/button1"
        android:layout_width="wrap_content"
        android:layout_height="wrap_content"
        android:layout_marginLeft="33dp"
        android:layout_marginTop="22dp"
        android:onClick="startStopRecording"
        android:text="@string/button_start" />
    <SurfaceView
        android:id="@+id/surfaceView"
        android:layout_width="match_parent"
        android:layout_height="match_parent" />
</LinearLayout>
2.代码清单43.6MainActivity类
package com.example.videorecorder;
import java.io.File;
import java.io.IOException;
import android.app.Activity;
import android.media.MediaRecorder;
import android.os.Bundle;
import android.os.Environment;
import android.view.SurfaceHolder;
import android.view.SurfaceView;
import android.view.View;
import android.widget.Button;

public class MainActivity extends Activity {
    private MediaRecorder mediaRecorder;
    private File outputDir;
    private boolean recording = false;

    @Override
    public void onCreate(Bundle savedInstanceState) {
        super.onCreate(savedInstanceState);
        File moviesDir = Environment
                .getExternalStoragePublicDirectory(
                        Environment.DIRECTORY_MOVIES);
        outputDir = new File(moviesDir,
                "VideoRecorder");
        outputDir.mkdirs();
        setContentView(R.layout.activity_main);
    }

    @Override
    protected void onResume() {
        super.onResume();
        mediaRecorder = new MediaRecorder();
        initAndConfigureMediaRecorder();
    }

    @Override
    protected void onPause() {
        super.onPause();
        if (recording) {
            try {
                mediaRecorder.stop();
            } catch (IllegalStateException e) {
            }
        }
        releaseMediaRecorder();
        Button button = (Button) findViewById(R.id.button1);
        button.setText("Start");
        recording = false;
    }

    private void releaseMediaRecorder() {
        if (mediaRecorder != null) {
            mediaRecorder.reset();
            mediaRecorder.release();
            mediaRecorder = null;
        }
    }

    private void initAndConfigureMediaRecorder() {
        mediaRecorder.setAudioSource(
                MediaRecorder.AudioSource.CAMCORDER);
        mediaRecorder
                .setVideoSource(MediaRecorder.VideoSource.CAMERA);
        mediaRecorder.setOutputFormat(
                MediaRecorder.OutputFormat.MPEG_4);
        mediaRecorder.setVideoFrameRate(10);// make it very low
        mediaRecorder.setVideoEncoder(
                MediaRecorder.VideoEncoder.MPEG_4_SP);
        mediaRecorder.setAudioEncoder(
                MediaRecorder.AudioEncoder.AMR_NB);
        String outputFile = new File(outputDir,
                System.currentTimeMillis() + ".mp4")
                .getAbsolutePath();

        mediaRecorder.setOutputFile(outputFile);
        SurfaceView surfaceView = (SurfaceView)
                findViewById(R.id.surfaceView);
        SurfaceHolder surfaceHolder = surfaceView.getHolder();
        mediaRecorder.setPreviewDisplay(surfaceHolder
                .getSurface());
    }

    public void startStopRecording(View view) {
        Button button = (Button) findViewById(R.id.button1);
        if (recording) {
            button.setText("Start");
            try {
                mediaRecorder.stop();
            } catch (IllegalStateException e) {

            }
            releaseMediaRecorder();
        } else {
            button.setText("Stop");
            if (mediaRecorder == null) {
                mediaRecorder = new MediaRecorder();
                initAndConfigureMediaRecorder();
            }
            // prepare MediaRecorder
            try {
                mediaRecorder.prepare();
            } catch (IllegalStateException e) {
                e.printStackTrace();
            } catch (IOException e) {
                e.printStackTrace();
            }
            mediaRecorder.start();
        }
        recording = !recording;
    }
}
其中有三个重要的方法:onCreate方法、onResume方法和onPause方法。
第44章声音录制
44.1MediaRecorder类
MediaRecorder类可以采样声音或噪声层级。MediaRecorder类用于记录音频和视频,其输出可以写入到一个文件,可以很容易地选择输入源。有:start、stop、reset和release方法。
44.2示例
1.代码清单44.1SoundMeter的清单
<?xml version="1.0" encoding="utf-8"?>
<manifest xmlns:android="http://schemas.android.com/apk/res/android"
    package="com.example.soundmeter"
    android:versionCode="1"
    android:versionName="1.0" >

    <uses-sdk
        android:minSdkVersion="8"
        android:targetSdkVersion="17" />

    <uses-permission android:name="android.permission.RECORD_AUDIO" />

    <application
        android:allowBackup="true"
        android:icon="@drawable/ic_launcher"
        android:label="@string/app_name"
        android:theme="@style/AppTheme" >
        <activity
            android:name="com.example.soundmeter.MainActivity"
            android:label="@string/app_name" >
            <intent-filter>
                <action android:name="android.intent.action.MAIN"/>
                <category android:name="android.intent.category.LAUNCHER" />
            </intent-filter>
        </activity>
    </application>
</manifest>
使用清单中的uses-permission元素来请求用户许可录制视频。如果没有包括这个元素的话,应用程序将无法工作。此外,如果用户不同意的话,应用程序将不会安装。
2.代码清单44.2SoundMeter中的res/layout/activity_main.xml文件
<RelativeLayout xmlns:android="http://schemas.android.com/apk/res/android"
    xmlns:tools="http://schemas.android.com/tools"
    android:layout_width="match_parent"
    android:layout_height="match_parent"
    android:paddingBottom="@dimen/activity_vertical_margin"
    android:paddingLeft="@dimen/activity_horizontal_margin"
    android:paddingRight="@dimen/activity_horizontal_margin"
    android:paddingTop="@dimen/activity_vertical_margin"
    tools:context=".MainActivity" >

    <TextView
        android:id="@+id/level"
        android:layout_width="wrap_content"
        android:layout_height="wrap_content" />

    <Button
        android:id="@+id/button1"
        style="?android:attr/buttonStyleSmall"
        android:layout_width="wrap_content"
        android:layout_height="wrap_content"
        android:layout_alignLeft="@+id/level"
        android:layout_below="@+id/level"
        android:background="#ff0000"
        android:layout_marginTop="30dp" />

</RelativeLayout>
该应用程序有两个类。第一个类是一个名为SoundMeter的类,它封装了MediaRecorder并且暴露了3个方法来管理它。第一个方法是start,创建了MediaRecorder的一个实例,配置并且启动它。第二个方法stop,停止了MediaRecorder。第3个方法是getAmplitude,返回一个double类型数据以表明采样声音的层级。
3.代码清单44.3SoundMeter类
package com.example.soundmeter;
import java.io.IOException;
import android.media.MediaRecorder;

public class SoundMeter {

    private MediaRecorder mediaRecorder;
    boolean started = false;

    public void start() {
        if (started) {
            return;
        }
        if (mediaRecorder == null) {
            mediaRecorder = new MediaRecorder();

            mediaRecorder.setAudioSource(
                    MediaRecorder.AudioSource.MIC);
            mediaRecorder.setOutputFormat(
                    MediaRecorder.OutputFormat.THREE_GPP);
            mediaRecorder.setAudioEncoder(
                    MediaRecorder.AudioEncoder.AMR_NB);
            mediaRecorder.setOutputFile("/dev/null");
            try {
                mediaRecorder.prepare();
            } catch (IllegalStateException e) {
                e.printStackTrace();
            } catch (IOException e) {
                e.printStackTrace();
            }
            mediaRecorder.start();
            started = true;
        }
    }

    public void stop() {
        if (mediaRecorder != null) {
            mediaRecorder.stop();
            mediaRecorder.release();
            mediaRecorder = null;
            started = false;
        }
    }
    public double getAmplitude() {
        return mediaRecorder.getMaxAmplitude() / 100;
    }
}
4.代码清单44.4SoundMeter中的MainActivity类
package com.example.soundmeter;
import android.app.Activity;
import android.os.Bundle;
import android.os.Handler;
import android.view.Menu;
import android.widget.Button;
import android.widget.TextView;
public class MainActivity extends Activity {
Handler handler = new Handler();
SoundMeter soundMeter = new SoundMeter();
@Override
protected void onCreate(Bundle savedInstanceState) {
super.onCreate(savedInstanceState);
setContentView(R.layout.activity_main);
}
@Override
public boolean onCreateOptionsMenu(Menu menu) {
// Inflate the menu; this adds items to the action bar if it
// is present.
getMenuInflater().inflate(R.menu.menu_main, menu);
return true;
}
@Override
public void onStart() {
super.onStart();
soundMeter.start();
handler.postDelayed(pollTask, 150);
}
@Override
public void onPause() {
soundMeter.stop();
super.onPause();
}
private Runnable pollTask = new Runnable() {
@Override
public void run() {
double amplitude = soundMeter.getAmplitude();
TextView textView = (TextView) findViewById(R.id.level);
textView.setText("amp:" + amplitude);
Button button = (Button) findViewById(R.id.button1);
button.setWidth((int) amplitude * 10);
handler.postDelayed(pollTask, 150);
}
};
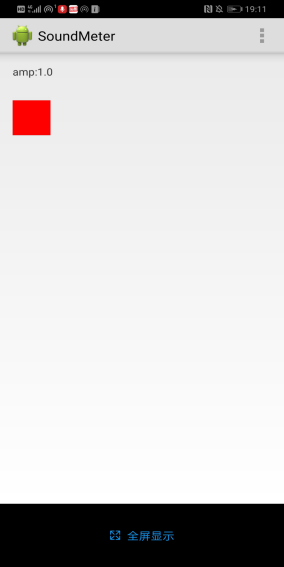
}MainActivity类覆盖了两个活动生命周期方法,onStart和onPause。当活动创建或者活动重新启动之后,系统将调用onStart方法。当活动暂停或者由于另一个活动启动了,或者由于一个重要的事件发生了,系统将调用onPause方法。MainActivity类还使用了一个Handler来实现每150毫秒采样一次声音层级。
| !真机测试VideoDemo |
用指关节敲击手机屏幕,amp值不断变化:
第45章处理Handler
45.1概览
android.os.Handler可以用来在将来的某一时刻执行一个Runnable.分配给Handler的任何任务,都会在Handler的线程上运行。反过来,Handler在创建它的线程上运行,在大多数情况下,这个线程将会是UI线程。因此,不应该使用一个Handler来调度一个长时间运行的任务,这会让应用程序冻结。若能够将任务分解为较小的部分,也可以使用一个Handler来处理长时间运行的任务。
要调度一个在将来某个时刻运行的任务,调用Handler类的postDelayed或postAtTime方法即可。
postDelayed方法调用x毫秒之后,开始运行一个任务。
postAtTime在将来的某一时刻运行一个任务。
45.2示例
1.代码清单45.1HandlerDemo的清单
<?xml version="1.0" encoding="utf-8"?>
<manifest xmlns:android="http://schemas.android.com/apk/res/android"
    package="com.example.handlerdemo" >

    <application
        android:allowBackup="true"
        android:icon="@drawable/ic_launcher"
        android:label="@string/app_name"
        android:theme="@style/AppTheme" >
        <activity
            android:name="com.example.handlerdemo.MainActivity"
            android:label="@string/app_name" >
            <intent-filter>
                <action android:name="android.intent.action.MAIN" />

                <category android:name="android.intent.category.LAUNCHER" />
            </intent-filter>
        </activity>
    </application>

</manifest>
2.代码清单45.2HandlerTest中的res/layout/activity_main.xml文件
<RelativeLayout xmlns:android="http://schemas.android.com/apk/res/android"
    xmlns:tools="http://schemas.android.com/tools"
    android:layout_width="match_parent"
    android:layout_height="match_parent"
    android:paddingBottom="@dimen/activity_vertical_margin"
    android:paddingLeft="@dimen/activity_horizontal_margin"
    android:paddingRight="@dimen/activity_horizontal_margin"
    android:paddingTop="@dimen/activity_vertical_margin"
    tools:context=".MainActivity" >

    <ImageView
        android:id="@+id/imageView1"
        android:layout_width="wrap_content"
        android:layout_height="wrap_content"
        android:layout_alignParentLeft="true"
        android:layout_alignParentTop="true"
        android:layout_marginLeft="51dp"
        android:layout_marginTop="58dp"
        android:src="@drawable/surprise" />

    <Button
        android:id="@+id/button1"
        style="?android:attr/buttonStyleSmall"
        android:layout_width="wrap_content"
        android:layout_height="wrap_content"
        android:layout_alignRight="@+id/imageView1"
        android:layout_below="@+id/imageView1"
        android:layout_marginRight="18dp"
        android:layout_marginTop="65dp"
        android:onClick="buttonClicked"
        android:text="Button"/>
</RelativeLayout>
3.代码清单45.3 HandlerDemo中的MainActivity类
package com.example.handlerdemo;
import android.app.Activity;
import android.os.Bundle;
import android.os.Handler;
import android.view.Menu;
import android.view.View;
import android.widget.ImageView;
public class MainActivity extends Activity {
int counter = 0;
Handler handler = new Handler();
@Override
protected void onCreate(Bundle savedInstanceState) {
super.onCreate(savedInstanceState);
setContentView(R.layout.activity_main);
getUserAttention();
}
@Override
public boolean onCreateOptionsMenu(Menu menu) {
// Inflate the menu; this adds items to the action bar if it
// is present.
getMenuInflater().inflate(R.menu.menu_main, menu);
return true;
}
public void buttonClicked(View view) {
counter = 0;
getUserAttention();
}
private void getUserAttention() {
handler.post(task);
}
Runnable task = new Runnable() {
@Override
public void run() {
ImageView imageView = (ImageView)
findViewById(R.id.imageView1);
if (counter % 2 == 0) {
imageView.setVisibility(View.INVISIBLE);
} else {
imageView.setVisibility(View.VISIBLE);
}
counter++;
if (counter < 8) {
handler.postDelayed(this, 400);
}
}
};
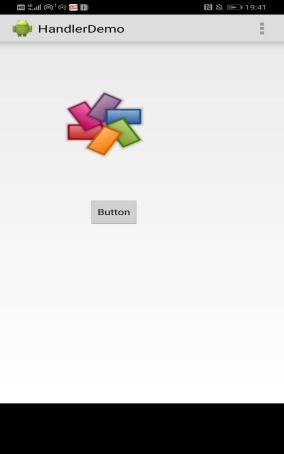
}这个活动的核心是一个叫作task的Runnable,它实现了ImageView的动画以及一个getUserAttention方法,该方法调用一个Handler上的postDelayed方法。这个Runnable,根据counter变量的值是奇数还是偶数,将ImageView的可见性设置为VISIBLE或INVISIABLE。
| !真机测试VideoDemo |
第46章异步工具
46.1概览
Android.os.AsyncTask类使得处理后台进程以及将进度更新发布到UI线程更加容易。这个类专门用于持续最多数秒钟的较短的操作。对于长时间运行的后台任务,应该使用Java并发工具框架。
AsyncTask类带有一组公有的方法和一组受保护的方法。公有方法用于执行和取消其任务。受保护的方法将在子类中覆盖。
46.2示例
反转和模糊的图像操作。
1.代码清单46.1PhotoEditor的清单
<?xml version="1.0" encoding="utf-8"?>
<manifest xmlns:android="http://schemas.android.com/apk/res/android"
    package="com.example.photoeditor" >

    <application
        android:allowBackup="true"
        android:icon="@drawable/ic_launcher"
        android:label="@string/app_name"
        android:theme="@style/AppTheme" >
        <activity
            android:name="com.example.photoeditor.MainActivity"
            android:label="@string/app_name" >
            <intent-filter>
                <action android:name="android.intent.action.MAIN" />

                <category android:name="android.intent.category.LAUNCHER" />
            </intent-filter>
        </activity>
    </application>

</manifest>
2.代码清单46.2PhotoEditor中的res/layout/activity_main.xml文件
<LinearLayout xmlns:android="http://schemas.android.com/apk/res/android"
    xmlns:tools="http://schemas.android.com/tools"
    android:layout_width="fill_parent"
    android:layout_height="fill_parent"
    android:orientation="vertical"
    android:paddingLeft="16dp"
    android:paddingRight="16dp" >

    <LinearLayout
        android:layout_height="wrap_content"
        android:layout_width="fill_parent"
        android:orientation="horizontal" >

        <Button
            android:id="@+id/blurButton"
            android:layout_width="wrap_content"
            android:layout_height="wrap_content"
            android:onClick="doBlur"
            android:text="@string/blur_button_text" />

        <Button
            android:id="@+id/button2"
            android:layout_width="wrap_content"
            android:layout_height="wrap_content"
            android:onClick="doInvert"
            android:text="@string/invert_button_text" />
    </LinearLayout>

    <ProgressBar
        android:id="@+id/progressBar1"
        style="?android:attr/progressBarStyleHorizontal"
        android:layout_width="fill_parent"
        android:layout_height="10dp" />

    <ImageView
        android:id="@+id/imageView1"
        android:layout_width="wrap_content"
        android:layout_height="wrap_content"
        android:layout_gravity="top|center"
        android:src="@drawable/photo1" />

</LinearLayout>
3.代码清单46.3PhotoEditor中的MainActivity类
package com.example.photoeditor;
import android.app.Activity;
import android.graphics.Bitmap;
import android.graphics.drawable.BitmapDrawable;
import android.os.AsyncTask;
import android.os.Bundle;
import android.view.Menu;
import android.view.View;
import android.widget.ImageView;
import android.widget.ProgressBar;

public class MainActivity extends Activity {
    private ProgressBar progressBar;

    @Override
    protected void onCreate(Bundle savedInstanceState) {
        super.onCreate(savedInstanceState);
        setContentView(R.layout.activity_main);
        progressBar = (ProgressBar) findViewById(R.id.progressBar1);
    }

    @Override
    public boolean onCreateOptionsMenu(Menu menu) {
        // Inflate the menu; this adds items to the action bar if it
        // is present.
        getMenuInflater().inflate(R.menu.menu_main, menu);
        return true;
    }

    public void doBlur(View view) {
        BlurImageTask task = new BlurImageTask();
        ImageView imageView = (ImageView)
                findViewById(R.id.imageView1);
        Bitmap bitmap = ((BitmapDrawable)
                imageView.getDrawable()).getBitmap();
        task.execute(bitmap);
    }

    public void doInvert(View view) {
        InvertImageTask task = new InvertImageTask();
        ImageView imageView = (ImageView)
                findViewById(R.id.imageView1);
        Bitmap bitmap = ((BitmapDrawable)
                imageView.getDrawable()).getBitmap();
        task.execute(bitmap);
    }

    private class InvertImageTask extends AsyncTask<Bitmap, Integer,
            Bitmap> {
        protected Bitmap doInBackground(Bitmap... bitmap) {
            Bitmap input = bitmap[0];
            Bitmap result = input.copy(input.getConfig(),
                    /*isMutable'*/true);
            int width = input.getWidth();
            int height = input.getHeight();
            for (int i = 0; i < height; i++) {
                for (int j = 0; j < width; j++) {
                    int pixel = input.getPixel(j, i);
                    int a = pixel & 0xff000000;
                    a = a | (~pixel & 0x00ffffff);
                    result.setPixel(j, i, a);
                }
                int progress = (int) (100*(i+1)/height);
                publishProgress(progress);
            }
            return result;
        }

        protected void onProgressUpdate(Integer... values) {
            progressBar.setProgress(values[0]);
        }

        protected void onPostExecute(Bitmap result) {
            ImageView imageView = (ImageView)
                    findViewById(R.id.imageView1);
            imageView.setImageBitmap(result);
            progressBar.setProgress(0);
        }
    }

    private class BlurImageTask extends AsyncTask<Bitmap, Integer,
            Bitmap> {
        protected Bitmap doInBackground(Bitmap... bitmap) {
            Bitmap input = bitmap[0];
            Bitmap result = input.copy(input.getConfig(),
                    /*isMutable=*/ true);
            int width = bitmap[0].getWidth();
            int height = bitmap[0].getHeight();
            int level = 7;
            for (int i = 0; i < height; i++) {
                for (int j = 0; j < width; j++) {
                    int pixel = bitmap[0].getPixel(j, i);
                    int a = pixel & 0xff000000;
                    int r = (pixel >> 16) & 0xff;
                    int g = (pixel >> 8) & 0xff;
                    int b = pixel & 0xff;
                    r = (r+level)/2;
                    g = (g+level)/2;
                    b = (b+level)/2;
                    int gray = a | (r << 16) | (g << 8) | b;
                    result.setPixel(j, i, gray);
                }
                int progress = (int) (100*(i+1)/height);
                publishProgress(progress);
            }
            return result;
        }

        protected void onProgressUpdate(Integer... values) {
            progressBar.setProgress(values[0]);
        }

        protected void onPostExecute(Bitmap result) {
            ImageView imageView = (ImageView)
                    findViewById(R.id.imageView1);
            imageView.setImageBitmap(result);
            progressBar.setProgress(0);
        }
    }
}| !真机测试VideoDemo |
位图效果——

教材学习中的问题和解决过程(^▽^)
- 问题1:究竟什么是UI线程?
- 问题解决方案1:
在Windows应用程序中,窗体是由一种称为“UI线程(User Interface Thread)”的特殊类型的线程创建的。
首先,UI线程是一种“线程”,所以它具有一个线程应该具有的所有特征,比如有一个线程函数和一个线程ID。
其次,“UI线程”又是“特殊”的,这是因为UI线程的线程函数中会创建一种特殊的对象——窗体,同时,还一并负责创建窗体上的各种控件。
窗体和控件具有接收用户操作的功能,它们是用户使用整个应用程序的媒介,没有这样一个媒介,用户就无法控制整个应用程序的运行和停止,往往也无法直接看到程序的运行过程和最终结果。
补充——主线程
当 Java 程序启动时,一个线程立刻运行,该线程通常叫做程序的主线程(main Thread),因为它是程序开始时就执行的。
一般来说,某个类中会有一个 main 函数,当程序启动时,该函数就会第一个自动得到执行,并成为程序的主线程。
主线程的特征如下:
(1)主线程是产生其他子线程的线程。
(2)主线程中执行程序的控制。
(3)通常主线程必须最后完成执行,因为它执行各种关闭动作
(4)永远不要在主线程中直接操作界面
代码调试中的问题和解决过程
- 问题1:不会真机调试
- 问题解决方案1:Android Studio在华为手机上的调试步骤——
(1)设置——系统——关于手机——点击版本号——进入开发者模式。
(2)设置——系统——开发人员选项——打开USB调试功能。
(3)进入Android Studio——运行代码无错——Edit Configurations——Target选择USB Device——运行程序——在真机上安装并使用。
上周错题总结
[代码托管]
https://gitee.com/EvelynYang/eleventh_week
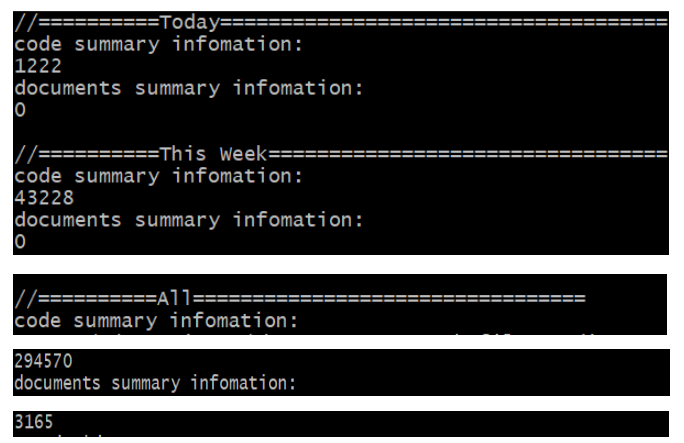
statistics.sh脚本运行结果的截图
在新建的AndroidProjects文件夹中运行脚本,第六周及之前都是在IdeaProjects文件夹里运行。
学习进度条
| 代码行数(新增/累积) | 博客量(新增/累积) | 学习时间(新增/累积) | 重要成长 | |
|---|---|---|---|---|
| 目标 | 5000行 | 30篇 | 400小时 | |
| 第一周 | 200/200 | 2/2 | 20/20 | |
| 第二周 | 300/500 | 1/3 | 18/38 | |
| 第三周 | 500/1000 | 1/4 | 38/76 | |
| 第四周 | 1000/2000 | 1/5 | 20/96 | |
| 第五周 | 1000/3000 | 1/6 | 25/121 | |
| 第六周 | 1000/4000 | 1/7 | 25/146 | |
| 第七周 | 1000/5000 | 1/8 | 25/171 | |
| 第八周 | 1000/6000 | 1/9 | 15/186 | |
| 第九周 | 1000/7000 | 1/10 | 20/206 | |
| 第十周 | 1000/8000 | 1/11 | 20/226 | |
| 第十一周 | 1000/9000 | 1/12 | 10/236 |