目录
学习《Java和Android开发学习指南(第二版)》第23、24、25、26章——
第23章 Android简介
1.Android向后兼容,针对较早的版本编写的应用程序,总能够在新的版本上运行。
2.4种Android应用程序组件:
活动(Activity):包含用户交互组件的一个窗口。
服务(Service):在后台长时间运行的操作。
广播接收者(Broadcast receiver):一个监听器,负责对系统或应用程序声明作出响应。
内容提供者(Content provider):管理要和其他应用程序分享的一组数据的一个组件。
3.每个应用程序都必须有一个清单(manifest),描述该应用程序。清单以XML文件的形式给出,其中包含的内容有:
运行该应用程序所需的最小API Level。
应用程序的名称。这个名称将会显示在设备上。
当用户在其手机或平板电脑的主屏幕上触碰该应用程序的图标时,将会打开的第一个活动(窗口)。
是否允许从其他的应用程序调用你的应用程序组件。
对于在目标设备上安装的应用程序,用户必须保证一组什么样的许可。如果用户不能保证所有必须的许可,将不会安装该应用程序。
第24章 初识Android
24.4 应用程序结构
1.Project窗口中有两个主要的节点,app和Gradle Scripts。App节点包含了应用程序中所有的组件。Gradle Scripts节点包含了Gradle构件脚本,供Android Studio构建你的项目。
app节点下面有如下的3个节点:
Manifests。包含了一个AndroidManifest.xml文件,它描述了应用程序。
java。包含了所有的Java应用程序和测试类。
res。包含了资源文件。在这个目录下还有一些目录:
drawable(包含了用于各种屏幕分辨率的图像),layout(包含了布局文件)和menu(包含了菜单文件),mipmap(包含了用于各种屏幕分辨率的app图标),还有values(包含了字符串和其他值)。
2.R类
R类是一个名为R的通用的Java类,可以在项目的app/build/generated/source目录下找到。R包含了嵌套的类,该类反过来包含了所有资源ID。每次添加、修改或删除资源的时候,都会重新生成R。例如,如果你向res/drawable目录添加了一个名为logo.png的文件,Android Studio将在drawable类下面生成一个名为logo的文件。R的作用是让你能够引用代码中的一个资源。
24.4.1 Android清单
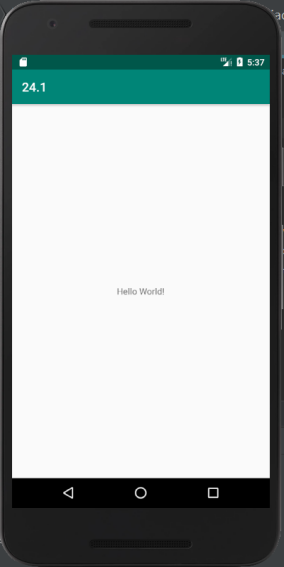
1.创建一个新项目241
(1)主函数
package com.example.yangxiaopang.a241;

        import android.support.v7.app.AppCompatActivity;
        import android.os.Bundle;

public class MainActivity extends AppCompatActivity {

    @Override
    protected void onCreate(Bundle savedInstanceState) {
        super.onCreate(savedInstanceState);
        setContentView(R.layout.activity_main);
    }
}
(2)清单文件
<?xml version="1.0" encoding="utf-8"?>
<android.support.constraint.ConstraintLayout xmlns:android="http://schemas.android.com/apk/res/android"
    xmlns:app="http://schemas.android.com/apk/res-auto"
    xmlns:tools="http://schemas.android.com/tools"
    android:layout_width="match_parent"
    android:layout_height="match_parent"
    tools:context=".MainActivity">

    <TextView
        android:layout_width="wrap_content"
        android:layout_height="wrap_content"
        android:text="Hello World!"
        app:layout_constraintBottom_toBottomOf="parent"
        app:layout_constraintLeft_toLeftOf="parent"
        app:layout_constraintRight_toRightOf="parent"
        app:layout_constraintTop_toTopOf="parent" />

</android.support.constraint.ConstraintLayout>
(3)项目运行结果
打印出Hello World!
第25章活动
25.1 活动的生命周期

25.2 ActivityDemo示例
1.代码清单25.1 ActivityDemo的清单
<?xml version="1.0" encoding="utf-8"?>
<manifest xmlns:android="http://schemas.android.com/apk/res/android"
    package="com.example.activitydemo" >

    <application
        android:allowBackup="true"
        android:icon="@drawable/ic_launcher"
        android:label="@string/app_name"
        android:theme="@style/AppTheme" >
        <activity
            android:name="com.example.activitydemo.MainActivity"
            android:label="@string/app_name" >
            <intent-filter>
                <action android:name="android.intent.action.MAIN" />

                <category android:name="android.intent.category.LAUNCHER" />
            </intent-filter>
        </activity>
    </application>

</manifest>
2.代码清单25.2 ActivityDemo的MainActivity类
package com.example.activitydemo;

import android.app.Activity;
import android.os.Bundle;
import android.util.Log;
import android.view.Menu;

public class MainActivity extends Activity {

    @Override
    protected void onCreate(Bundle savedInstanceState) {
        super.onCreate(savedInstanceState);
        Log.d("lifecycle", "onCreate");
        setContentView(R.layout.activity_main);
    }

    @Override
    public boolean onCreateOptionsMenu(Menu menu) {
        // Inflate the menu; this adds items to the action bar if it is present.
        getMenuInflater().inflate(R.menu.menu_main, menu);
        return true;
    }

    @Override
    public void onStart() {
        super.onStart();
        Log.d("lifecycle", "onStart");
    }

    @Override
    public void onRestart() {
        super.onRestart();
        Log.d("lifecycle", "onRestart");
    }

    @Override
    public void onResume() {
        super.onResume();
        Log.d("lifecycle", "onResume");
    }

    @Override
    public void onPause() {
        super.onPause();
        Log.d("lifecycle", "onPause");
    }

    @Override
    public void onStop() {
        super.onStop();
        Log.d("lifecycle", "onStop");
    }

    @Override
    public void onDestroy() {
        super.onDestroy();
        Log.d("lifecycle", "onDestroy");
    }
}

25.5 启动另一个活动
1.代码清单25.3 SecondActivityDemo的清单
<?xml version="1.0" encoding="utf-8"?>
<manifest xmlns:android="http://schemas.android.com/apk/res/android"
    package="com.example.secondactivitydemo" >

    <application
        android:allowBackup="true"
        android:icon="@drawable/ic_launcher"
        android:label="@string/app_name"
        android:theme="@style/AppTheme" >
        <activity
            android:name="com.example.secondactivitydemo.MainActivity"
            android:label="@string/app_name" >
            <intent-filter>
                <action android:name="android.intent.action.MAIN" />

                <category android:name="android.intent.category.LAUNCHER" />
            </intent-filter>
        </activity>
        <activity
            android:name="com.example.secondactivitydemo.SecondActivity"
            android:label="@string/title_activity_second" >
        </activity>
    </application>

</manifest>
2.代码清单25.4 activity_main.xml文件
<RelativeLayout xmlns:android="http://schemas.android.com/apk/res/android"
xmlns:tools="http://schemas.android.com/tools"
android:layout_width="match_parent"
android:layout_height="match_parent"
android:paddingBottom="@dimen/activity_vertical_margin"
android:paddingLeft="@dimen/activity_horizontal_margin"
android:paddingRight="@dimen/activity_horizontal_margin"
android:paddingTop="@dimen/activity_vertical_margin"
tools:context=".MainActivity" >
<TextView
android:id="@+id/textView1"
android:layout_width="wrap_content"
android:layout_height="wrap_content"
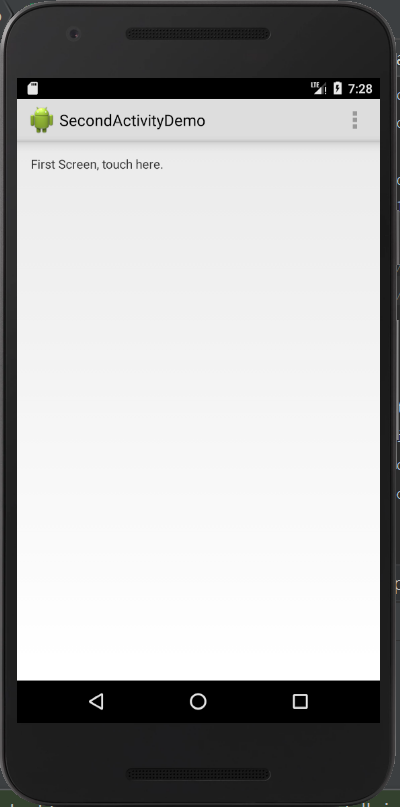
android:text="@string/first_screen" />
</RelativeLayout>3.代码清单25.5 activity_second.xml文件
<RelativeLayout xmlns:android="http://schemas.android.com/apk/res/android"
    xmlns:tools="http://schemas.android.com/tools"
    android:layout_width="match_parent"
    android:layout_height="match_parent"
    android:paddingBottom="@dimen/activity_vertical_margin"
    android:paddingLeft="@dimen/activity_horizontal_margin"
    android:paddingRight="@dimen/activity_horizontal_margin"
    android:paddingTop="@dimen/activity_vertical_margin"
    tools:context=".SecondActivity" >

    <TextView
        android:id="@+id/textView1"
        android:layout_width="wrap_content"
        android:layout_height="wrap_content" />

</RelativeLayout>
4.代码清单25.6 MainActivity类
package com.example.secondactivitydemo;

import android.app.Activity;
import android.content.Intent;
import android.os.Bundle;
import android.view.Menu;
import android.view.MotionEvent;
import android.view.View;
import android.view.View.OnTouchListener;
import android.widget.TextView;

public class MainActivity extends Activity implements
        OnTouchListener {

    @Override
    protected void onCreate(Bundle savedInstanceState) {
        super.onCreate(savedInstanceState);
        setContentView(R.layout.activity_main);
        TextView tv = (TextView) findViewById(R.id.textView1);
        tv.setOnTouchListener(this);
    }

    @Override
    public boolean onCreateOptionsMenu(Menu menu) {
        // Inflate the menu; this adds items to the action bar if it
        // is present.
        getMenuInflater().inflate(R.menu.menu_main, menu);
        return true;
    }

    @Override
    public boolean onTouch(View arg0, MotionEvent event) {
        Intent intent = new Intent(this, SecondActivity.class);
        intent.putExtra("message", "Message from First Screen");
        startActivity(intent);
        return true;
    }
}
5.代码清单25.7 SecondActivity类
package com.example.secondactivitydemo;
import android.app.Activity;
import android.content.Intent;
import android.os.Bundle;
import android.view.Menu;
import android.widget.TextView;
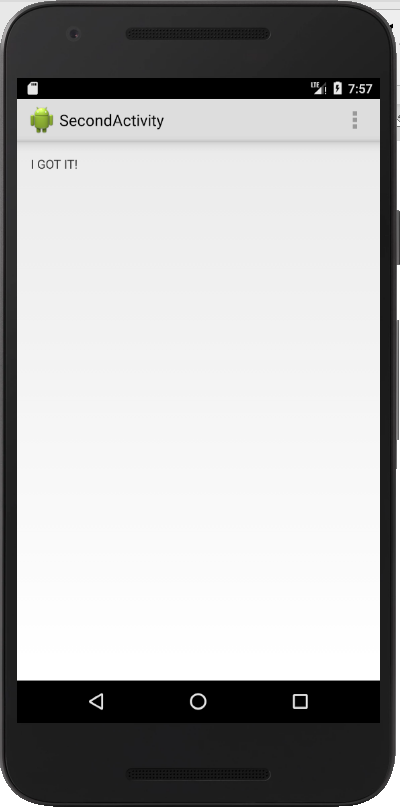
public class SecondActivity extends Activity {
@Override
protected void onCreate(Bundle savedInstanceState) {
super.onCreate(savedInstanceState);
setContentView(R.layout.activity_second);
Intent intent = getIntent();
String message = intent.getStringExtra("message");
((TextView) findViewById(R.id.textView1)).setText(message);
}
@Override
public boolean onCreateOptionsMenu(Menu menu) {
getMenuInflater().inflate(R.menu.menu_second, menu);
return true;
}
}

第26章UI组件
26.1 概览
1.微件和布局,都在android.view.View类中实现。
26.2 使用Android Studio UI工具
1.使用UI工具所做的事情,都会反映到布局文件中,以XML元素的形式体现出来。要查看你生成了什么,单击UI工具底部的XML视图即可。
26.3 使用基本组件
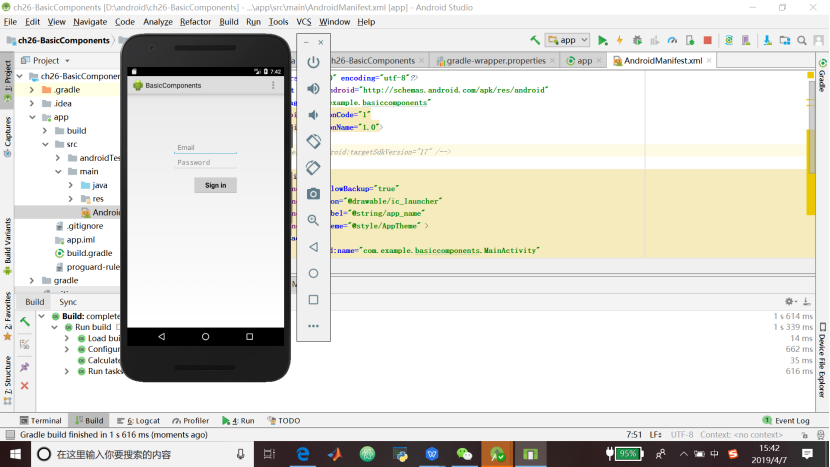
1.代码清单26.1 BasicComponents项目的清单文件
<?xml version="1.0" encoding="utf-8"?>
<manifest xmlns:android="http://schemas.android.com/apk/res/android"
    package="com.example.basiccomponents"
    android:versionCode="1"
    android:versionName="1.0">

   <!--uses-sdk android:targetSdkVersion="17" /-->

    <application
        android:allowBackup="true"
        android:icon="@drawable/ic_launcher"
        android:label="@string/app_name"
        android:theme="@style/AppTheme" >
        <activity
            android:name="com.example.basiccomponents.MainActivity"
            android:label="@string/app_name" >
            <intent-filter>
                <action android:name="android.intent.action.MAIN"/>
                <category
                    android:name="android.intent.category.LAUNCHER"/>
            </intent-filter>
        </activity>
    </application>
</manifest>
2.代码清单26.2 res/values下的strings.xml文件
<?xml version="1.0" encoding="utf-8"?>
<resources>
    <string name="app_name">BasicComponents</string>
    <string name="action_settings">Settings</string>
    <string name="prompt_email">Email</string>
    <string name="prompt_password">Password</string>
    <string name="action_sign_in"><b>Sign in</b></string>
</resources>
3.代码清单26.3 布局文件
<LinearLayout xmlns:android="http://schemas.android.com/apk/res/android"
    xmlns:tools="http://schemas.android.com/tools"
    android:layout_width="match_parent"
    android:layout_height="match_parent"
    android:layout_gravity="center"
    android:gravity="center_horizontal"
    android:orientation="vertical"
    android:padding="120dp"
    tools:context=".MainActivity" >

    <EditText
        android:id="@+id/email"
        android:layout_width="match_parent"
        android:layout_height="wrap_content"
        android:hint="@string/prompt_email"
        android:inputType="textEmailAddress"
        android:maxLines="1"
        android:singleLine="true" />

    <EditText
        android:id="@+id/password"
        android:layout_width="match_parent"
        android:layout_height="wrap_content"
        android:hint="@string/prompt_password"
        android:imeActionId="@+id/login"
        android:imeOptions="actionUnspecified"
        android:inputType="textPassword"
        android:maxLines="1"
        android:singleLine="true" />

    <Button
        android:id="@+id/sign_in_button"
        android:layout_width="wrap_content"
        android:layout_height="wrap_content"
        android:layout_gravity="right"
        android:layout_marginTop="16dp"
        android:paddingLeft="32dp"
        android:paddingRight="32dp"
        android:text="@string/action_sign_in" />

</LinearLayout>
4.代码清单26.4 BasicComponents项目的MainActivity类
package com.example.basiccomponents;

import android.app.Activity;
import android.os.Bundle;
import android.view.Menu;

public class MainActivity extends Activity {

    @Override
    protected void onCreate(Bundle savedInstanceState) {
        super.onCreate(savedInstanceState);
        setContentView(R.layout.activity_main);
    }

    @Override
    public boolean onCreateOptionsMenu(Menu menu) {
        // Inflate the menu; this adds items to the action bar if it
        // is present.
        getMenuInflater().inflate(R.menu.menu_main, menu);
        return true;
    }
}
26.5 通知
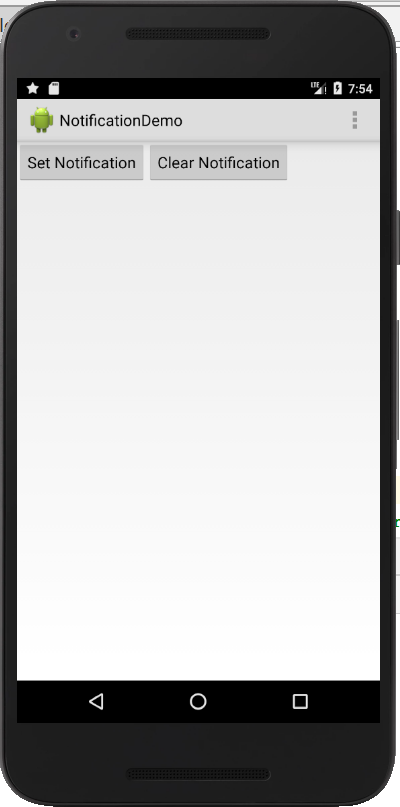
1.代码清单26.5 NotificationDemo的主活动的布局文件
<LinearLayout xmlns:android="http://schemas.android.com/apk/res/android"
    xmlns:tools="http://schemas.android.com/tools"
    android:layout_width="match_parent"
    android:layout_height="match_parent"
    android:layout_gravity="center"
    android:gravity="center_horizontal"
    android:orientation="vertical"
    android:padding="120dp"
    tools:context=".MainActivity" >

    <EditText
        android:id="@+id/email"
        android:layout_width="match_parent"
        android:layout_height="wrap_content"
        android:hint="@string/prompt_email"
        android:inputType="textEmailAddress"
        android:maxLines="1"
        android:singleLine="true" />

    <EditText
        android:id="@+id/password"
        android:layout_width="match_parent"
        android:layout_height="wrap_content"
        android:hint="@string/prompt_password"
        android:imeActionId="@+id/login"
        android:imeOptions="actionUnspecified"
        android:inputType="textPassword"
        android:maxLines="1"
        android:singleLine="true" />

    <Button
        android:id="@+id/sign_in_button"
        android:layout_width="wrap_content"
        android:layout_height="wrap_content"
        android:layout_gravity="right"
        android:layout_marginTop="16dp"
        android:paddingLeft="32dp"
        android:paddingRight="32dp"
        android:text="@string/action_sign_in" />

</LinearLayout>
2.代码清单26.6 主活动类
package com.example.notificationdemo;
import android.app.Activity;
import android.app.Notification;
import android.app.NotificationManager;
import android.app.PendingIntent;
import android.content.Intent;
import android.os.Bundle;
import android.view.Menu;
import android.view.View;
public class MainActivity extends Activity {
int notificationId = 1001;
@Override
protected void onCreate(Bundle savedInstanceState) {
super.onCreate(savedInstanceState);
setContentView(R.layout.activity_main);
}
@Override
public boolean onCreateOptionsMenu(Menu menu) {
getMenuInflater().inflate(R.menu.menu_main, menu);
return true;
}
public void setNotification(View view) {
Intent intent = new Intent(this, SecondActivity.class);
PendingIntent pendingIntent =
PendingIntent.getActivity(this, 0, intent, 0);
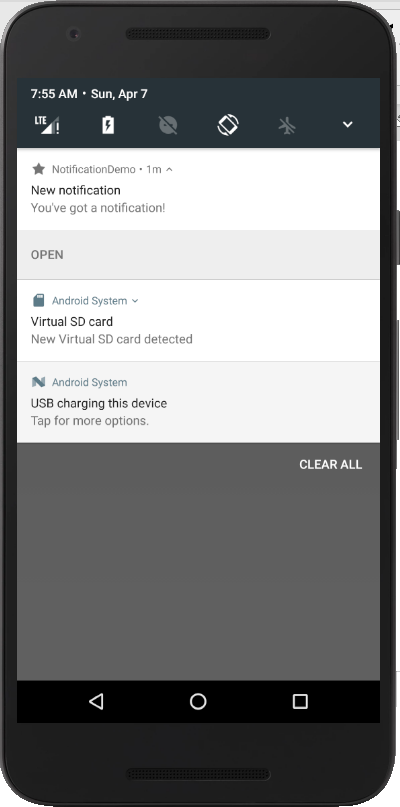
Notification notification = new Notification.Builder(this)
.setContentTitle("New notification")
.setContentText("You've got a notification!")
.setSmallIcon(android.R.drawable.star_on)
.setContentIntent(pendingIntent)
.setAutoCancel(true)
.addAction(android.R.drawable.ic_menu_gallery,
"Open", pendingIntent)
.build();
NotificationManager notificationManager =
(NotificationManager) getSystemService(
NOTIFICATION_SERVICE);
notificationManager.notify(notificationId, notification);
}
public void clearNotification(View view) {
NotificationManager notificationManager =
(NotificationManager) getSystemService(
NOTIFICATION_SERVICE);
notificationManager.cancel(notificationId);
}
}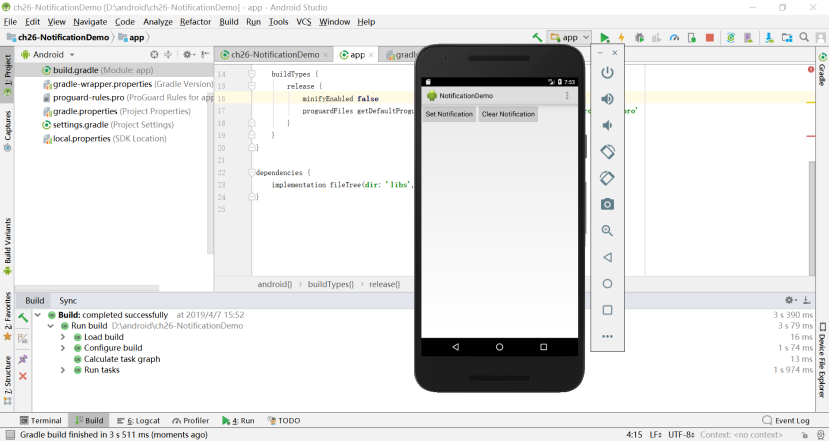
单击Set Notification按钮,通知图标(一个橙色的星)将会出现在状态栏上:
将状态栏向屏幕的右下方拖动以打开通知绘制区:
触碰通知启动SecondActivity:
教材学习中的问题和解决过程
- 问题1:本周出现的问题主要是Android Studio下载安装和使用的问题。
- 问题解决方案1:把Android Studio项目从C盘移植到了D盘,解决了SDK包和模拟器所占内存空间太大,导致项目无法运行的问题。
代码调试中的问题和解决过程
- 问题1:从配套程序示例中直接导入的项目多次报错,无法运行。
- 问题1解决方案:
(1)Error:Unsupported method: BaseConfig.getApplicationIdSuffix().
A.修改项目的build.gradle文件,找到dependencies,修改classpath
classpath 'com.android.tools.build:gradle:1.0.0'
改成:
classpath 'com.android.tools.build:gradle:3.2.0';
B.上一步修改了build.gradle中的版本之后,gradle-wrapper.properties文件中的gradle的版本也需要修改,
直接修改:distributionUrl
distributionUrl=https://services.gradle.org/distributions/gradle-4.6-all.zip
(2)修改后运行又报错:
Configuration ‘compile’ is obsolete and has been replaced with ‘implementation’ and ‘api’.
It will be removed at the end of 2018. For more information see: http://d.android.com/r/tools/update-dependency-configurations.html
A.修改build gradle:compile fileTree(dir: 'libs', include: ['*.jar'])为implementation fileTree(dir: 'libs', include: ['*.jar'])即可。 - 问题2:本周课堂作业在上传码云的时候总是push报错
- 问题2解决方案:在app处git bash here上传src文件夹的时候,如不手动更改src文件夹名称,就会在pull和push过程中将先前的项目自动覆盖。
上周错题总结
1.Assume that you have an InputStream whose next bytes are XYZABC. What is the result of
calling the following method on the stream, using a count value of 3?
假如有一个InputStream,接下来的内容是XYZABC,下面代码中假如count
为3,下面代码执行结果是?
public static String pullBytes(InputStream is, int count) throws IOException
{
is.mark(count);
final StringBuilder sb = new StringBuilder();
for(int i=0; i<count; i++)
sb.append((char)is.read());
is.reset();
is.skip(1);
sb.append((char)is.read());
return sb.toString();
}
A .It will return a String value of XYZ.
B .It will return a String value of XYZA.
C .It will return a String value of XYZX.
D .It will return a String value of XYZB.
E .It will return a String value of XYZY.
F .The code does not compile.
G .The code compiles but throws an exception at runtime.
H .The result cannot be determined with the information given.
正确答案: H 我的答案: A
并非所有java.io流都支持mark()操作;因此,如果不在流上调用mark-supported(),则在运行时之前结果是未知的。如果流确实支持mark()操作,那么结果将是xyzy,因为reset()操作将流放回调用mark()之前的位置,skip(1)将跳过x,e将正确。如果流不支持mark()操作,则可能会引发运行时异常,并且g是正确的。因为不知道输入流是否支持mark()操作,所以h是唯一正确的选择。
2.What is the value of name after an instance of Eagle is serialized and then deserialized?
Eagle的一个实例经过serialized 和 deserialized后,name的值是?
public class Bird implements Serializable {
protected transient String name = "Bridget";
public void setName(String name) { this.name = name; }
public String getName() { return name; }
public Bird() {
this.name = "Matt";
}
}
public class Eagle extends Bird implements Serializable {
{ this.name = "Janette"; }
public Eagle() {
this.name = "Daniel";
}
}
A .Bridget
B .Matt
C .Janette
D .Daniel
E .null
F .The code does not compile.
G .The code compiles but throws an exception at runtime.
H .The value may not be known until runtime.
正确答案: E 我的答案: B
首先,虽然bird类实现了serializable,但它没有定义建议但不需要的非静态serial version uid变量;因此它编译时没有问题,而f是不正确的。代码也可以毫无问题地运行,因此g是不正确的。这里的关键是,Java将在反序列化期间调用第一个非序列化的无参数父类的构造函数,跳过任何构造函数和介于其间的序列化类的默认初始化,包括EGLE和BED本身。因此,object()是第一个被调用的构造函数。跳过所有默认初始化,因此a、b、c和d都不正确。由于名称被标记为瞬态,因此反序列化的值为空,并且e是正确的。h也不正确,因为调用方不能用setname()更改name的序列化值,因为name被标记为transien。
3.Assuming the following class has proper public getter/setter methods for all of its private fields, which of the following fields will always be null after an instance of the class is
serialized and then deserialized? (Choose all that apply.)
加入下面的类的private成员都有合适的public getter/setter,类的实例serialized and 和 deserialized后哪些成员会是null?
public class Zebra implements Serializable {
private static final long serialUID = 1L;
private transient String name = "George";
private static String birthPlace = "Africa";
private transient Integer age;
private java.util.List
private Object tail = null;
{ age = 10;}
public Zebra() {
this.name = "Sophia";}
}
}
A .name
B .tail
C .age
D .friends
E .birthPlace
F .The code does not compile.
G .The code compiles but throws an exception at runtime.
正确答案: A C 我的答案: B D
代码编译和运行时没有问题,因此f和g是不正确的。请注意,serial uid与serial version uid不同,尽管建议使用serial version uid,但不需要使用,因此不会造成任何编译问题。请注意,序列化过程不会使用seria luid进行版本控制。名称变量和年龄变量都是暂时的,这意味着它们的值在序列化时不会被保存。反序列化后,将跳过默认初始化和构造函数,它们都将为空;因此a和c是正确的。B不正确,因为它不是暂时的,并且可以由调用方在序列化之前设置。d也不正确,因为序列化的空数组与空指针不同。即使这些非瞬态字段可以设置为空,但在反序列化后它们也不能保证为空。E不正确,因为静态值不会被序列化;反序列化后,它将在类上可用。
5.Which values when inserted into the blank would allow the code to compile? (Choose all
that apply.)
插入哪些代码可以让下面的代码正确编译?
1: Console console = System.console();
2: String color = console.readLine("What is your favorite color? ");
3: console._("Your favorite color is "+color);
A .print
B .printf
C .println
D .format
E .writer().println
F .out
正确答案: B D E 我的答案: A C E
控制台定义两个输出方法,format()和printf(),它们是相同的在函数中,所以b和d是正确的。a、c和f都不正确,因为在控制台类中没有定义具有该名称的此类方法。还可以使用writer()方法访问控制台的printwriter对象,因此e是正确的。
11.Suppose that the file c:\book\java exists. Which of the following lines of code creates an
object that represents the file? (Choose all that apply.)
A .new File("c:\book\java");
B .new File("c:\book\java");
C .new File("c:/book/java");
D .new File("c://book//java");
E .None of the above
正确答案: B C 我的答案: A C
选项B是正确的,因为Java需要用另一个反斜杠来转义反斜杠。选项C也是正确的,因为Java将在使用路径时将斜杠转换为右斜杠。
21.如果有以下代码片段:
...
public _________ void add(Object o) {
if(next == list.length) {
list = Arrays.copyOf(list, list.length * 2);
}
list[next++] = o;
}
...
为了确保add()在多线程访问下的线程安全,应该加上()关键字。
A .abstract
B .synchronized
C .static
D .volatile
正确答案: B 我的答案: D
要点:synchronized和volatile的使用方法以及区别——
一旦一个共享变量(类的成员变量、类的静态成员变量)被volatile修饰之后,那么就具备了两层语义:
1)保证了不同线程对这个变量进行操作时的可见性,即一个线程修改了某个变量的值,这新值对其他线程来说是
立即可见的。
2)禁止进行指令重排序。
volatile本质是在告诉jvm当前变量在寄存器(工作内存)中的值是不确定的,需要从主存中读取;
synchronized则是锁定当前变量,只有当前线程可以访问该变量,其他线程被阻塞住。
1.volatile仅能使用在变量级别;
synchronized则可以使用在变量、方法、和类级别的
2.volatile仅能实现变量的修改可见性,并不能保证原子性;
synchronized则可以保证变量的修改可见性和原子性
3.volatile不会造成线程的阻塞;
synchronized可能会造成线程的阻塞。
4.volatile标记的变量不会被编译器优化;
synchronized标记的变量可以被编译器优化
[代码托管]
https://gitee.com/EvelynYang/sixth_week_homework
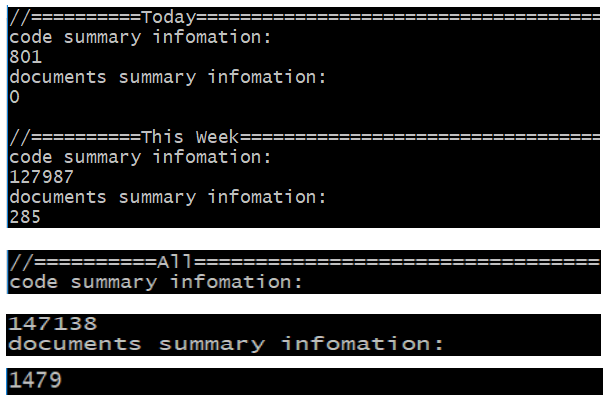
statistics.sh脚本运行结果的截图
新建AndroidProjects文件夹运行脚本,之前都是在IdeaProjects文件夹里运行。
学习进度条
| 代码行数(新增/累积) | 博客量(新增/累积) | 学习时间(新增/累积) | 重要成长 | |
|---|---|---|---|---|
| 目标 | 5000行 | 30篇 | 400小时 | |
| 第一周 | 200/200 | 2/2 | 20/20 | |
| 第二周 | 300/500 | 1/3 | 18/38 | |
| 第三周 | 500/1000 | 1/4 | 38/76 | |
| 第四周 | 1000/2000 | 1/5 | 20/96 | |
| 第五周 | 1000/3000 | 1/6 | 25/121 | |
| 第六周 | 1000/4000 | 1/7 | 25/146 |
参考资料
- 《Java和Android开发学习指南(第二版)(Java for Android.2nd)》
-[Android Studio中文社区](http://www.android-studio.org/)