目录
学习《Java和Android开发学习指南(第二版)》第27、28、29、30章——
第27章 布局
27.1 概览
1.Android中的一些布局
LinearLayout。将所有子视图以相同的方向(或者水平地或者垂直地)对齐的一个布局。
RelativeLayout。根据子视图的一个或多个同级视图的位置来排列它的一个布局。
FrameLayout。将每一个子视图放在另一个子视图顶部的一种布局。
TableLayout。将子视图按照行和列来组织的一种布局。
GridLayout。将子视图放置到一个栅格中的一种布局。
27.2 LinearLayout
1.代码清单27.1 一个水平的LinearLayout
<LinearLayout xmlns:android="http://schemas.android.com/apk/res/android"
    xmlns:tools="http://schemas.android.com/tools"
    android:orientation="horizontal"
    android:layout_width="match_parent"
    android:layout_height="match_parent">

    <ImageButton
        android:src="@android:drawable/btn_star_big_on"
        android:layout_width="wrap_content"
        android:layout_height="wrap_content"/>

    <TextView
        android:layout_width="wrap_content"
        android:layout_height="wrap_content"
        android:text="@string/hello_world" />
    <Button android:text="Button1"
        android:layout_width="wrap_content"
        android:layout_height="wrap_content"/>

</LinearLayout>
2.代码清单27.2 垂直的LinearLayout
<LinearLayout xmlns:android="http://schemas.android.com/apk/res/android"
    xmlns:tools="http://schemas.android.com/tools"
    android:orientation="vertical"
    android:layout_width="match_parent"
    android:layout_height="match_parent">

    <ImageButton
        android:src="@android:drawable/btn_star_big_on"
        android:layout_gravity="center"
        android:layout_width="wrap_content"
        android:layout_height="wrap_content"/>
    <TextView
        android:layout_gravity="center"
        android:layout_width="wrap_content"
        android:layout_height="wrap_content"
        android:layout_marginLeft="15dp"
        android:text="@string/hello_world"/>
    <Button android:text="Button1"
        android:layout_gravity="center"
        android:layout_width="wrap_content"
        android:layout_height="wrap_content"/>
</LinearLayout>
3.代码清单27.3 gravity属性设置为bottom的垂直的LinearLayout
<LinearLayout xmlns:android="http://schemas.android.com/apk/res/android"
    xmlns:tools="http://schemas.android.com/tools"
    android:orientation="vertical"
    android:layout_width="match_parent"
    android:layout_height="match_parent"
    android:gravity="bottom">

    <ImageButton
        android:src="@android:drawable/btn_star_big_on"
        android:layout_gravity="center"
        android:layout_width="wrap_content"
        android:layout_height="wrap_content"/>
    <TextView
        android:layout_gravity="center"
        android:layout_width="wrap_content"
        android:layout_height="wrap_content"
        android:layout_marginLeft="15dp"
        android:text="@string/hello_world"/>
    <Button android:text="Button1"
        android:layout_gravity="center"
        android:layout_width="wrap_content"
        android:layout_height="wrap_content"/>
</LinearLayout>
27.3 RelativeLayout
1.代码清单27.4 RelativeLayout
<RelativeLayout xmlns:android="http://schemas.android.com/apk/res/android"
    xmlns:tools="http://schemas.android.com/tools"
    android:layout_width="match_parent"
    android:layout_height="match_parent"
    android:paddingLeft="2dp"
    android:paddingRight="2dp">

    <Button
        android:id="@+id/cancelButton"
        android:layout_width="wrap_content"
        android:layout_height="wrap_content"
        android:text="Cancel" />

    <Button
        android:id="@+id/saveButton"
        android:layout_width="wrap_content"
        android:layout_height="wrap_content"
        android:layout_toRightOf="@id/cancelButton"
        android:text="Save" />

    <ImageView
        android:layout_width="150dp"
        android:layout_height="150dp"
        android:layout_marginTop="230dp"
        android:padding="4dp"
        android:layout_below="@id/cancelButton"
        android:layout_centerHorizontal="true"
        android:src="@android:drawable/ic_btn_speak_now"
    />

    <LinearLayout
        android:id="@+id/filter_button_container"
        android:layout_width="match_parent"
        android:layout_height="wrap_content"
        android:layout_alignParentBottom="true"
        android:gravity="center|bottom"
        android:background="@android:color/white"
        android:orientation="horizontal" >

        <Button
            android:id="@+id/filterButton"
            android:layout_width="wrap_content"
            android:layout_height="fill_parent"
            android:text="Filter" />

        <Button
            android:id="@+id/shareButton"
            android:layout_width="wrap_content"
            android:layout_height="fill_parent"
            android:text="Share" />

        <Button
            android:id="@+id/deleteButton"
            android:layout_width="wrap_content"
            android:layout_height="fill_parent"
            android:text="Delete" />
    </LinearLayout>

</RelativeLayout>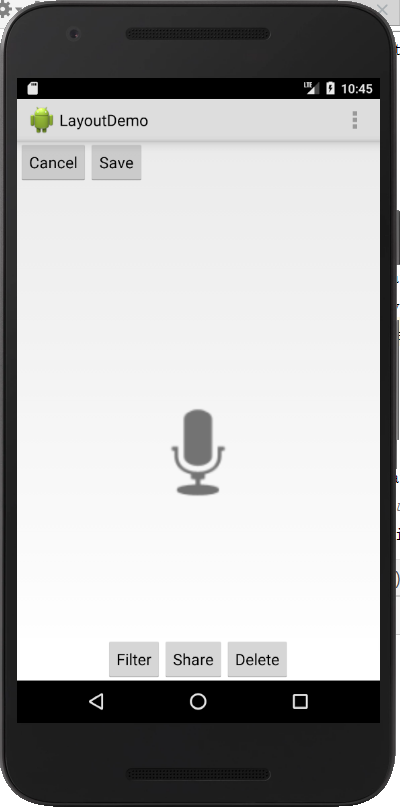
27.4 FrameLayout
1.代码清单27.5 使用一个FrameLayout
<FrameLayout xmlns:android="http://schemas.android.com/apk/res/android"
    xmlns:tools="http://schemas.android.com/tools"
    android:orientation="horizontal"
    android:layout_width="match_parent"
    android:layout_height="match_parent">

    <Button android:text="Button1"
        android:layout_width="wrap_content"
        android:layout_height="wrap_content"
        android:layout_marginTop="100dp"
        android:layout_marginLeft="100dp" />
    <ImageButton
        android:src="@android:drawable/btn_star_big_on"
        android:alpha="0.35"
        android:layout_width="wrap_content"
        android:layout_height="wrap_content"
        android:layout_marginTop="90dp"
        android:layout_marginLeft="90dp" />
</FrameLayout>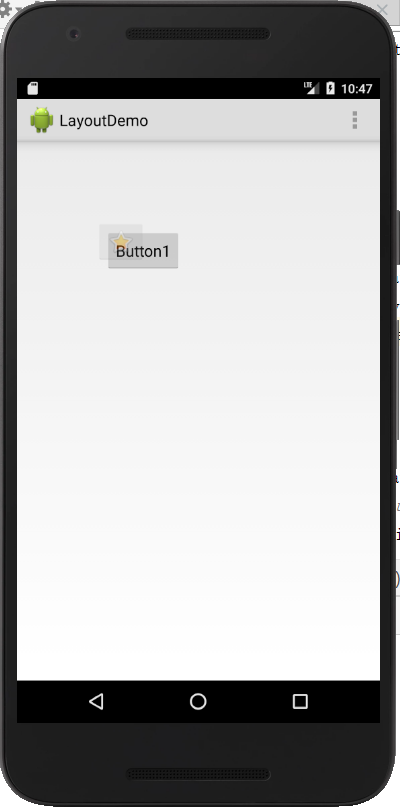
27.5 TableLayout
1.代码清单27.6 使用TableLayout
<TableLayout xmlns:android="http://schemas.android.com/apk/res/android"
    android:layout_width="wrap_content"
    android:layout_height="wrap_content"
    android:layout_gravity="center" >

    <TableRow
        android:id="@+id/tableRow1"
        android:layout_width="500dp"
        android:layout_height="wrap_content"
        android:padding="5dip" >

        <ImageView android:src="@drawable/ic_launcher" />

        <ImageView android:src="@android:drawable/btn_star_big_on" />

        <ImageView android:src="@drawable/ic_launcher" />
    </TableRow>

    <TableRow
        android:id="@+id/tableRow2"
        android:layout_width="wrap_content"
        android:layout_height="wrap_content" >

        <ImageView android:src="@android:drawable/btn_star_big_off" />

        <TextClock />

        <ImageView android:src="@android:drawable/btn_star_big_on" />
    </TableRow>

    <EditText android:hint="Your name" />

    <Button
        android:layout_height="wrap_content"
        android:text="Go" />

</TableLayout>
27.6 GridLayout
1.代码清单27.7 GridLayout示例
<GridLayout xmlns:android="http://schemas.android.com/apk/res/android"
    android:layout_width="wrap_content"
    android:layout_height="wrap_content"
    android:layout_gravity="center"
    android:columnCount="3"

    >

    <!-- 1st row, spanning 3 columns -->
    <TextView
        android:layout_width="wrap_content"
        android:layout_height="wrap_content"
        android:text="Enter your name"
        android:layout_columnSpan="3"
        android:textSize="26sp"
        />
    <!-- 2nd row -->
    <TextView android:text="First Name"/>
    <EditText
        android:id="@+id/firstName"
        android:layout_width="200dp"
        android:layout_columnSpan="2"/>

    <!-- 3rd row -->
    <TextView android:text="Last Name"/>
    <EditText
        android:id="@+id/lastName"
        android:layout_width="200dp"
        android:layout_columnSpan="2"/>

    <!-- 4th row, spanning 3 columns -->
    <Button
        android:layout_width="wrap_content"
        android:layout_height="wrap_content"
        android:layout_column="2"
        android:layout_gravity="right"
        android:text="Submit"/>

</GridLayout>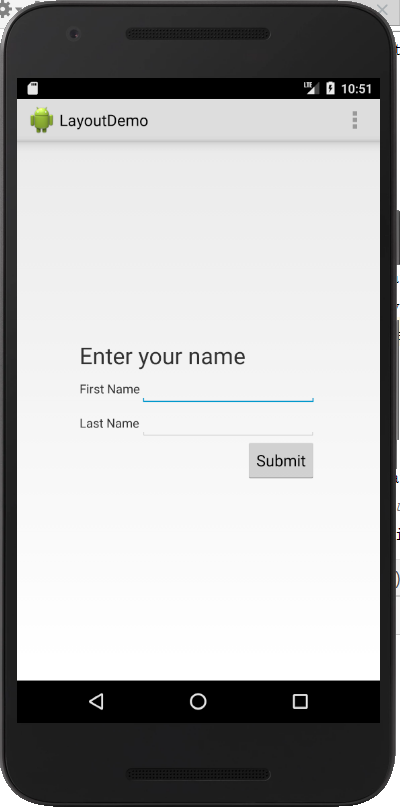
第28章监听器
和众多的GUI系统一样,Android也是基于事件的。使用活动中的一个视图进行的用户交互,可能会触发一个事件,而且你可以编写当事件发生的时候所执行的代码。包含了响应某一个事件的代码的类,叫作事件监听器。
28.2 使用onClick属性
1.代码清单28.1 MulticolorClock的清单
<?xml version="1.0" encoding="utf-8"?>
<manifest xmlns:android="http://schemas.android.com/apk/res/android"
    package="com.example.multicolorclock"
    android:versionCode="1"
    android:versionName="1.0" >


    <application
        android:allowBackup="true"
        android:icon="@drawable/ic_launcher"
        android:label="@string/app_name"
        android:theme="@style/AppTheme" >
        <activity
            android:name="com.example.multicolorclock.MainActivity"
            android:label="@string/app_name" >
            <intent-filter>
                <action android:name="android.intent.action.MAIN" />
                <category android:name="android.intent.category.LAUNCHER" />
            </intent-filter>
        </activity>
    </application>
</manifest>
2.代码清单28.2 MulticolorClock中的布局文件
<RelativeLayout xmlns:android="http://schemas.android.com/apk/res/android"
    xmlns:tools="http://schemas.android.com/tools"
    android:layout_width="match_parent"
    android:layout_height="match_parent"
    android:paddingBottom="@dimen/activity_vertical_margin"
    android:paddingLeft="@dimen/activity_horizontal_margin"
    android:paddingRight="@dimen/activity_horizontal_margin"
    android:paddingTop="@dimen/activity_vertical_margin"
    tools:context=".MainActivity">

    <AnalogClock
        android:id="@+id/analogClock1"
        android:layout_width="wrap_content"
        android:layout_height="wrap_content"
        android:layout_alignParentTop="true"
        android:layout_centerHorizontal="true"
        android:layout_marginTop="90dp"
        android:onClick="changeColor"
        />

</RelativeLayout>
3.代码清单28.3 MulticolorClock中的MainActivity类
package com.example.multicolorclock;
import android.app.Activity;
import android.graphics.Color;
import android.os.Bundle;
import android.view.Menu;
import android.view.View;
import android.widget.AnalogClock;

public class MainActivity extends Activity {

    int counter = 0;
    int[] colors = { Color.BLACK, Color.BLUE, Color.CYAN,
            Color.DKGRAY, Color.GRAY, Color.GREEN, Color.LTGRAY,
            Color.MAGENTA, Color.RED, Color.WHITE, Color.YELLOW };

    @Override
    protected void onCreate(Bundle savedInstanceState) {
        super.onCreate(savedInstanceState);
        setContentView(R.layout.activity_main);
    }

    @Override
    public boolean onCreateOptionsMenu(Menu menu) {
        // Inflate the menu; this adds items to the action bar if it
        // is present.
        getMenuInflater().inflate(R.menu.menu_main, menu);
        return true;
    }

    public void changeColor(View view) {
        if (counter == colors.length) {
            counter = 0;
        }
        view.setBackgroundColor(colors[counter++]);
    }
}
28.3 实现一个监听器
1.代码清单28.4 CellView类
package com.example.gesturedemo;
import android.content.Context;
import android.widget.ImageView;

public class CellView extends ImageView {
    int x;
    int y;

    public CellView(Context context, int x, int y) {
        super(context);
        this.x = x;
        this.y = y;
    }
}
2.代码清单28.5 MainActivity类
package com.example.gesturedemo;
import android.app.Activity;
import android.graphics.drawable.Drawable;
import android.os.Bundle;
import android.view.Gravity;
import android.view.Menu;
import android.view.MotionEvent;
import android.view.View;
import android.view.View.OnTouchListener;
import android.view.ViewGroup;
import android.widget.ImageView;
import android.widget.LinearLayout;

public class MainActivity extends Activity {

    int rowCount = 7;
    int cellCount = 7;
    ImageView imageView1;
    ImageView imageView2;
    CellView[][] cellViews;
    int downX;
    int downY;
    boolean swapping = false;

    @Override
    protected void onCreate(Bundle savedInstanceState) {
        super.onCreate(savedInstanceState);

        LinearLayout root = new LinearLayout(this);
        LinearLayout.LayoutParams matchParent =
                new LinearLayout.LayoutParams(
                        LinearLayout.LayoutParams.MATCH_PARENT,
                        LinearLayout.LayoutParams.MATCH_PARENT);
        root.setOrientation(LinearLayout.VERTICAL);
        root.setGravity(Gravity.CENTER_VERTICAL);

        addContentView(root, matchParent);


        // create row
        cellViews = new CellView[rowCount][cellCount];
        LinearLayout.LayoutParams rowLayoutParams =
                new LinearLayout.LayoutParams(
                        LinearLayout.LayoutParams.MATCH_PARENT,
                        LinearLayout.LayoutParams.WRAP_CONTENT);

        ViewGroup.LayoutParams cellLayoutParams =
                new ViewGroup.LayoutParams(
                        ViewGroup.LayoutParams.WRAP_CONTENT,
                        ViewGroup.LayoutParams.WRAP_CONTENT);

        int count = 0;
        for (int i = 0; i < rowCount; i++) {
            CellView[] cellRow = new CellView[cellCount];
            cellViews[i] = cellRow;

            LinearLayout row = new LinearLayout(this);
            row.setLayoutParams(rowLayoutParams);
            row.setOrientation(LinearLayout.HORIZONTAL);
            row.setGravity(Gravity.CENTER_HORIZONTAL);
            root.addView(row);
            // create cells
            for (int j = 0; j < cellCount; j++) {
                CellView cellView = new CellView(this, j, i);
                cellRow[j] = cellView;
                if (count == 0) {
                    cellView.setImageDrawable(
                            getResources().getDrawable(
                                    R.drawable.image1));
                } else if (count == 1) {
                    cellView.setImageDrawable(
                            getResources().getDrawable(
                                    R.drawable.image2));
                } else {
                    cellView.setImageDrawable(
                            getResources().getDrawable(
                                    R.drawable.image3));
                }
                count++;
                if (count == 3) {
                    count = 0;
                }
                cellView.setLayoutParams(cellLayoutParams);
                cellView.setOnTouchListener(touchListener);
                row.addView(cellView);
            }
        }
    }

    @Override
    public boolean onCreateOptionsMenu(Menu menu) {
        getMenuInflater().inflate(R.menu.menu_main, menu);
        return true;
    }

    private void swapImages(CellView v1, CellView v2) {
        Drawable drawable1 = v1.getDrawable();
        Drawable drawable2 = v2.getDrawable();
        v1.setImageDrawable(drawable2);
        v2.setImageDrawable(drawable1);
    }

    OnTouchListener touchListener = new OnTouchListener() {
        @Override
        public boolean onTouch(View v, MotionEvent event) {
            CellView cellView = (CellView) v;

            int action = event.getAction();
            switch (action) {
                case (MotionEvent.ACTION_DOWN):
                    downX = cellView.x;
                    downY = cellView.y;
                    return true;
                case (MotionEvent.ACTION_MOVE):
                    if (swapping) {
                        return true;
                    }
                    float x = event.getX();
                    float y = event.getY();
                    int w = cellView.getWidth();
                    int h = cellView.getHeight();
                    if (downX < cellCount - 1
                            && x > w && y >= 0 && y <= h) {
                        // swap with right cell
                        swapping = true;
                        swapImages(cellView,
                                cellViews[downY][downX + 1]);
                    } else if (downX > 0 && x < 0
                            && y >=0 && y <= h) {
                        // swap with left cell
                        swapping = true;
                        swapImages(cellView,
                                cellViews[downY][downX - 1]);
                    } else if (downY < rowCount - 1
                            && y > h && x >= 0 && x <= w) {
                        // swap with cell below
                        swapping = true;
                        swapImages(cellView,
                                cellViews[downY + 1][downX]);
                    } else if (downY > 0 && y < 0
                            && x >= 0 && x <= w) {
                        // swap with cell above
                        swapping = true;
                        swapImages(cellView,
                                cellViews[downY - 1][downX]);
                    }
                    return true;
                case (MotionEvent.ACTION_UP):
                    swapping = false;
                    return true;
                default:
                    return true;
            }
        }
    };
}
触碰操作前——
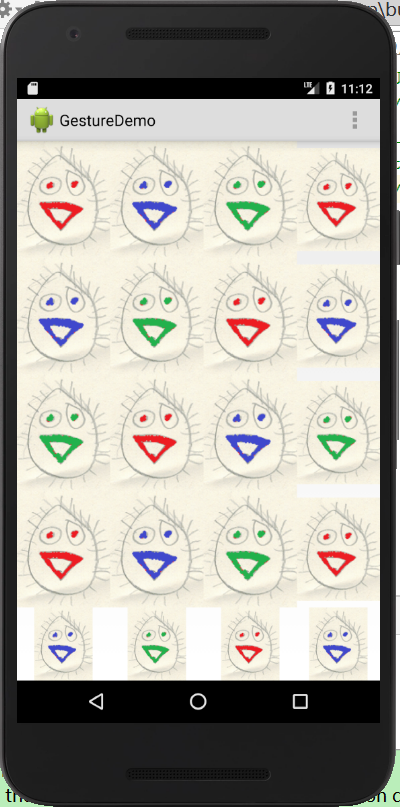
触碰操作后——

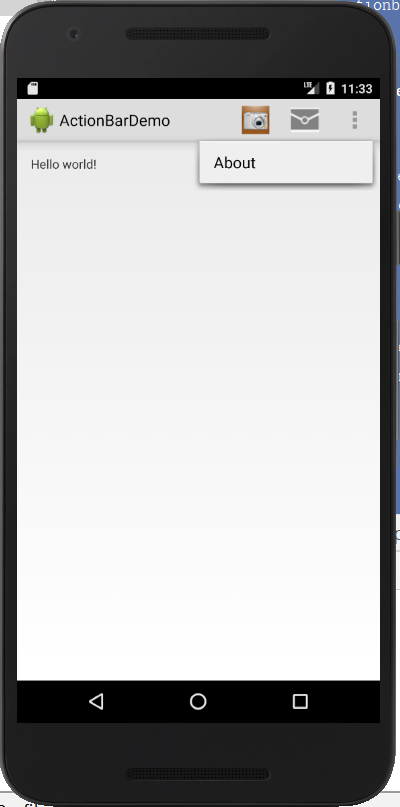
第29章操作栏
29.2 添加操作项
1.代码清单29.1 ActionBarDemo的清单
<?xml version="1.0" encoding="utf-8"?>
<manifest xmlns:android="http://schemas.android.com/apk/res/android"
    package="com.example.multicolorclock"
    android:versionCode="1"
    android:versionName="1.0" >
    <application
        android:allowBackup="true"
        android:icon="@drawable/ic_launcher"
        android:label="@string/app_name"
        android:theme="@style/AppTheme" >
        <activity
            android:name="com.example.multicolorclock.MainActivity"
            android:label="@string/app_name" >
            <intent-filter>
                <action android:name="android.intent.action.MAIN" />
                <category android:name="android.intent.category.LAUNCHER" />
            </intent-filter>
        </activity>
    </application>
</manifest>
2.代码清单29.2 res/values/strings.xml
<?xml version="1.0" encoding="utf-8"?>
<resources>

    <string name="app_name">MultiColorClock</string>
    <string name="hello_world">Hello world!</string>
    <string name="action_settings">Settings</string>

</resources>
3.代码清单29.3 res/menu/menu_main.xml
<menu xmlns:android="http://schemas.android.com/apk/res/android"
    xmlns:app="http://schemas.android.com/apk/res-auto"
    xmlns:tools="http://schemas.android.com/tools" tools:context=".MainActivity">
    <item android:id="@+id/action_settings" android:title="@string/action_settings"
        android:orderInCategory="100" android:showAsAction="never" />
</menu>
4.代码清单29.4 MainActivity类
package com.example.actionbardemo;
import android.app.Activity;
import android.app.AlertDialog;
import android.os.Bundle;
import android.view.Menu;
import android.view.MenuItem;

public class MainActivity extends Activity {

    @Override
    protected void onCreate(Bundle savedInstanceState) {
        super.onCreate(savedInstanceState);
        setContentView(R.layout.activity_main);
    }

    @Override
    public boolean onCreateOptionsMenu(Menu menu) {
        getMenuInflater().inflate(R.menu.menu_main, menu);
        return true;
    }

    @Override
    public boolean onOptionsItemSelected(MenuItem item) {
        // Handle presses on the action bar items
        switch (item.getItemId()) {
            case R.id.action_profile:
                showAlertDialog("Profile", "You selected Profile");
                return true;
            case R.id.action_capture:
                showAlertDialog("Settings",
                        "You selected Settings");
                return true;
            case R.id.action_about:
                showAlertDialog("About", "You selected About");
                return true;
            default:
                return super.onOptionsItemSelected(item);
        }
    }

    private void showAlertDialog(String title, String message) {
        AlertDialog alertDialog = new
                AlertDialog.Builder(this).create();
        alertDialog.setTitle(title);
        alertDialog.setMessage(message);
        alertDialog.show();
    }
}
29.3 添加下拉式导航
1.代码清单29.5 DropDownNavigationDemo清单
<?xml version="1.0" encoding="utf-8"?>
<manifest xmlns:android="http://schemas.android.com/apk/res/android"
    package="com.example.dropdownnavigationdemo"
    android:versionCode="1"
    android:versionName="1.0" >
    <application
        android:allowBackup="true"
        android:icon="@drawable/ic_launcher"
        android:label="@string/app_name"
        android:theme="@style/AppTheme" >
        <activity
            android:name="com.example.dropdownnavigationdemo.MainActivity"
            android:label="@string/app_name"
            android:theme="@style/MyTheme">
            <intent-filter>
                <action android:name="android.intent.action.MAIN"/>
                <category
                    android:name="android.intent.category.LAUNCHER" />
            </intent-filter>
        </activity>
    </application>
</manifest>
2.代码清单29.6 res/values/strings.xml文件
<?xml version="1.0" encoding="utf-8"?>
<resources>
    <string name="app_name">DropDownNavigationDemo</string>
    <string name="action_settings">Settings</string>
    <string name="hello_world">Hello world!</string>

    <string-array name="colors">
        <item>White</item>
        <item>Red</item>
        <item>Green</item>
        <item>Blue</item>
        <item>Yellow</item>
    </string-array>
</resources>
3.MainActivity类
package com.example.dropdownnavigationdemo;
import android.app.ActionBar;
import android.app.ActionBar.OnNavigationListener;
import android.app.Activity;
import android.graphics.Color;
import android.os.Bundle;
import android.view.Menu;
import android.widget.ArrayAdapter;
import android.widget.SpinnerAdapter;

public class MainActivity extends Activity {

    @Override
    protected void onCreate(Bundle savedInstanceState) {
        super.onCreate(savedInstanceState);
        setContentView(R.layout.activity_main);
        SpinnerAdapter spinnerAdapter =
                ArrayAdapter.createFromResource(this,
                        R.array.colors,
                        android.R.layout.simple_spinner_dropdown_item);
        ActionBar actionBar = getActionBar();
        actionBar.setNavigationMode(
                ActionBar.NAVIGATION_MODE_LIST);
        actionBar.setListNavigationCallbacks(spinnerAdapter,
                onNavigationListener);
    }

    @Override
    public boolean onCreateOptionsMenu(Menu menu) {
        getMenuInflater().inflate(R.menu.menu_main, menu);
        return true;
    }

    OnNavigationListener onNavigationListener = new
            OnNavigationListener() {
                @Override
                public boolean onNavigationItemSelected(
                        int position, long itemId) {
                    String[] colors = getResources().
                            getStringArray(R.array.colors);
                    String selectedColor = colors[position];

                    getWindow().getDecorView().setBackgroundColor(
                            Color.parseColor(selectedColor));
                    return true;
                }
            };
}
4.代码清单29.8 res/values/styles.xml文件
<resources>
    <style name="AppBaseTheme" parent="android:Theme.Light">
    </style>

    <style name="AppTheme" parent="AppBaseTheme">
    </style>

    <style name="MyTheme"
        parent="@android:style/Widget.Holo.Light">
        <item name="android:actionBarStyle">@style/MyActionBar</item>
    </style>

    <style name="MyActionBar"
        parent="@android:style/Widget.Holo.Light.ActionBar.Solid.Inverse">
        <item
            name="android:background">@android:color/holo_blue_bright</item>
    </style>
</resources>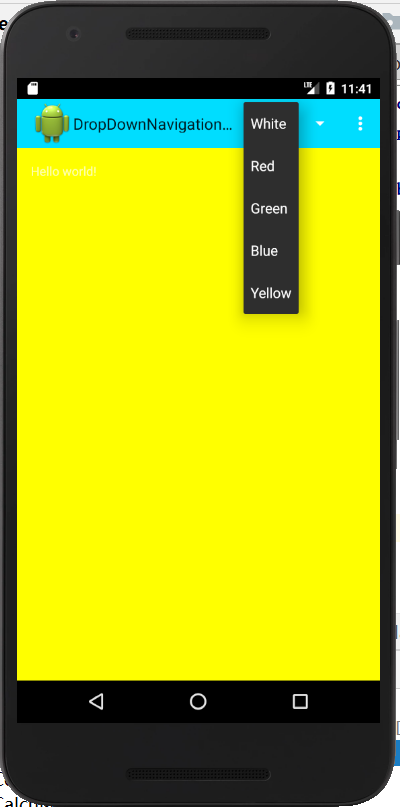
第30章菜单
30.1 概览
1.Android中有3种类型的菜单:选项菜单、上下文菜单、弹出式菜单。
2.使用选项菜单和上下文菜单的时候需要做的3件事情。
(1)在一个XML文件中创建菜单,并将其保存到res/menu目录下。
(2)在活动类中,根据菜单类型,覆盖onCreateOptionsMenu或onCreateContextMenu方法。然后,在覆盖的方法中,调用getMenuInflater().inflate()传入要使用的菜单。
(3)在活动类中,根据菜单类型,覆盖onOptionsItemSelected或onContextItemSelected方法。
3.弹出式菜单:
(1)在XML文件中创建菜单,并将其保存到res/menu目录中。
(2)在活动类中,创建一个PopupMenu对象和一个PupopMenu.OnMenuItemClickListener对象。在监听器类中,定义一个方法,当选择一个弹出式菜单选项的时候,该方法将处理点击事件。
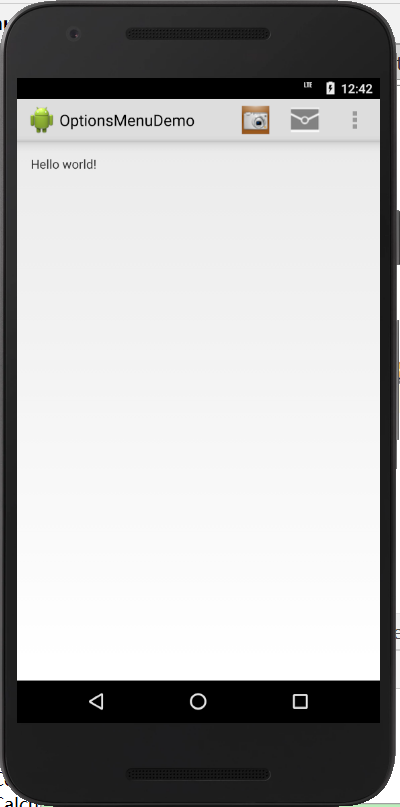
30.3 选项菜单
1.代码清单30.1 OptionsMenuDemo的清单
<?xml version="1.0" encoding="utf-8"?>
<manifest xmlns:android="http://schemas.android.com/apk/res/android"
    package="com.example.optionsmenudemo"
    android:versionCode="1"
    android:versionName="1.0" >
    <application
        android:allowBackup="true"
        android:icon="@drawable/ic_launcher"
        android:label="@string/app_name"
        android:theme="@style/AppTheme" >
        <activity
            android:name="com.example.optionsmenudemo.MainActivity"
            android:label="@string/app_name" >
            <intent-filter>
                <action android:name="android.intent.action.MAIN"/>
                <category
                    android:name="android.intent.category.LAUNCHER"/>
            </intent-filter>
        </activity>
    </application>
</manifest>
2.代码清单30.2 options_menu.xml文件
<menu xmlns:android="http://schemas.android.com/apk/res/android">
    <item
        android:id="@+id/action_capture"
        android:orderInCategory="100"
        android:showAsAction="ifRoom|withText"
        android:icon="@drawable/icon1"
        android:title="@string/action_capture"/>

    <item
        android:id="@+id/action_profile"
        android:orderInCategory="200"
        android:showAsAction="ifRoom|withText"
        android:icon="@drawable/icon2"
        android:title="@string/action_profile"/>

    <item
        android:id="@+id/action_about"
        android:orderInCategory="50"
        android:showAsAction="never"
        android:title="@string/action_about"/>
</menu>
3.代码清单30.3 用于OptionsMenuDemo的strings.xml
<?xml version="1.0" encoding="utf-8"?>
<resources>
    <string name="app_name">OptionsMenuDemo</string>
    <string name="action_capture">Capture</string>
    <string name="action_profile">Profile</string>
    <string name="action_about">About</string>
    <string name="hello_world">Hello world!</string>
</resources>
4.代码清单30.4 OptionsMenuDemo的MainActivity
package com.example.optionsmenudemo;
import android.app.Activity;
import android.app.AlertDialog;
import android.os.Bundle;
import android.view.Menu;
import android.view.MenuItem;

public class MainActivity extends Activity {
    @Override
    protected void onCreate(Bundle savedInstanceState) {
        super.onCreate(savedInstanceState);
        setContentView(R.layout.activity_main);
    }

    @Override
    public boolean onCreateOptionsMenu(Menu menu) {
        getMenuInflater().inflate(R.menu.options_menu, menu);
        return true;
    }

    @Override
    public boolean onOptionsItemSelected(MenuItem item) {
        // Handle click on menu items
        switch (item.getItemId()) {
            case R.id.action_profile:
                showAlertDialog("Profile", "You selected Profile");
                return true;
            case R.id.action_capture:
                showAlertDialog("Settings",
                        "You selected Settings");
                return true;
            case R.id.action_about:
                showAlertDialog("About", "You selected About");
                return true;
            default:
                return super.onOptionsItemSelected(item);
        }
    }

    private void showAlertDialog(String title, String message) {
        AlertDialog alertDialog = new
                AlertDialog.Builder(this).create();
        alertDialog.setTitle(title);
        alertDialog.setMessage(message);
        alertDialog.show();
    }
}
30.4 上下文菜单
1.代码清单30.5 ContextMenuDemo的AndroidMenifest.xml
<?xml version="1.0" encoding="utf-8"?>
<manifest xmlns:android="http://schemas.android.com/apk/res/android"
    package="com.example.contextmenudemo"
    android:versionCode="1"
    android:versionName="1.0" >
    <application
        android:allowBackup="true"
        android:icon="@drawable/ic_launcher"
        android:label="@string/app_name"
        android:theme="@style/AppTheme" >
        <activity
            android:name="com.example.contextmenudemo.MainActivity"
            android:label="@string/app_name" >
            <intent-filter>
                <action android:name="android.intent.action.MAIN"/>
                <category
                    android:name="android.intent.category.LAUNCHER"/>
            </intent-filter>
        </activity>
    </application>
</manifest>
2.代码清单30.6 ContextMenuDemo的context_menu.xml
<menu xmlns:android="http://schemas.android.com/apk/res/android">
    <item
        android:id="@+id/action_rotate"
        android:title="@string/action_rotate"/>
    <item
        android:id="@+id/action_resize"
        android:title="@string/action_resize"/>
</menu>
3.代码清单30.7 ContextMenuDemo的strings.xml
<?xml version="1.0" encoding="utf-8"?>
<resources>
    <string name="app_name">ContextMenuDemo</string>
    <string name="action_settings">Settings</string>
    <string name="action_rotate">Rotate</string>
    <string name="action_resize">Resize</string>
    <string name="hello_world">Hello world!</string>
</resources>
4.代码清单30.8 ContextMenuDemo的MainActivity
package com.example.contextmenudemo;
import android.app.Activity;
import android.app.AlertDialog;
import android.os.Bundle;
import android.view.ContextMenu;
import android.view.ContextMenu.ContextMenuInfo;
import android.view.MenuInflater;
import android.view.MenuItem;
import android.view.View;
import android.widget.ImageButton;

public class MainActivity extends Activity {
    @Override
    protected void onCreate(Bundle savedInstanceState) {
        super.onCreate(savedInstanceState);
        setContentView(R.layout.activity_main);
        ImageButton imageButton = (ImageButton)
                findViewById(R.id.button1);
        registerForContextMenu(imageButton);
    }

    @Override
    public void onCreateContextMenu(ContextMenu menu, View v,
                                    ContextMenuInfo menuInfo) {
        super.onCreateContextMenu(menu, v, menuInfo);
        MenuInflater inflater = getMenuInflater();
        inflater.inflate(R.menu.context_menu, menu);
    }
    @Override
    public boolean onContextItemSelected(MenuItem item) {
        switch (item.getItemId()) {
            case R.id.action_rotate:
                showAlertDialog("Rotate", "You selected Rotate ");
                return true;
            case R.id.action_resize:
                showAlertDialog("Resize", "You selected Resize");
                return true;
            default:
                return super.onContextItemSelected(item);
        }
    }

    private void showAlertDialog(String title, String message) {
        AlertDialog alertDialog = new
                AlertDialog.Builder(this).create();
        alertDialog.setTitle(title);
        alertDialog.setMessage(message);
        alertDialog.show();
    }
}
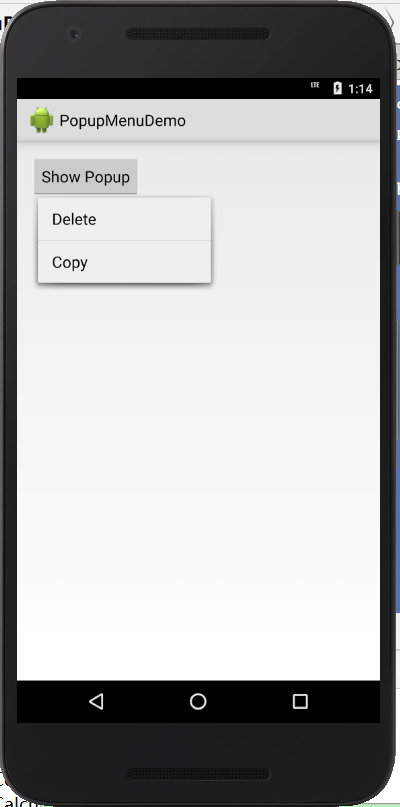
30.5 弹出式菜单
1.代码清单30.9 PopupMenuDemo的AndroidManifest.xml文件
<?xml version="1.0" encoding="utf-8"?>
<manifest xmlns:android="http://schemas.android.com/apk/res/android"
    package="com.example.popupmenudemo"
    android:versionCode="1"
    android:versionName="1.0" >

    <uses-sdk
        android:minSdkVersion="18"
        android:targetSdkVersion="18" />

    <application
        android:allowBackup="true"
        android:icon="@drawable/ic_launcher"
        android:label="@string/app_name"
        android:theme="@style/AppTheme" >
        <activity
            android:name="com.example.popupmenudemo.MainActivity"
            android:label="@string/app_name" >
            <intent-filter>
                <action android:name="android.intent.action.MAIN"/>
                <category
                    android:name="android.intent.category.LAUNCHER"/>
            </intent-filter>
        </activity>
    </application>
</manifest>
2.代码清单30.10 PopupMenuDemo的popup_menu.xml
<menu xmlns:android="http://schemas.android.com/apk/res/android">
    <item
        android:id="@+id/action_delete"
        android:title="@string/action_delete"/>
    <item
        android:id="@+id/action_copy"
        android:title="@string/action_copy"/>
</menu>
3.代码清单30.11 PopupMenuDemo的strings.xml
<?xml version="1.0" encoding="utf-8"?>
<resources>
    <string name="app_name">PopupMenuDemo</string>
    <string name="action_settings">Settings</string>
    <string name="action_delete">Delete</string>
    <string name="action_copy">Copy</string>
    <string name="show_menu">Show Popup</string>
</resources>
4.代码清单30.12 PopupMenuDemo的MainActivity
package com.example.popupmenudemo;
import android.app.Activity;
import android.os.Bundle;
import android.util.Log;
import android.view.MenuItem;
import android.view.View;
import android.widget.Button;
import android.widget.PopupMenu;

public class MainActivity extends Activity {

    PopupMenu popupMenu;
    PopupMenu.OnMenuItemClickListener menuItemClickListener;

    @Override
    protected void onCreate(Bundle savedInstanceState) {
        super.onCreate(savedInstanceState);
        setContentView(R.layout.activity_main);
        menuItemClickListener =
                new PopupMenu.OnMenuItemClickListener() {
                    @Override
                    public boolean onMenuItemClick(MenuItem item) {
                        switch (item.getItemId()) {
                            case R.id.action_delete:
                                Log.d("menu", "Delete clicked");
                                return true;
                            case R.id.action_copy:
                                Log.d("menu", "Copy clicked");
                                return true;
                            default:
                                return false;
                        }
                    }
                };
        Button button = (Button) findViewById(R.id.button1);
        popupMenu = new PopupMenu(this, button);
        popupMenu.setOnMenuItemClickListener(menuItemClickListener);
        popupMenu.inflate(R.menu.popup_menu);
    }

    public void showPopupMenu(View view) {
        popupMenu.show();
    }
}
教材学习中的问题和解决过程
- 问题1:布局管理器名称、作用、要点、特点的归纳总结
- 问题解决方案1:

代码调试中的问题和解决过程
- 问题1:本周头脑风暴中提到的“命令行参数”不知道怎么操作
- 问题1解决方案:写好TestArgs类后,点击界面右上角这个标识——
选择Edit Configurations——Program Arguments添加命令行参数“4 5 6”
[代码托管]
https://gitee.com/EvelynYang/seventh_weeks
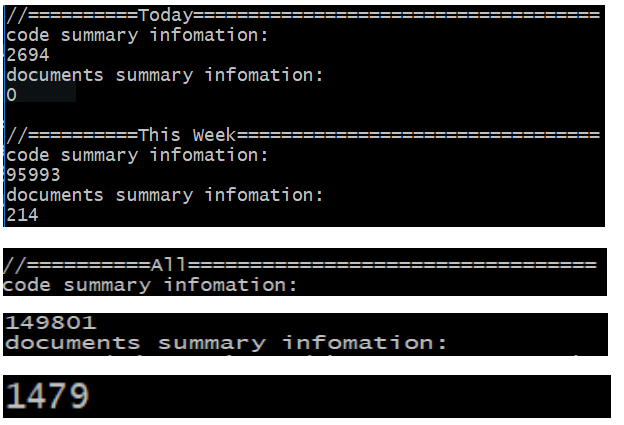
statistics.sh脚本运行结果的截图
在上周新建的AndroidProjects文件夹中运行脚本,之前都是在IdeaProjects文件夹里运行。
学习进度条
| 代码行数(新增/累积) | 博客量(新增/累积) | 学习时间(新增/累积) | 重要成长 | |
|---|---|---|---|---|
| 目标 | 5000行 | 30篇 | 400小时 | |
| 第一周 | 200/200 | 2/2 | 20/20 | |
| 第二周 | 300/500 | 1/3 | 18/38 | |
| 第三周 | 500/1000 | 1/4 | 38/76 | |
| 第四周 | 1000/2000 | 1/5 | 20/96 | |
| 第五周 | 1000/3000 | 1/6 | 25/121 | |
| 第六周 | 1000/4000 | 1/7 | 25/146 | |
| 第七周 | 1000/5000 | 1/8 | 25/171 |