在本教程中,我们将介绍一组Caffe2基础知识:基本概念,包括如何编写运算符ops和网络net。
首先,让我们导入Caffe2。 core和workspace通常是你最需要的两个。 如果你想操纵Caffe2生成的协议缓冲区,你可能还想从caffe2.proto导入caffe2_pb2。
from __future__ import absolute_import
from __future__ import division
from __future__ import print_function
from __future__ import unicode_literals

# We'll also import a few standard python libraries
from matplotlib import pyplot
import numpy as np
import time

# These are the droids you are looking for.
from caffe2.python import core, workspace
from caffe2.proto import caffe2_pb2

# Let's show all plots inline.
%matplotlib inline
1 workspace 所有数据所在的工作空间
与Matlab类似,Caffe2工作区由您创建并存储在内存中的blob组成。 现在,考虑一个blob是一个N维张量,类似于numpy的ndarray,但是是连续的。 接下来,我们将向您展示blob实际上是一个可以存储任何类型的C ++对象的类型指针,但Tensor是存储在blob中的最常见类型。 让我们来看看界面是什么样的。
Blobs()打印出工作区中的所有现有blob。HasBlob()查询工作空间中是否存在blob。 截至目前,我们没有任何。
print("Current blobs in the workspace: {}".format(workspace.Blobs()))
print("Workspace has blob 'X'? {}".format(workspace.HasBlob("X")))
运行结果:
Current blobs in the workspace: []
Workspace has blob 'X'? False
- 用
FeedBlob()将blobs输入到workspace中
X = np.random.randn(2, 3).astype(np.float32)
print("Generated X from numpy:\n{}".format(X))
workspace.FeedBlob("X", X) #返回True或者False
运行结果:
Generated X from numpy:
[[ 1.0922441  -0.65129787 -0.2511869 ]
 [ 1.3999398  -0.86516035 -2.0602188 ]]
True
- 现在,让我们看看工作区中的blob是什么。
print("Current blobs in the workspace: {}".format(workspace.Blobs()))
print("Workspace has blob 'X'? {}".format(workspace.HasBlob("X")))
print("Fetched X:\n{}".format(workspace.FetchBlob("X")))
运行结果:
Current blobs in the workspace: [u'X']
Workspace has blob 'X'? True
Fetched X:
[[ 1.0922441  -0.65129787 -0.2511869 ]
 [ 1.3999398  -0.86516035 -2.0602188 ]]
- 让我们验证数组是否相等。
np.testing.assert_array_equal(X, workspace.FetchBlob("X"))
- 请注意,如果您尝试访问不存在的blob,则会引发错误:
try:
    workspace.FetchBlob("invincible_pink_unicorn")
except RuntimeError as err:
    print(err)
- 您可能不会立即使用的一件事:您可以使用不同的名称在Python中拥有多个workspace,并在它们之间切换。 不同workspace中的Blob彼此分开。 您可以使用
CurrentWorkspace查询当前workspace。 让我们尝试按名称(gutentag)切换工作区,如果不存在则创建一个新workspace。
print("Current workspace: {}".format(workspace.CurrentWorkspace()))
print("Current blobs in the workspace: {}".format(workspace.Blobs()))

# Switch the workspace. The second argument "True" means creating
# the workspace if it is missing.
workspace.SwitchWorkspace("gutentag", True)

# Let's print the current workspace. Note that there is nothing in the
# workspace yet.
print("Current workspace: {}".format(workspace.CurrentWorkspace()))
print("Current blobs in the workspace: {}".format(workspace.Blobs()))
输出结果:
Current workspace: gutentag
Current blobs in the workspace: []
Current workspace: gutentag
Current blobs in the workspace: []
- 让我们切换回默认workspace。
workspace.SwitchWorkspace("default")
print("Current workspace: {}".format(workspace.CurrentWorkspace()))
print("Current blobs in the workspace: {}".format(workspace.Blobs()))
输出结果:
Current workspace: default
Current blobs in the workspace: ['X']
- 最后,
ResetWorkspace()清除当前工作空间中的任何内容。
workspace.ResetWorkspace()
print("Current blobs in the workspace after reset: {}".format(workspace.Blobs()))
运行结果
Current blobs in the workspace after reset: []
2 Operators
Caffe2中的ops类似于函数。 从C ++方面来看,它们都来自一个通用接口,并且是按类型注册的,因此我们可以在运行时调用不同的运算符。 运算符的接口在caffe2/proto/caffe2.proto中定义。 基本上,它需要一堆输入,并产生一堆输出。
请记住,当我们在Caffe2 Python中说“创建一个ops”时,没有任何东西可以运行。 它所做的就是创建协议缓冲区,指定运营商应该是什么。 稍后它将被发送到C ++后端执行。 如果您不熟悉protobuf,它是一个类似json的结构化数据序列化工具。 在此处查找协议缓冲区的更多信
下面是一个真正的实例:
# Create an operator.
op = core.CreateOperator(
    "Relu", # The type of operator that we want to run
    ["X"], # A list of input blobs by their names
    ["Y"], # A list of output blobs by their names
)
正如我们提到的,创建的op实际上是一个protobuf对象。 让我们来看看内容。
print("Type of the created op is: {}".format(type(op)))
print("Content:\n")
print(str(op))
运行结果:
Type of the created op is: <class 'caffe2.proto.caffe2_pb2.OperatorDef'>
Content:

input: "X"
output: "Y"
name: ""
type: "Relu"
好的,让我们运行ops。 我们首先将输入X提供给workspace。 然后运行ops的最简单方法是执行workspace.RunOperatorOnce(operator)
workspace.FeedBlob("X", np.random.randn(2, 3).astype(np.float32))
workspace.RunOperatorOnce(op)
运行结果:
True
执行后,让我们看看ops是否正在做正确的事情。
在这种情况下,ops是神经网络中使用的常见激活函数,称为[ReLU]
(https://en.wikipedia.org/wiki/Rectifier_( neural_networks)
,或整流线性单元激活. ReLU激活有助于添加必要的 神经网络分类器的非线性特征,定义如下:

print("Current blobs in the workspace: {}\n".format(workspace.Blobs()))
print("X:\n{}\n".format(workspace.FetchBlob("X")))
print("Y:\n{}\n".format(workspace.FetchBlob("Y")))
print("Expected:\n{}\n".format(np.maximum(workspace.FetchBlob("X"), 0)))
运行结果:
Current blobs in the workspace: ['X', 'Y']

X:
[[ 0.5013918  -0.8857052  -0.01655474]
 [ 0.70461506  0.24207334  0.1704993 ]]

Y:
[[0.5013918  0.         0.        ]
 [0.70461506 0.24207334 0.1704993 ]]

Expected:
[[0.5013918  0.         0.        ]
 [0.70461506 0.24207334 0.1704993 ]]
如果您的预期输出与此示例中的Y输出匹配,则此方法有效。
如果需要,ops也可以使用可选参数。 它们被指定为键值对。 让我们看一个简单的例子,它采用张量并用高斯随机变量填充它。
op = core.CreateOperator(
    "GaussianFill",
    [], # GaussianFill does not need any parameters.
    ["Z"],
    shape=[100, 100], # shape argument as a list of ints.
    mean=1.0,  # mean as a single float
    std=1.0, # std as a single float
)
print("Content of op:\n")
print(str(op))
运行结果:
Content of op:

output: "Z"
name: ""
type: "GaussianFill"
arg {
  name: "shape"
  ints: 100
  ints: 100
}
arg {
  name: "mean"
  f: 1.0
}
arg {
  name: "std"
  f: 1.0
}
让我们运行它,看看事情是否符合预期。
workspace.RunOperatorOnce(op)
temp = workspace.FetchBlob("Z")
pyplot.hist(temp.flatten(), bins=50)
pyplot.title("Distribution of Z")
运行结果:
Text(0.5, 1.0, 'Distribution of Z')
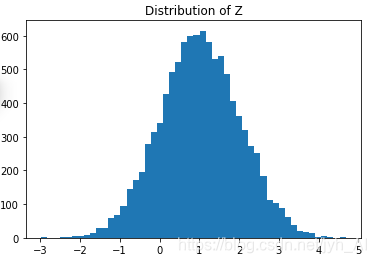
如果你看到一个钟形曲线,那么它就起效了!
3 Nets
网络本质上是计算图。 我们将名称Net保持为向后一致性(并且还向神经网络致敬)。 网络由多个ops组成,就像编写为一系列命令的程序一样。 让我们来看看。
当我们谈论nets时,我们还将讨论BlobReference,它是一个包裹字符串的对象,因此我们可以轻松地链接ops。
让我们创建一个基本上等同于以下python数学的网络:
X = np.random.randn(2, 3)
W = np.random.randn(5, 3)
b = np.ones(5)
Y = X * W^T + b
我们将逐步展示进展。 Caffe2的core.Net是围绕NetDef协议缓冲区的包装类。
创建网络时,除了网络名称之外,其底层协议缓冲区基本上是空的。 让我们创建网络,然后显示原型内容。
net = core.Net("my_first_net")
print("Current network proto:\n\n{}".format(net.Proto()))
运行结果:
Current network proto:

name: "my_first_net"
让我们创建一个名为X的blob,并使用GaussianFill和用一些随机数据填充它。
X = net.GaussianFill([], ["X"], mean=0.0, std=1.0, shape=[2, 3], run_once=0)
print("New network proto:\n\n{}".format(net.Proto()))
运行结果:
New network proto:

name: "my_first_net"
op {
  output: "X"
  name: ""
  type: "GaussianFill"
  arg {
    name: "mean"
    f: 0.0
  }
  arg {
    name: "std"
    f: 1.0
  }
  arg {
    name: "shape"
    ints: 2
    ints: 3
  }
  arg {
    name: "run_once"
    i: 0
  }
}
您可能已经观察到与早期core.CreateOperator调用的一些差异。 基本上,当使用网络时,您可以直接创建一个ops并通过调用net.SomeOp将其添加到网络中,其中SomeOp是ops的注册类型字符串。 这被翻译成了:
op = core.CreateOperator("SomeOp", ...)
net.Proto().op.append(op)
此外,您可能想知道X是什么。 X是BlobReference,它记录两件事:
- blob的名称,用
str(X)访问 - 它创建的网络
net,由内部变量_from_net记录
我们来核实一下。 另外,请记住,我们实际上还没有运行任何东西,所以X只包含一个符号。 不要指望现在得到任何数值
print("Type of X is: {}".format(type(X)))
print("The blob name is: {}".format(str(X)))
运行结果:
Type of X is: <class 'caffe2.python.core.BlobReference'>
The blob name is: X
继续创建一个w和b
W = net.GaussianFill([], ["W"], mean=0.0, std=1.0, shape=[5, 3], run_once=0)
b = net.ConstantFill([], ["b"], shape=[5,], value=1.0, run_once=0)
现在,一个简单的代码糖:由于BlobReference对象知道它是从哪个网络net生成的,除了从net创建ops之外,您还可以从BlobReferences创建ops。 让我们以这种方式创建FC运算符ops。
Y = X.FC([W, b], ["Y"])
Under the hood,X.FC(...)只是通过插入X作为相应运算符的第一个输入来委托给net.FC,所以我们上面所做的相当于:Y = net.FC([X, W, b], ["Y"])
看看当前的网络:
print("Current network proto:\n\n{}".format(net.Proto()))
运行结果:
Current network proto:

name: "my_first_net"
op {
  output: "X"
  name: ""
  type: "GaussianFill"
  arg {
    name: "mean"
    f: 0.0
  }
  arg {
    name: "std"
    f: 1.0
  }
  arg {
    name: "shape"
    ints: 2
    ints: 3
  }
  arg {
    name: "run_once"
    i: 0
  }
}
op {
  output: "W"
  name: ""
  type: "GaussianFill"
  arg {
    name: "mean"
    f: 0.0
  }
  arg {
    name: "std"
    f: 1.0
  }
  arg {
    name: "shape"
    ints: 5
    ints: 3
  }
  arg {
    name: "run_once"
    i: 0
  }
}
op {
  output: "b"
  name: ""
  type: "ConstantFill"
  arg {
    name: "shape"
    ints: 5
  }
  arg {
    name: "value"
    f: 1.0
  }
  arg {
    name: "run_once"
    i: 0
  }
}
op {
  input: "X"
  input: "W"
  input: "b"
  output: "Y"
  name: ""
  type: "FC"
}
太冗长了吧? 让我们尝试将其可视化为图形。 为此,Caffe2附带了一个非常小的图形可视化工具。
from caffe2.python import net_drawer
from IPython import display
graph = net_drawer.GetPydotGraph(net, rankdir="LR")
display.Image(graph.create_png(), width=800)
运行结果:

所以我们已经定义了一个网络net,但还没有执行任何内容。 请记住,上面的网络本质上是一个保存网络定义的protobuf。 当我们真正运行网络时,幕后发生的事情是:
- 从protobuf实例化C ++ net对象
- 调用实例化的net的Run()函数
在我们做任何事情之前,我们应该使用ResetWorkspace()清除任何早期的工作空间变量。
然后有两种方法可以从Python运行网络。 我们将在下面的示例中执行第一个选项。
- 调用
workspace.RunNetOnce(),它实例化,运行并立即破坏网络 - 调用
workspace.CreateNet()创建工作空间所拥有的C ++网络对象,然后调用workspace.RunNet(),将网络名称传递给它
workspace.ResetWorkspace()
print("Current blobs in the workspace: {}".format(workspace.Blobs()))
workspace.RunNetOnce(net)
print("Blobs in the workspace after execution: {}".format(workspace.Blobs()))
# Let's dump the contents of the blobs
for name in workspace.Blobs():
    print("{}:\n{}".format(name, workspace.FetchBlob(name)))
运行结果:
Current blobs in the workspace: []
Blobs in the workspace after execution: ['W', 'X', 'Y', 'b']
W:
[[-0.0031894   1.7336688   0.27950844]
 [-0.48033044 -0.1165835  -0.7897966 ]
 [ 0.11369271  0.7270878  -0.04239561]
 [ 1.2409002  -0.47867033  0.27645606]
 [-0.14715256  0.20965365  1.5887681 ]]
X:
[[-0.2782579  -0.13700671 -0.5398759 ]
 [-0.02580372  0.9412147   0.05672361]]
Y:
[[0.61246336 1.5760206  0.89163655 0.57103884 0.15448475]
 [2.6476915  0.85786414 1.6790073  0.53313017 1.2912469 ]]
b:
[1. 1. 1. 1. 1.]
现在让我们尝试第二种方法来创建网络并运行它。 首先,使用ResetWorkspace()清除变量。 然后使用CreateNet(net_object) 创建我们之前创建的workspace的net对象。 最后,使用RunNet(net_name)运行网络
workspace.ResetWorkspace()
print("Current blobs in the workspace: {}".format(workspace.Blobs()))
workspace.CreateNet(net)
workspace.RunNet(net.Proto().name)
print("Blobs in the workspace after execution: {}".format(workspace.Blobs()))
for name in workspace.Blobs():
    print("{}:\n{}".format(name, workspace.FetchBlob(name)))
运行结果:
Current blobs in the workspace: []
Blobs in the workspace after execution: ['W', 'X', 'Y', 'b']
W:
[[ 1.472266    0.31774315  1.1714906 ]
 [-0.5819608  -0.16325644 -1.1215156 ]
 [-1.3346492   0.49878564 -1.3358629 ]
 [-0.4924696  -0.33719686  0.04513658]
 [-0.94076407 -0.45550206  0.10465849]]
X:
[[-0.11183697  0.6481622  -1.0311767 ]
 [-0.02665127 -1.8198379   0.7797021 ]]
Y:
[[-0.16671848  2.115749    2.8500679   0.7899743   0.70205164]
 [ 1.2959349   0.4381621  -0.91371405  1.6619617   1.935615  ]]
b:
[1. 1. 1. 1. 1.]
RunNetOnce和RunNet之间存在一些差异,但主要区别在于计算开销。 由于RunNetOnce涉及序列化protobuf以在Python和C之间传递并实例化网络,因此运行可能需要更长时间。 让我们进行测试,看看时间开销是多少。
# It seems that %timeit magic does not work well with
# C++ extensions so we'll basically do for loops
start = time.time()
for i in range(1000):
    workspace.RunNetOnce(net)
end = time.time()
print('Run time per RunNetOnce: {}'.format((end - start) / 1000))

start = time.time()
for i in range(1000):
    workspace.RunNet(net.Proto().name)
end = time.time()
print('Run time per RunNet: {}'.format((end - start) / 1000))
运行结果:
Run time per RunNetOnce: 0.00020985078811645508
Run time per RunNet: 2.2382259368896484e-05
恭喜,您现在已经了解了Caffe2 Python API的许多关键组件! 准备好更多Caffe2? 查看其余的教程,了解各种有趣的用例!