官网:https://gstreamer.freedesktop.org/
Demo基础教程:hhttps://gstreamer.freedesktop.org/documentation/tutorials/basic/concepts.html
Demo下载地址:git://anongit.freedesktop.org/gstreamer/gst-docs
Goal
The previous tutorial showed how to build a pipeline automatically. Now we are going to build a pipeline manually by instantiating each element and linking them all together. In the process, we will learn:
-
What is a GStreamer element and how to create one.
-
How to connect elements to each other.
-
How to customize an element's behavior.
-
How to watch the bus for error conditions and extract information from GStreamer messages.
Manual Hello World
Copy this code into a text file named basic-tutorial-2.c (or find it in your GStreamer installation).
basic-tutorial-2.c
#include <gst/gst.h>

int main(int argc, char *argv[]) {
  GstElement *pipeline, *source, *sink;
  GstBus *bus;
  GstMessage *msg;
  GstStateChangeReturn ret;

  /* Initialize GStreamer */
  gst_init (&argc, &argv);

  /* Create the elements */
  source = gst_element_factory_make ("videotestsrc", "source");
  sink = gst_element_factory_make ("autovideosink", "sink");

  /* Create the empty pipeline */
  pipeline = gst_pipeline_new ("test-pipeline");

  if (!pipeline || !source || !sink) {
    g_printerr ("Not all elements could be created.\n");
    return -1;
  }

  /* Build the pipeline */
  gst_bin_add_many (GST_BIN (pipeline), source, sink, NULL);
  if (gst_element_link (source, sink) != TRUE) {
    g_printerr ("Elements could not be linked.\n");
    gst_object_unref (pipeline);
    return -1;
  }

  /* Modify the source's properties */
  g_object_set (source, "pattern", 0, NULL);

  /* Start playing */
  ret = gst_element_set_state (pipeline, GST_STATE_PLAYING);
  if (ret == GST_STATE_CHANGE_FAILURE) {
    g_printerr ("Unable to set the pipeline to the playing state.\n");
    gst_object_unref (pipeline);
    return -1;
  }

  /* Wait until error or EOS */
  bus = gst_element_get_bus (pipeline);
  msg = gst_bus_timed_pop_filtered (bus, GST_CLOCK_TIME_NONE, GST_MESSAGE_ERROR | GST_MESSAGE_EOS);

  /* Parse message */
  if (msg != NULL) {
    GError *err;
    gchar *debug_info;

    switch (GST_MESSAGE_TYPE (msg)) {
      case GST_MESSAGE_ERROR:
        gst_message_parse_error (msg, &err, &debug_info);
        g_printerr ("Error received from element %s: %s\n", GST_OBJECT_NAME (msg->src), err->message);
        g_printerr ("Debugging information: %s\n", debug_info ? debug_info : "none");
        g_clear_error (&err);
        g_free (debug_info);
        break;
      case GST_MESSAGE_EOS:
        g_print ("End-Of-Stream reached.\n");
        break;
      default:
        /* We should not reach here because we only asked for ERRORs and EOS */
        g_printerr ("Unexpected message received.\n");
        break;
    }
    gst_message_unref (msg);
  }

  /* Free resources */
  gst_object_unref (bus);
  gst_element_set_state (pipeline, GST_STATE_NULL);
  gst_object_unref (pipeline);
  return 0;
}
Walkthrough
The elements are GStreamer's basic construction blocks. They process the data as it flows downstream from the source elements (data producers) to the sink elements (data consumers), passing through filter elements.
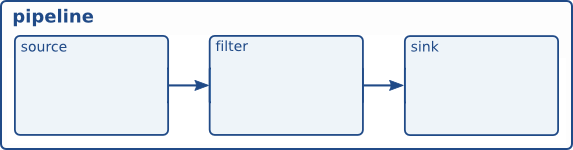
Figure 1. Example pipeline
Element creation
创建组件,参数一:插件名称,系统提供或自创建插件。参数二:组件名称(意义不大,调试使用)。
We will skip GStreamer initialization, since it is the same as the previous tutorial:
/* Create the elements */
source = gst_element_factory_make ("videotestsrc", "source");
sink = gst_element_factory_make ("autovideosink", "sink");
As seen in this code, new elements can be created with gst_element_factory_make(). The first parameter is the type of element to create (Basic tutorial 14: Handy elements shows a few common types, and Basic tutorial 10: GStreamer tools shows how to obtain the list of all available types). The second parameter is the name we want to give to this particular instance. Naming your elements is useful to retrieve them later if you didn't keep a pointer (and for more meaningful debug output). If you pass NULL for the name, however, GStreamer will provide a unique name for you.
For this tutorial we create two elements: a videotestsrc and an autovideosink.
videotestsrc is a source element (it produces data), which creates a test video pattern. This element is useful for debugging purposes (and tutorials) and is not usually found in real applications.
autovideosink is a sink element (it consumes data), which displays on a window the images it receives. There exist several video sinks, depending on the operating system, with a varying range of capabilities. autovideosink automatically selects and instantiates the best one, so you do not have to worry with the details, and your code is more platform-independent.
Pipeline creation
管道(pipeline)是包含组件(element)的容器,组件必须放在管道里,管道负责时钟、消息的传递。
/* Create the empty pipeline */
pipeline = gst_pipeline_new ("test-pipeline");
All elements in GStreamer must typically be contained inside a pipeline before they can be used, because it takes care of some clocking and messaging functions. We create the pipeline with gst_pipeline_new().
/* Build the pipeline */
gst_bin_add_many (GST_BIN (pipeline), source, sink, NULL);
if (gst_element_link (source, sink) != TRUE) {
  g_printerr ("Elements could not be linked.\n");
  gst_object_unref (pipeline);
  return -1;
}
管道是一个特殊的箱柜(bin),所有bin的方法,管道都适用。通过gst_bin_add_many方法,将组件添加到管道中,此方法参数不定,最后参数必须是NULL。
A pipeline is a particular type of bin, which is the element used to contain other elements. Therefore all methods which apply to bins also apply to pipelines. In our case, we call gst_bin_add_many() to add the elements to the pipeline (mind the cast). This function accepts a list of elements to be added, ending with NULL. Individual elements can be added with gst_bin_add().
同一管道中的组件,必须连接之后,才可以进行数据的传输。通过函数gst_element_link可以连接同一管道中的组件。二个参数:第一个是数据源头,第二个是数据目的地。
These elements, however, are not linked with each other yet. For this, we need to use gst_element_link(). Its first parameter is the source, and the second one the destination. The order counts, because links must be established following the data flow (this is, from source elements to sink elements). Keep in mind that only elements residing in the same bin can be linked together, so remember to add them to the pipeline before trying to link them!
Properties
每一个组件都有一组属性值,属性以name:value的形式成对出现。通过 g_object_get()和 g_object_set()来获取和设置属性值,这二个函数可以同时对多组属性进行获取和设置,参数可变,最后以NULL结尾。具体每个组件有什么属相,可以使用功能根据gst_inspect_1.0获取。
/* Modify the source's properties */
g_object_set (source, "pattern", 0, NULL);
Most GStreamer elements have customizable properties: named attributes that can be modified to change the element's behavior (writable properties) or inquired to find out about the element's internal state (readable properties).
Properties are read from with g_object_get() and written to with g_object_set().
g_object_set() accepts a NULL-terminated list of property-name, property-value pairs, so multiple properties can be changed in one go.
GStreamer elements are all a particular kind of GObject, which is the entity offering property facilities. This is why the property handling methods have the g_ prefix.
The line of code above changes the “pattern” property of videotestsrc, which controls the type of test video the element outputs. Try different values!
The names and possible values of all the properties an element exposes can be found using the gst-inspect-1.0 tool described in Basic tutorial 10: GStreamer tools.
Error checking
设置状态,可以获取返回值,判断是否失败。
At this point, we have the whole pipeline built and setup, and the rest of the tutorial is very similar to the previous one, but we are going to add more error checking:
/* Start playing */
ret = gst_element_set_state (pipeline, GST_STATE_PLAYING);
if (ret == GST_STATE_CHANGE_FAILURE) {
  g_printerr ("Unable to set the pipeline to the playing state.\n");
  gst_object_unref (pipeline);
  return -1;
}
We call gst_element_set_state(), but this time we check its return value for errors. Changing states is a delicate process and a few more details are given in Basic tutorial 3: Dynamic pipelines.
/* Wait until error or EOS */
bus = gst_element_get_bus (pipeline);
msg = gst_bus_timed_pop_filtered (bus, GST_CLOCK_TIME_NONE, GST_MESSAGE_ERROR | GST_MESSAGE_EOS);

/* Parse message */
if (msg != NULL) {
  GError *err;
  gchar *debug_info;

  switch (GST_MESSAGE_TYPE (msg)) {
    case GST_MESSAGE_ERROR:
      gst_message_parse_error (msg, &err, &debug_info);
      g_printerr ("Error received from element %s: %s\n", GST_OBJECT_NAME (msg->src), err->message);
      g_printerr ("Debugging information: %s\n", debug_info ? debug_info : "none");
      g_clear_error (&err);
      g_free (debug_info);
      break;
    case GST_MESSAGE_EOS:
      g_print ("End-Of-Stream reached.\n");
      break;
    default:
      /* We should not reach here because we only asked for ERRORs and EOS */
      g_printerr ("Unexpected message received.\n");
      break;
  }
  gst_message_unref (msg);
}
总线的消息可以通过一系列函数获取,展示,可以协助定位问题原因。
gst_bus_timed_pop_filtered() waits for execution to end and returns with a GstMessage which we previously ignored. We asked gst_bus_timed_pop_filtered() to return when GStreamer encountered either an error condition or an EOS, so we need to check which one happened, and print a message on screen (Your application will probably want to undertake more complex actions).
GstMessage is a very versatile structure which can deliver virtually any kind of information. Fortunately(幸运的), GStreamer provides a series of parsing functions for each kind of message.
In this case, once we know the message contains an error (by using the GST_MESSAGE_TYPE() macro), we can use gst_message_parse_error() which returns a GLib GError error structure and a string useful for debugging. Examine the code to see how these are used and freed afterward.
The GStreamer bus
总线是传递由GstMessage产生的消息给组件。消息检测和组件是二个不同的线程,组件可以同步的监听消息,也可以异步的监听消息。
At this point it is worth introducing the GStreamer bus a bit more formally(正式). It is the object responsible for delivering to the application the GstMessages generated by the elements, in order and to the application thread. This last point is important, because the actual streaming of media is done in another thread than the application.
Messages can be extracted from the bus synchronously with gst_bus_timed_pop_filtered() and its siblings, or asynchronously, using signals (shown in the next tutorial). Your application should always keep an eye on the bus to be notified of errors and other playback-related issues.
The rest of the code is the cleanup sequence, which is the same as in Basic tutorial 1: Hello world!.
Exercise(练习)
If you feel like practicing, try this exercise: Add a video filter element in between the source and the sink of this pipeline. Use vertigotv for a nice effect. You will need to create it, add it to the pipeline, and link it with the other elements.
Depending on your platform and available plugins, you might get a “negotiation” error, because the sink does not understand what the filter is producing (more about negotiation in Basic tutorial 6: Media formats and Pad Capabilities). In this case, try to add an element called videoconvert after the filter (this is, build a pipeline of 4 elements. More on videoconvert in Basic tutorial 14: Handy elements).
Conclusion
This tutorial showed:
-
How to create elements with
gst_element_factory_make() -
How to create an empty pipeline with
gst_pipeline_new() -
How to add elements to the pipeline with
gst_bin_add_many() -
How to link the elements with each other with
gst_element_link()
This concludes the first of the two tutorials devoted to basic GStreamer concepts. The second one comes next.
Remember that attached to this page you should find the complete source code of the tutorial and any accessory files needed to build it.
It has been a pleasure having you here, and see you soon!