1. 下载YOLOv3工程并编译配置
git clone https://github.com/pjreddie/darknet
cd darknet
vim Makefile编辑该文件
GPU=1 #使用GPU设置为1, CPU设置为0
CUDNN=1
其实,很多博客中说,根据自己的路径,还应修改NVCC, COMMON, LDFLAGS等选项。我这里只修改了GPU和CUDNN就能使用GPU了,也同样有只修改这两项的。
2. 准备训练使用的数据
1)按照VOC数据的文件夹结构,将自己的训练数据(人脸数据)放到各个文件夹下。这里可以参考其他博客(制作自己的VOC数据集)的内容。
2)下载voc_label.py文件,把它放在和VOCdevkit同级的路径下。
wget https://pjreddie.com/media/files/voc_label.py
import xml.etree.ElementTree as ET
import pickle
import os
from os import listdir, getcwd
from os.path import join
#sets=[('2012', 'train'), ('2012', 'val'), ('2007', 'train'), ('2007', 'val'), ('2007', 'test')]
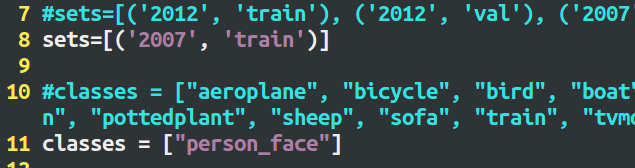
sets=[('2007', 'train')]
#classes = ["aeroplane", "bicycle", "bird", "boat", "bottle", "bus", "car", "cat", "chair", "cow", "diningtable", "dog", "horse", "motorbike", "person", "pottedplant", "sheep", "sofa", "train", "tvmonitor"]
classes = ["person_face"]
def convert(size, box):
dw = 1./size[0]
dh = 1./size[1]
# print dw, dh
x = (box[0] + box[1])/2.0
y = (box[2] + box[3])/2.0
w = box[1] - box[0]
h = box[3] - box[2]
x = x*dw
w = w*dw
y = y*dh
h = h*dh
return (x,y,w,h)
def convert_annotation(year, image_id):
in_file = open('VOCdevkit/VOC%s/Annotations/%s.xml'%(year, image_id))
out_file = open('VOCdevkit/VOC%s/labels/%s.txt'%(year, image_id), 'w')
tree=ET.parse(in_file)
root = tree.getroot()
size = root.find('size')
w = int(size.find('width').text)
h = int(size.find('height').text)
# print w, h
for obj in root.iter('object'):
difficult = obj.find('difficult').text
cls = obj.find('name').text
if cls not in classes or int(difficult) == 1:
continue
cls_id = classes.index(cls)
xmlbox = obj.find('bndbox')
b = (float(xmlbox.find('xmin').text), float(xmlbox.find('xmax').text), float(xmlbox.find('ymin').text), float(xmlbox.find('ymax').text))
# print b
bb = convert((w,h), b)
out_file.write(str(cls_id) + " " + " ".join([str(a) for a in bb]) + '\n')
wd = getcwd()
for year, image_set in sets:
if not os.path.exists('VOCdevkit/VOC%s/labels/'%(year)):
os.makedirs('VOCdevkit/VOC%s/labels/'%(year))
image_ids = open('VOCdevkit/VOC%s/ImageSets/Main/%s.txt'%(year, image_set)).read().strip().split()
list_file = open('%s_%s.txt'%(year, image_set), 'w')
for image_id in image_ids:
list_file.write('%s/VOCdevkit/VOC%s/JPEGImages/%s.jpg\n'%(wd, year, image_id))
convert_annotation(year, image_id)
list_file.close()
我这里使用的数据为检测人脸的数据, sets按照VOC的文件名,classes = [“person_face”],就这一个类别(这里可以根据自己的数据来更改)
运行python voc_label.py, 生成2007_train.txt,同理修改sets=[(‘2007’, ‘val’)],生成2007_val.txt。这两个文件里的内容,如下图: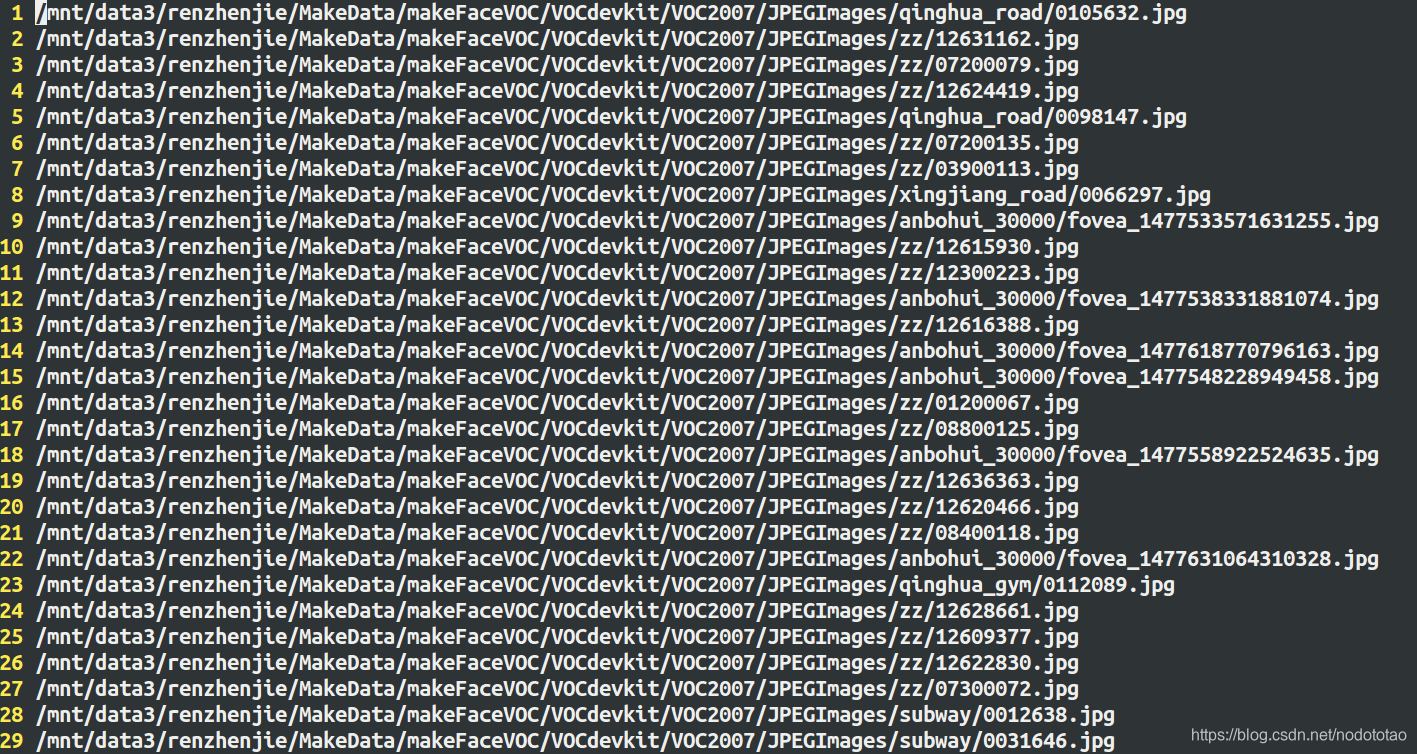
保存的是训练图片的路径。
在代码中可以看出,在运行voc_label.py后,在VOCdevkit/VOC2007/文件夹下回生成一个labels文件夹, 在该文件夹下面会根据每个图片对应的xml文件中的数据生成一个.txt文件 
每个txt文件,是一张训练图片的YOLO标记文件, 格式如下
<object-class> <x> <y> <height>
object-class是类的索引, 后面的4个值都是相对于整张图片的比例。 x是ROI中心的x坐标,y是ROI中心的y坐标,width是ROI的宽,height是ROI的高。
具体的内容,如下图所示:

到这里训练的数据都准备好了。
3. 维度聚类,生成自己的anchors数据
1)K-means(或者K-means++)计算Anchors boxes
这里使用k-means算法计算anchors boxes,需要上述2中的label中各个txt标记文件中的数据
卷积神经网络具有平移不变性,且anchor boxes的位置,有每个栅格确定,故我们只需使用k-means算法计算出anchor boxes的width和height即可,而object-class, x, y我们不需要。
label文件夹中,每个txt文件中的width,height 数值,是每张图片中anchor boxes的width和height相对于整张图片的比例。因为yolo中的bounding boxes是基于栅格来确定的,这里先将anchors boxes的width和height转换为相对于栅格边长的比例。转换公式如下:
	w = anchor_width*input_width/downsamples
	h = anchor_height*input_height/downsamples
例如:卷积神经网络的输入为416*416时,YOLOv3网络的下采样倍率为32,若K-means计算得到的一个anchor box的anchor_width=0.2, anchor_height-0.6, 则
	w = 0.2 * 416/32  = 2.6
	h  = 0.6 * 416/32 = 7.8
代码实现
kmens.py (参考)
# coding=utf-8
# k-means ++ for YOLOv2 anchors
# 通过k-means ++ 算法获取YOLOv2需要的anchors的尺寸
import numpy as np

# 定义Box类,描述bounding box的坐标
class Box():
    def __init__(self, x, y, w, h):
        self.x = x
        self.y = y
        self.w = w
        self.h = h


# 计算两个box在某个轴上的重叠部分
# x1是box1的中心在该轴上的坐标
# len1是box1在该轴上的长度
# x2是box2的中心在该轴上的坐标
# len2是box2在该轴上的长度
# 返回值是该轴上重叠的长度
def overlap(x1, len1, x2, len2):
    len1_half = len1 / 2
    len2_half = len2 / 2

    left = max(x1 - len1_half, x2 - len2_half)
    right = min(x1 + len1_half, x2 + len2_half)

    return right - left


# 计算box a 和box b 的交集面积
# a和b都是Box类型实例
# 返回值area是box a 和box b 的交集面积
def box_intersection(a, b):
    w = overlap(a.x, a.w, b.x, b.w)
    h = overlap(a.y, a.h, b.y, b.h)
    if w < 0 or h < 0:
        return 0

    area = w * h
    return area


# 计算 box a 和 box b 的并集面积
# a和b都是Box类型实例
# 返回值u是box a 和box b 的并集面积
def box_union(a, b):
    i = box_intersection(a, b)
    u = a.w * a.h + b.w * b.h - i
    return u


# 计算 box a 和 box b 的 iou
# a和b都是Box类型实例
# 返回值是box a 和box b 的iou
def box_iou(a, b):
#    print a.x, a.y, a.w, a.h
#    print b.x, b.y, b.w, b.h
#    print box_intersection(a, b) / box_union(a, b)
    return box_intersection(a, b) / box_union(a, b)


# 使用k-means ++ 初始化 centroids,减少随机初始化的centroids对最终结果的影响
# boxes是所有bounding boxes的Box对象列表
# n_anchors是k-means的k值
# 返回值centroids 是初始化的n_anchors个centroid
def init_centroids(boxes,n_anchors):
    centroids = []
    boxes_num = len(boxes)
#    print boxes_num

    centroid_index = np.random.choice(boxes_num, 1)
#    print centroid_index[0]
    centroids.append(boxes[centroid_index[0]])

    print(centroids[0].w,centroids[0].h)

    for centroid_index in range(0,n_anchors-1):

        sum_distance = 0
        distance_thresh = 0
        distance_list = []
        cur_sum = 0

        for box in boxes:
            min_distance = 1
            for centroid_i, centroid in enumerate(centroids):
                distance = (1 - box_iou(box, centroid))
                if distance < min_distance:
                    min_distance = distance
            sum_distance += min_distance
            distance_list.append(min_distance)

        distance_thresh = sum_distance*np.random.random()

        for i in range(0,boxes_num):
            cur_sum += distance_list[i]
            if cur_sum > distance_thresh:
                centroids.append(boxes[i])
                print(boxes[i].w, boxes[i].h)
                break

    return centroids


# 进行 k-means 计算新的centroids
# boxes是所有bounding boxes的Box对象列表
# n_anchors是k-means的k值
# centroids是所有簇的中心
# 返回值new_centroids 是计算出的新簇中心
# 返回值groups是n_anchors个簇包含的boxes的列表
# 返回值loss是所有box距离所属的最近的centroid的距离的和
def do_kmeans(n_anchors, boxes, centroids):
    loss = 0
    groups = []
    new_centroids = []
    for i in range(n_anchors):
        groups.append([])
        new_centroids.append(Box(0, 0, 0, 0))

    for box in boxes:
        min_distance = 1
        group_index = 0
        for centroid_index, centroid in enumerate(centroids):
            distance = (1 - box_iou(box, centroid))
#            print distance
            if distance < min_distance:
                min_distance = distance
                group_index = centroid_index
        groups[group_index].append(box)
        loss += min_distance
        new_centroids[group_index].w += box.w
        new_centroids[group_index].h += box.h

    for i in range(n_anchors):
#        print '@@@@@@@@@@@@@@@@@@@@@@@@@@@@@@@@@@@@@@'
#        print len(groups[i])
        new_centroids[i].w /= len(groups[i])
        new_centroids[i].h /= len(groups[i])

    return new_centroids, groups, loss


# 计算给定bounding boxes的n_anchors数量的centroids
# label_path是训练集列表文件地址
# n_anchors 是anchors的数量
# loss_convergence是允许的loss的最小变化值
# grid_size * grid_size 是栅格数量
# iterations_num是最大迭代次数
# plus = 1时启用k means ++ 初始化centroids
def compute_centroids(label_path,n_anchors,loss_convergence,grid_size,iterations_num,plus):

    boxes = []
    label_files = []
    f = open(label_path)
    for line in f:
        label_path = line.rstrip().replace('images', 'labels')
#        print label_path
        label_path = label_path.replace('JPEGImages', 'labels')
        label_path = label_path.replace('.jpg', '.txt')
        label_path = label_path.replace('.JPEG', '.txt')
#        print label_path
        label_files.append(label_path)
    f.close()

    for label_file in label_files:
        f = open(label_file)
        for line in f:
            temp = line.strip().split(" ")
            if len(temp) > 1:
                boxes.append(Box(0, 0, float(temp[3]), float(temp[4])))

#    print boxes[0].w, boxes[0].h
    print len(boxes)

    if plus:
        centroids = init_centroids(boxes, n_anchors)
    else:
        centroid_indices = np.random.choice(len(boxes), n_anchors)
#        centroid_indices = [0, 1, 2, 3, 4]
        print centroid_indices
        centroids = []
        for centroid_index in centroid_indices:
            centroids.append(boxes[centroid_index])

    # iterate k-means
    centroids, groups, old_loss = do_kmeans(n_anchors, boxes, centroids)
    iterations = 1
    while (True):
        centroids, groups, loss = do_kmeans(n_anchors, boxes, centroids)
        iterations = iterations + 1
        print("loss = %f" % loss)
        if abs(old_loss - loss) < loss_convergence or iterations > iterations_num:
            break
        old_loss = loss

        for centroid in centroids:
            print(centroid.w * grid_size, centroid.h * grid_size)

    # print result
    for centroid in centroids:
        print("k-means result:\n")
        print(centroid.w * grid_size, centroid.h * grid_size)


#label_path = "/raid/pengchong_data/Data/Lists/paul_train.txt"
label_path = "/mnt/data3/renzhenjie/MakeData/makeFaceVOC/2007_train.txt"
n_anchors = 9
loss_convergence = 1e-6
grid_size = 13
iterations_num = 1000
plus = 1
compute_centroids(label_path,n_anchors,loss_convergence,grid_size,iterations_num,plus)
yolov3中使用的anchors 的数目为9:n_anchors=9, 使用K-means++算法:plus =1,得到的结果为,如下图所示:
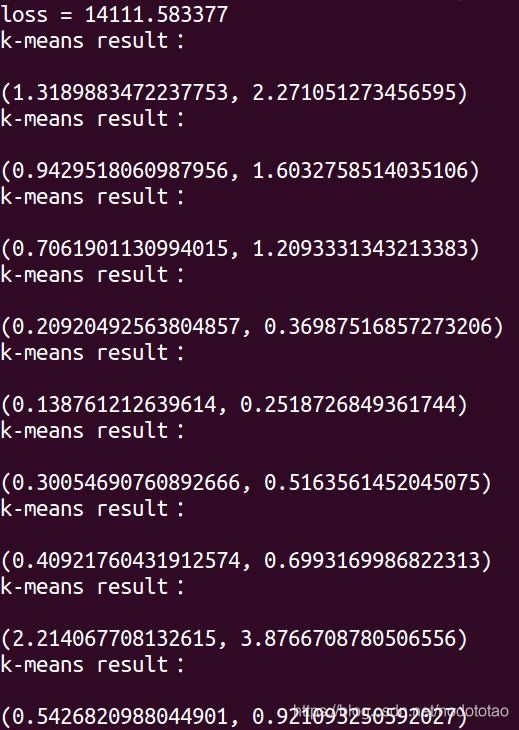
这个数值是相对于栅格边长(13)的数据,在yolov3的cfg/yolov3-voc.cfg文件中,anchors使用的数值是相对于416的输入数据的大小。故计算后的结果为:
(anchors = 4,8, 7,12, 10,17, 13,22, 17,29, 23,39, 30,51, 42,73, 71,124)
举例:使用最后一个0.921093250592027来说,取近似值0.92,
0.92 * 416/13 = 29.44, 四舍五入,取整数29。
4. 下载预训练的模型,修改相应的文件
1)下载darknet53.conv.74权重模型
wget https://pjreddie.com/media/files/darknet53.conv.74
2)修改cfg/voc.data
	classes =1
	train = /mnt/data3/ndtt/makeData/makeFaceVOC/2007_train.txt
	valid = /mnt/data3/ndtt/makeData/makeFaceVOC/2007_val.txt
	names = data/voc.names
	backup = backup # 这个是保存训练生成的模型的位置
3)修改data/voc.names
是个文本文件,里面是你的训练数据的类别
person_face
4) 修改cfg/yolov3-voc.cfg
这里根据自己的训练数据和通过聚类获取的anchor boxes的值,修改
filters = 18 # 3*(1+4+1)
anchors = 4,8, 7,12, 10,17, 13,22, 17,29, 23,39, 30,51, 42,73, 71,124
classes = 1
等几个参数的值
[net]
# Testing
# batch=1
# subdivisions=1
# Training
batch=64
subdivisions=16
width=416
height=416
channels=3
momentum=0.9
decay=0.0005
angle=0
saturation = 1.5
exposure = 1.5
hue=.1

learning_rate=0.001
burn_in=1000
max_batches = 50200
policy=steps
steps=40000,45000
scales=.1,.1

[convolutional]
batch_normalize=1
filters=32
size=3
stride=1
pad=1
activation=leaky

...

[convolutional]
size=1
stride=1
pad=1
#filters=75
filters = 18 # 3*(1+4+1)
activation=linear

[yolo]
mask = 6,7,8
#anchors = 10,13,  16,30,  33,23,  30,61,  62,45,  59,119,  116,90,  156,198,  373,326
anchors = 4,8,  7,12,  10,17,  13,22,  17,29,  23,39,  30,51,  42,73,  71,124
classes=1 #############3
num=9
jitter=.3
ignore_thresh = .5
truth_thresh = 1
random=1

...

[convolutional]
size=1
stride=1
pad=1
filters=18 # 3*(1+4+1)
activation=linear

[yolo]
mask = 3,4,5
#anchors = 10,13,  16,30,  33,23,  30,61,  62,45,  59,119,  116,90,  156,198,  373,326
anchors = 4,8,  7,12,  10,17,  13,22,  17,29,  23,39,  30,51,  42,73,  71,124
classes=1 ######
num=9
jitter=.3
ignore_thresh = .5
truth_thresh = 1
random=1

...

[convolutional]
size=1
stride=1
pad=1
filters=18 # 3*(1+4+1)
activation=linear

[yolo]
mask = 0,1,2
#anchors = 10,13,  16,30,  33,23,  30,61,  62,45,  59,119,  116,90,  156,198,  373,326
anchors = 4,8,  7,12,  10,17,  13,22,  17,29,  23,39,  30,51,  42,73,  71,124
classes=1 #############
num=9
jitter=.3
ignore_thresh = .5
truth_thresh = 1
random=1
5. 训练
./darknet detector train cfg/voc.data cfg/yolov3-voc.cfg darknet53.conv74 -gpu 2
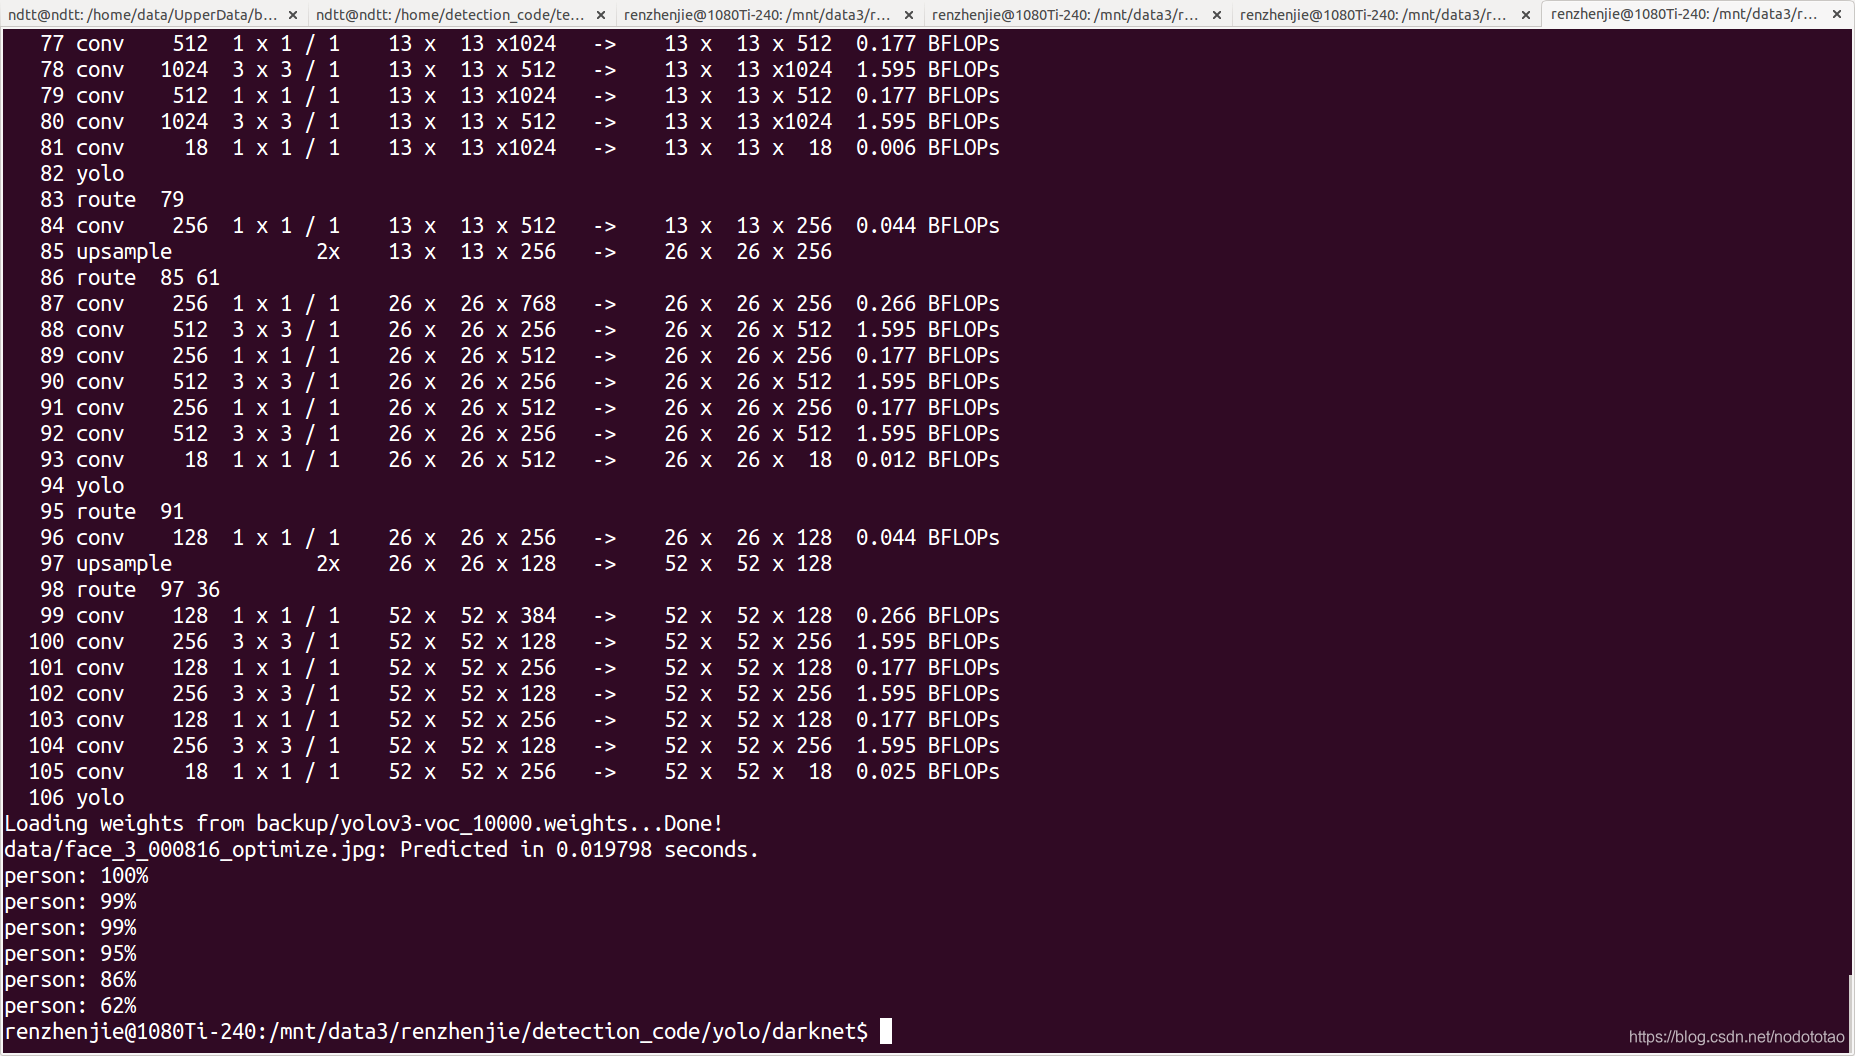
6. 测试
./darknet detect cfg/yolov3-voc.cfg backup/yolov3-voc_10000.weights data/face_3.jpg