转载自 https://blog.csdn.net/u011392897/article/details/60151323
这里看下1.8的HashMap,jdk1.8是个大改版,对于HashMap以及ConcurrentHashMap来说也是个很大的改版。
零、主要改动
相对于1.7:
1、处理hash冲突的方式变化,当一条链表太长时,转化为红黑树保存,提高hash冲突时的查找速度,也就提升了几个主要的方法的速度。
2、hashseed相关的都去掉了,Node(就是Entry)的hash又变回final了。
3、一些方法、类的名称的变化,比如Entry变成Node。
4、Map接口1.8新增了几个普通的方法,完善了Map的操作。
5、函数式编程、Stream相关的方法(这块就先不说了)。
6、链表添加时,新节点会放在链表末尾,而不是像1.6/1.7一样放在头部;扩容操作也会尽量保证扩容后还在同一条链表上的节点之间的相对顺序不变。
7、修复之前的一些小问题,加上其他的一些小改动。
一、基本性质
主要改动中,对实现影响最大的就是红黑树这块,这只影响结构和性能,不影响其他的使用,主要方法是整体逻辑基本没变化,其余的没什么改变。
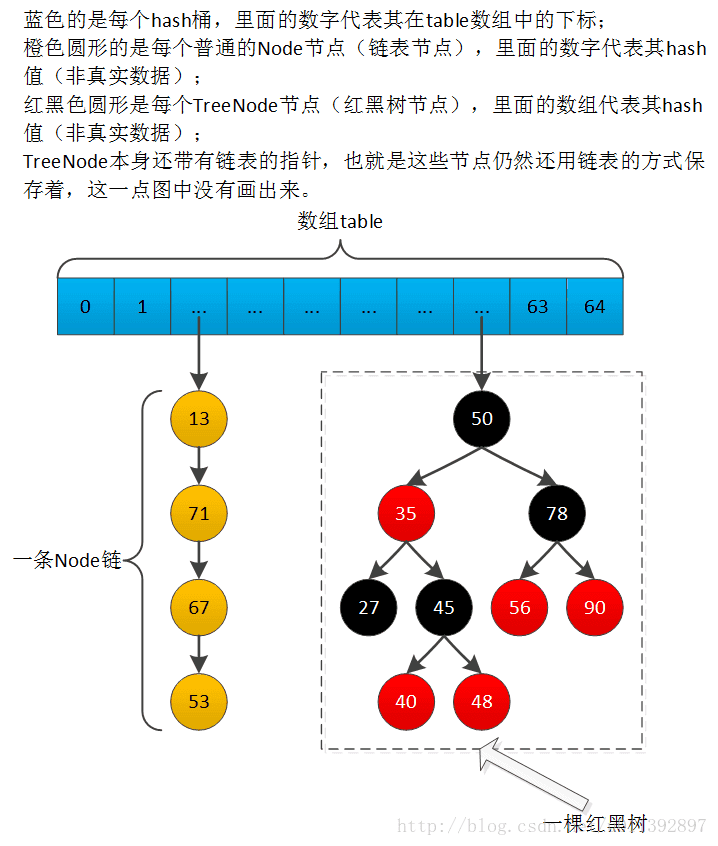
整体结构和1.6/1.7的有些区别,多了红黑树这块的,下面简单画了个示意图。
二、常量和变量
1、常量
新增红黑树有关的三个常量。
static final int DEFAULT_INITIAL_CAPACITY = 1 << 4; // aka 16
static final int MAXIMUM_CAPACITY = 1 << 30;
static final float DEFAULT_LOAD_FACTOR = 0.75f;

// 如果一个hash桶中的节点达到这个值,下次添加新节点时,会把这个hash桶的所有节点用红黑树保存
// 如果数组table的长度不足64,那么也不转化为红黑树,改为扩容一次
static final int TREEIFY_THRESHOLD = 8;

// 如果一棵红黑树的节点减少到这个值,那么就把它退化为链表保存
static final int UNTREEIFY_THRESHOLD = 6;

// 转化为红黑树的另一个条件。table的长度不足这个值时,不转化为红黑树,改为扩容一次
static final int MIN_TREEIFY_CAPACITY = 64;
2、变量
没什么改变,跟1.7的同名属性一样。
transient Node<K,V>[] table;
transient int size;
transient int modCount;
int threshold;
final float loadFactor;
transient Set<Map.Entry<K,V>> entrySet;
三、基本类
1、普通节点Node
它就是之前版本的Entry,hash又变回final了。
// jdk1.6的HashMap.Entry改了个名字而已,其余一样
static class Node<K,V> implements Map.Entry<K,V> {
    final int hash; // hash值又变回final了,1.7的不是final的,1.6的是final的
    final K key;
    V value;
    Node<K,V> next;

    // 后面的方法一样
}
2、红黑树节点TreeNode
因为是重要改动,代码本身比较多,就放在后面了。
四、构造方法
本身比较简单,没什么好说的。
/** Returns a power of two size for the given target capacity. */
// 求不小于cap的,满足2^n的数中最小的那个
// 这个方法的原型就是Integr.highestOneBit,1.7的版本中用过
static final int tableSizeFor(int cap) {
    int n = cap - 1;
    n |= n >>> 1;
    n |= n >>> 2;
    n |= n >>> 4;
    n |= n >>> 8;
    n |= n >>> 16;
    return (n < 0) ? 1 : (n >= MAXIMUM_CAPACITY) ? MAXIMUM_CAPACITY : n + 1;
}

public HashMap(int initialCapacity, float loadFactor) {
    if (initialCapacity < 0)
        throw new IllegalArgumentException("Illegal initial capacity: " + initialCapacity);
    if (initialCapacity > MAXIMUM_CAPACITY)
        initialCapacity = MAXIMUM_CAPACITY;
    if (loadFactor <= 0 || Float.isNaN(loadFactor))
        throw new IllegalArgumentException("Illegal load factor: " + loadFactor);
    this.loadFactor = loadFactor;
    this.threshold = tableSizeFor(initialCapacity); // 真正初始化时,使用的是threshold的值作为初始容量,然后再把它设置成阈值
    // 懒初始化,在put -> putVal -> resize方法中进行真正的初始化
}

public HashMap(int initialCapacity) {
    this(initialCapacity, DEFAULT_LOAD_FACTOR);
}

public HashMap() {
    this.loadFactor = DEFAULT_LOAD_FACTOR; // all other fields defaulted
}

public HashMap(Map<? extends K, ? extends V> m) {
    this.loadFactor = DEFAULT_LOAD_FACTOR; // m可能没有loadFactor这个概念,所以使用默认值
    putMapEntries(m, false);
}

/** Implements Map.putAll and Map constructor */
final void putMapEntries(Map<? extends K, ? extends V> m, boolean evict) {
    int s = m.size();
    if (s > 0) {
        if (table == null) { // pre-size 还未初始化时,设置一个初始化容量
            float ft = ((float)s / loadFactor) + 1.0F;
            int t = ((ft < (float)MAXIMUM_CAPACITY) ? (int)ft : MAXIMUM_CAPACITY);
            if (t > threshold)
                threshold = tableSizeFor(t); // 真正初始化时,使用的是threshold的值作为初始容量,然后再把它设置成阈值
                // 在put -> putVal -> resize方法中进行真正的初始化,后续添加m中的K-V时,不用再扩容
        }
        else if (s > threshold)
            resize(); // 扩容成2倍,因此可能不到位,后续可能还要扩容
        for (Map.Entry<? extends K, ? extends V> e : m.entrySet()) { // 循环添加
            K key = e.getKey();
            V value = e.getValue();
            putVal(hash(key), key, value, false, evict);
        }
    }
}
五、一些内部方法
// 因为使用了红黑树来保存冲突节点,冲突的代价变小了,因此hash函数也不用那么卖力了,只是简单的移位异或一次
static final int hash(Object key) {
    int h;
    return (key == null) ? 0 : (h = key.hashCode()) ^ (h >>> 16);
}

// 之前版本都有的indexFor方法,因为实现太简单了,所以就去掉了,直接使用其运算表达式,运算还是一样的。

// 红黑树有关的,放在后面说
static Class<?> comparableClassFor(Object x);
static int compareComparables(Class<?> kc, Object k, Object x);

// 上面一点说了
static final int tableSizeFor(int cap);

// 下面四个“构造”方法
// Create a regular (non-tree) node
Node<K,V> newNode(int hash, K key, V value, Node<K,V> next) {
    return new Node<>(hash, key, value, next);
}

// For conversion from TreeNodes to plain nodes
Node<K,V> replacementNode(Node<K,V> p, Node<K,V> next) {
    return new Node<>(p.hash, p.key, p.value, next);
}

// Create a tree bin node
TreeNode<K,V> newTreeNode(int hash, K key, V value, Node<K,V> next) {
    return new TreeNode<>(hash, key, value, next);
}

// For treeifyBin
TreeNode<K,V> replacementTreeNode(Node<K,V> p, Node<K,V> next) {
    return new TreeNode<>(p.hash, p.key, p.value, next);
}
六、扩容
先看代码。
// jdk1.8版本的扩容
final Node<K,V>[] resize() {
Node<K,V>[] oldTab = table;
int oldCap = (oldTab == null) ? 0 : oldTab.length;
int oldThr = threshold;
int newCap, newThr = 0;
// 下面两个if用于计算几个field的新值,看着复杂些是因为这里有处理第一次初始化时的情况,以及cap/threshold溢出的情况
if (oldCap > 0) {
if (oldCap >= MAXIMUM_CAPACITY) {
threshold = Integer.MAX_VALUE;
return oldTab;
}
else if ((newCap = oldCap << 1) < MAXIMUM_CAPACITY && oldCap >= DEFAULT_INITIAL_CAPACITY)
newThr = oldThr << 1; // double threshold 负数继续左移位可能会变成0,然后在下面的if中处理
}
else if (oldThr > 0) // initial capacity was placed in threshold
newCap = oldThr;
else { // zero initial threshold signifies using defaults
newCap = DEFAULT_INITIAL_CAPACITY;
newThr = (int)(DEFAULT_LOAD_FACTOR * DEFAULT_INITIAL_CAPACITY);
}
if (newThr == 0) {
float ft = (float)newCap * loadFactor;
newThr = (newCap < MAXIMUM_CAPACITY && ft < (float)MAXIMUM_CAPACITY ?
(int)ft : Integer.MAX_VALUE);
}
threshold = newThr;
@SuppressWarnings({"rawtypes","unchecked"})
Node<K,V>[] newTab = (Node<K,V>[])new Node[newCap]; // 新建数组
table = newTab;
if (oldTab != null) { // oldTab不为null表示是扩容,否则就是初始化,初始化时直接执行return
for (int j = 0; j < oldCap; ++j) {
Node<K,V> e;
if ((e = oldTab[j]) != null) {
oldTab[j] = null;
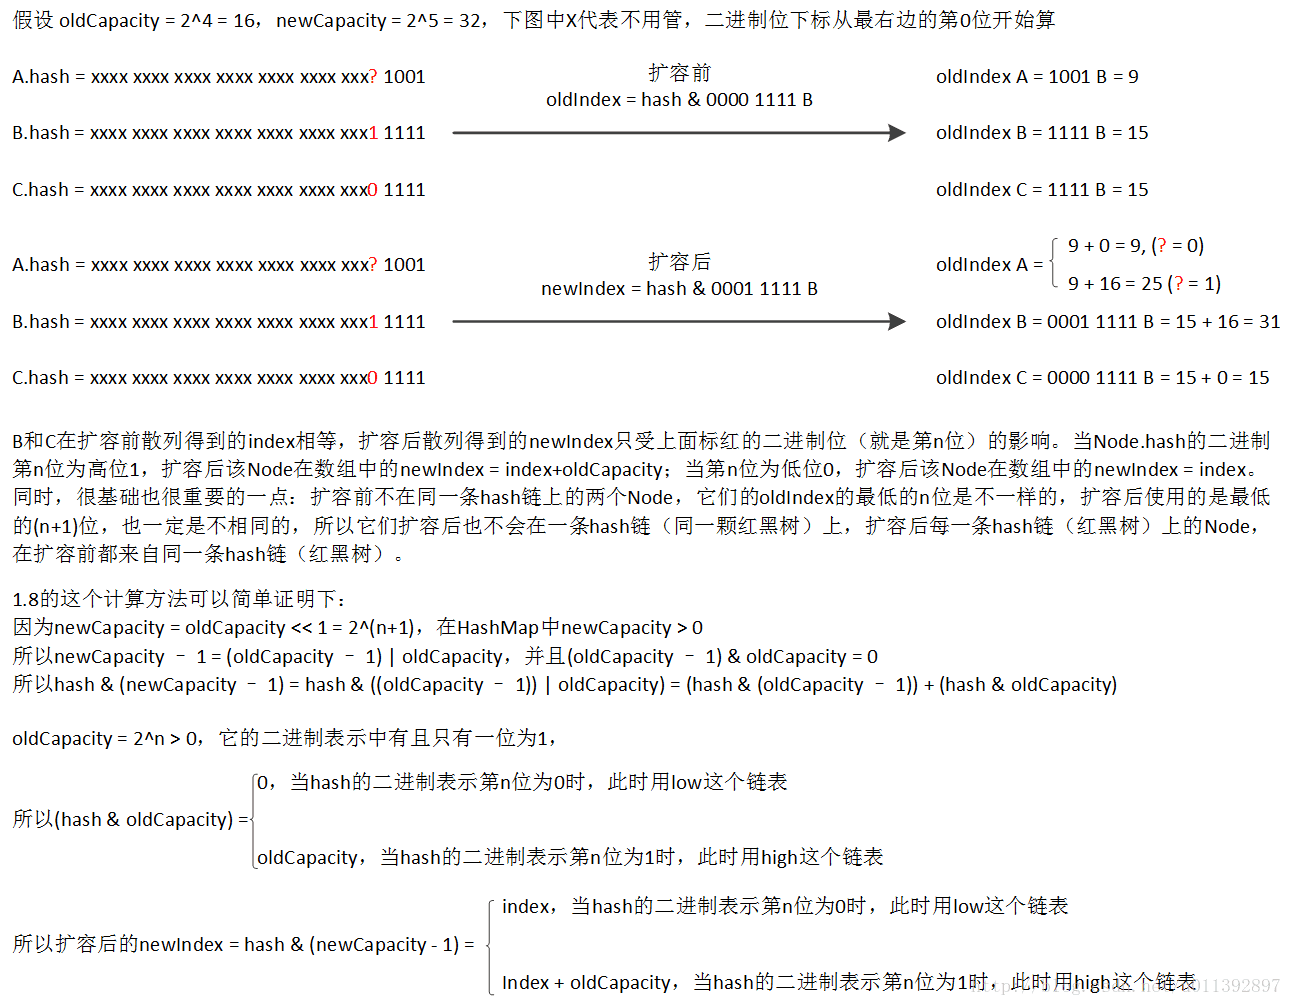
if (e.next == null)
newTab[e.hash & (newCap - 1)] = e; // 这里的处理和1.6、1.7的indexFor一样
else if (e instanceof TreeNode)
((TreeNode<K,V>)e).split(this, newTab, j, oldCap); // 处理红黑树这种情况,放在后面说
else { // preserve order ,这里会保留原来节点在链表中的相对顺序,和之前的1.6/1.7版本不一样
Node<K,V> loHead = null, loTail = null; // lo = low,表示低位0
Node<K,V> hiHead = null, hiTail = null; // hi = high,表示高位1
Node<K,V> next;
do { // 这个do-while中先把要迁移的节点根据它们迁移后的位置,按照原来在一条链表上的相对顺序,分为两队,然后一次性把一队整个放在新的hash桶中,这样就能保留节点之间的相对顺序
next = e.next;
if ((e.hash & oldCap) == 0) { // 原来二进制从右往左数第n位(从0开始)是低位0的所有Node,按照相对顺序依次在lo这条链表的尾部append
if (loTail == null)
loHead = e;
else
loTail.next = e;
loTail = e;
}
else { // 原来二进制从右往左数第n位(从0开始)是高位1的所有Node,按照相对顺序依次在hi这条链表的尾部append
if (hiTail == null)
hiHead = e;
else
hiTail.next = e;
hiTail = e;
}
} while ((e = next) != null);
if (loTail != null) { // 第n位(从0开始)是低位0的所有Node,它们重新散列后在数组中的newIndex = oldIndex,保持不变
loTail.next = null;
newTab[j] = loHead;
}
if (hiTail != null) { // 第n位(从0开始)是高位1的所有Node,它们重新散列后在数组中的newIndex = oldIndex + oldCapacity
hiTail.next = null;
newTab[j + oldCap] = hiHead;
}
}
}
}
}
return newTab;
}
看得出来,1.8的修改主要是两个地方:1、增加了红黑树情况的处理;2、节点迁移方式有变化,尽量保证相对顺序。
1.6和1.7的迁移节点的方式,是遍历链表,一个个重新添加到新链表的头部,这样会颠倒原来链表中节点之间的相对顺序;1.8的则是根据节点迁移后的位置,按照原来的相对顺序,分为两队,然后一队整个添加一次,这样能保留原来链表中节点之间的相对顺序。高低位那个,是个巧妙的设计,这个在jdk1.5出现的ConcurrentHashMap的Segment内部扩容中实际就有用到(只是没明说,1.8重新确立 hash值是final的,保证高低位是正确有效的,并且自带的英文注释明确说了)。
下面简单讲解下这个,因为码字不方便,就用图片代替。
七、常用方法
1、读操作
本身流程比较简单,就不多说了。
public int size() {
    return size;
}

public boolean isEmpty() {
    return size == 0;
}

public V get(Object key) {
    Node<K,V> e;
    return (e = getNode(hash(key), key)) == null ? null : e.value;
}

final Node<K,V> getNode(int hash, Object key) {
    Node<K,V>[] tab; Node<K,V> first, e; int n; K k;
    if ((tab = table) != null && (n = tab.length) > 0 &&
        (first = tab[(n - 1) & hash]) != null) { // 这里使用了indexFor
        if (first.hash == hash && // always check first node
            ((k = first.key) == key || (key != null && key.equals(k))))
            return first;
        if ((e = first.next) != null) {
            if (first instanceof TreeNode) // 树节点就使用红黑树的方式进行查找
                return ((TreeNode<K,V>)first).getTreeNode(hash, key);
            do { // 不是树节点,那就使用是链表的方式进行查找查找
                if (e.hash == hash && ((k = e.key) == key || (key != null && key.equals(k))))
                    return e;
            } while ((e = e.next) != null);
        }
    }
    return null;
}

public boolean containsKey(Object key) {
    return getNode(hash(key), key) != null;
}

public boolean containsValue(Object value) {
    Node<K,V>[] tab; V v;
    if ((tab = table) != null && size > 0) {
        for (int i = 0; i < tab.length; ++i) {
            for (Node<K,V> e = tab[i]; e != null; e = e.next) {
                if ((v = e.value) == value || (value != null && value.equals(v)))
                    return true;
            }
        }
    }
    return false;
}

// getOrDefault,1.8中Map接口新增的方法
@Override
public V getOrDefault(Object key, V defaultValue) {
    Node<K,V> e;
    return (e = getNode(hash(key), key)) == null ? defaultValue : e.value;
}
2、写操作
public V put(K key, V value) {
    return putVal(hash(key), key, value, false, true);
}

// put的变化:1、添加红黑树变换的情况;2、新添加的Node放在链表的尾部;3、put判断是否扩容时的处理跟1.6一样,先添加Node再判断,跟1.7的不一样。
/**  Implements Map.put and related methods */
// onlyIfAbsent,key不存在才put,存在了什么也不做,也不会更改value,除非旧的value为null
// evict,区分是初始化构建还是普通的put
final V putVal(int hash, K key, V value, boolean onlyIfAbsent,  boolean evict) {
    Node<K,V>[] tab; Node<K,V> p; int n, i;
    if ((tab = table) == null || (n = tab.length) == 0) // 处理table的初始化
        n = (tab = resize()).length;
    if ((p = tab[i = (n - 1) & hash]) == null) // hash桶为空,直接放进去就行
        tab[i] = newNode(hash, key, value, null);
    else {
        Node<K,V> e; K k;
        if (p.hash == hash &&  ((k = p.key) == key || (key != null && key.equals(k)))) // 碰见“相等”的key
            e = p;
        else if (p instanceof TreeNode) // 红黑树节点就使用红黑树的方式进行添加
            e = ((TreeNode<K,V>)p).putTreeVal(this, tab, hash, key, value);
        else {
            for (int binCount = 0; ; ++binCount) {
                if ((e = p.next) == null) {
                    p.next = newNode(hash, key, value, null); // 添加在链表的末尾
                    if (binCount >= TREEIFY_THRESHOLD - 1) // -1 for 1st ,-1是链表的第一个,7就是链表的第8个,把第9个添加到链表后,变换为红黑树(treeifyBin里面判断第二个条件)
                        treeifyBin(tab, hash);
                    break;
                }
                if (e.hash == hash &&  ((k = e.key) == key || (key != null && key.equals(k)))) // 碰见“相等”的key
                    break;
                p = e;
            }
        }
        if (e != null) { // existing mapping for key
            V oldValue = e.value;
            if (!onlyIfAbsent || oldValue == null)
                e.value = value;
            afterNodeAccess(e);  // 留给子类LinkedHashMap实现的方法
            return oldValue;
        }
    }
    ++modCount;
    if (++size > threshold) // 扩容这里跟1.6的一样,是先把Node添加进去,再判断是否扩容,跟1.7的不一样
        resize();
    afterNodeInsertion(evict); // 留给子类LinkedHashMap实现的方法
    return null;
}

public void putAll(Map<? extends K, ? extends V> m) {
    putMapEntries(m, true);
}

public V remove(Object key) {
    Node<K,V> e;
    return (e = removeNode(hash(key), key, null, false, true)) == null ?  null : e.value;
}

/**  Implements Map.remove and related methods */
// matchValue,为true时,只有key value全匹配才能remove;false时,key匹配就可以remove。
// value,这个和matchValue = true一起使用
// movable,true代表进行红黑树删除时,会把根节点变为hash桶直接引用的那个节点(通过调用一次moveRootToFront),
//     这一点很正常,因为持有红黑树的根节点能够用最直接方便的形式操作红黑树
// 但是moveRootToFront还会把根节点变为链表形式的头结点,这会改变节点之间的迭代顺序,这对迭代操作有很大的影响
// 常见的remove相关的方法都应该设置为true;迭代器是使用链表的方式进行迭代,它的remove方法,需要避免remove时因为根节点改动而造成迭代顺序变化,
//     所以要设置为false,在迭代完成后由其他方法进行moveRootToFront操作。
final Node<K,V> removeNode(int hash, Object key, Object value,  boolean matchValue, boolean movable) {
    Node<K,V>[] tab; Node<K,V> p; int n, index;
    if ((tab = table) != null && (n = tab.length) > 0 &&
        (p = tab[index = (n - 1) & hash]) != null) {
        Node<K,V> node = null, e; K k; V v;
        if (p.hash == hash &&  ((k = p.key) == key || (key != null && key.equals(k)))) // 判断下第一个节点
            node = p;
        else if ((e = p.next) != null) {
            if (p instanceof TreeNode) // 树节点就进行红黑树查找
                node = ((TreeNode<K,V>)p).getTreeNode(hash, key);
            else {
                do { // do-while循环进行链表查找
                    if (e.hash == hash &&  ((k = e.key) == key || (key != null && key.equals(k)))) {
                        node = e;
                        break;
                    }
                    p = e;
                } while ((e = e.next) != null);
            }
        }
        if (node != null && (!matchValue || (v = node.value) == value ||
                             (value != null && value.equals(v)))) {
            if (node instanceof TreeNode)
                ((TreeNode<K,V>)node).removeTreeNode(this, tab, movable); // 进行红黑树的删除
            else if (node == p) // 链表删除头结点
                tab[index] = node.next;
            else // 链表删除非头节点
                p.next = node.next;
            ++modCount;
            --size;
            afterNodeRemoval(node); // 这个方法交给子类LinkedHashMap实现
            return node;
        }
    }
    return null;
}

public void clear() {
    Node<K,V>[] tab;
    modCount++;
    if ((tab = table) != null && size > 0) {
        size = 0;
        for (int i = 0; i < tab.length; ++i)
            tab[i] = null;
    }
}

public V putIfAbsent(K key, V value) {
    return putVal(hash(key), key, value, true, true);
}

// K-V都匹配的时才删除
public boolean remove(Object key, Object value) {
    return removeNode(hash(key), key, value, true, true) != null;
}

// K-V都匹配时,把V替换成newValue
public boolean replace(K key, V oldValue, V newValue) {
    Node<K,V> e; V v;
    if ((e = getNode(hash(key), key)) != null &&
        ((v = e.value) == oldValue || (v != null && v.equals(oldValue)))) {
        e.value = newValue;
        afterNodeAccess(e);
        return true;
    }
    return false;
}

// K匹配时把V替换成value
public V replace(K key, V value) {
    Node<K,V> e;
    if ((e = getNode(hash(key), key)) != null) {
        V oldValue = e.value;
        e.value = value;
        afterNodeAccess(e);
        return oldValue;
    }
    return null;
}
八、视图和迭代器
就1点要说的。
HashMap的红黑树结构,本身还保留有链表结构,红黑树中节点被删除时,要从两种结构中都删除它。
红黑树本身就保留有链表,因此为了方便简单,迭代器使用的是链表方式进行的迭代。这样做还有另外一个好处:链表中某个节点被删除不影响剩下节点之间的相对顺序,如果使用树的方式进行遍历,因为红黑树remove时可能会出现的树的旋转,会改变树方式进行遍历时节点的相对顺序,可能会造成节点重复遍历或者没有被遍历的情况。迭代器使用链表遍历,在红黑树节点删除时,就能够不受树旋转的影响。
同时迭代器的remove操作,不能在删除节点后进行moveRootToFront操作。这个操作会将红黑树的根节点移动到链表的最前面,同时让它也是链表的头节点,这会改变链表节点之间的顺序。迭代器进行remove后,有可能 table[i] 引用的不是红黑树的根节点,但是TreeNode额外提供了寻找根节点的方法,不影响其他操作。这个迭代器未完成的moveRootToFront的操作由迭代完成后的下一个写操作来执行。这一点前面说了。
其余的基本没什么改动。
九、红黑树相关
放在最后面,一起看下。
红黑树是一种自平衡的二叉搜索树,额外多五个性质
性质1:节点是红色或黑色
性质2:根节点是黑色
性质3:NIL节点(null、空节点)是黑色的
性质4:每个红色节点的两个子节点都是黑色(从每个NIL节点到根的所有路径上不能有两个连续的红色节点)
性质5:从任一节点到其每个叶子的所有路径都包含相同数目的黑色节点
因为红黑树是二叉搜索树,二者的一些流程是一样的,下面的注释很多是针对二叉搜索树的操作写的。至于红黑树的平衡这块,暂时还不是特别熟悉,所以下面有4个方法先不看了,等以后再完善。后面TreeMap也是用红黑树实现的,到时候一起说。
TreeNode外面有几个相关的方法。
// 把原来链表上的普通节点转化为树节点,用双向链表保存
final void treeifyBin(Node<K,V>[] tab, int hash) {
    int n, index; Node<K,V> e;
    if (tab == null || (n = tab.length) < MIN_TREEIFY_CAPACITY)
        resize();
    else if ((e = tab[index = (n - 1) & hash]) != null) {
        TreeNode<K,V> hd = null, tl = null; // hd = head, tl = tail
        do {
            TreeNode<K,V> p = replacementTreeNode(e, null); // “构造”方法
            if (tl == null)
                hd = p;
            else {
                p.prev = tl;
                tl.next = p;
            }
            tl = p;
        } while ((e = e.next) != null);
        if ((tab[index] = hd) != null)
            hd.treeify(tab); // 转化为红黑树
    }
}

// 因为红黑树是二叉搜索树,关键字如何比较大小很重要
// HashMap这里首先直接使用hash值比较大小,如果发生hash值相等,那么进行以下处理
//     如果Key实现了Comparable<Key>接口,那么调用其compareTo方法进行大小比较;
//     如果没实现,那么调用System.identityHashCode获取其bject.hashCode(指的是未被子类覆盖时hashCode的返回值),再使用这个hashCode进行比较
// 这里允许不同的节点的Key在红黑树中相等,因为这里是HashMap不是TreeMap,不需要严格的顺序

/** Returns x's Class if it is of the form "class C implements Comparable<C>", else null. */
static Class<?> comparableClassFor(Object x) {
    if (x instanceof Comparable) {
        Class<?> c; Type[] ts, as; Type t; ParameterizedType p;
        if ((c = x.getClass()) == String.class) // bypass checks
            return c;
        if ((ts = c.getGenericInterfaces()) != null) {
            for (int i = 0; i < ts.length; ++i) {
                if (((t = ts[i]) instanceof ParameterizedType) &&
                    ((p = (ParameterizedType)t).getRawType() ==
                     Comparable.class) &&
                    (as = p.getActualTypeArguments()) != null &&
                    as.length == 1 && as[0] == c) // type arg is c
                    return c;
            }
        }
    }
    return null;
}

// 实现了Comparable接口就调用其compareTo方法进行大小比较
/** Returns k.compareTo(x) if x matches kc (k's screened comparable class), else 0. */
@SuppressWarnings({"rawtypes","unchecked"}) // for cast to Comparable
static int compareComparables(Class<?> kc, Object k, Object x) {
    return (x == null || x.getClass() != kc ? 0 :
            ((Comparable)k).compareTo(x));
}
剩下的都在TreeNode中。
除了红黑树相关的,其余都有注释了,红黑树等理解了,和TreeMap一起说。
// 红黑树节点TreeNode实际上还保存有链表的指针,因此也可以用链表的方式进行遍历读取操作
// 继承LinkedHashMap.Entry主要是为了子类的方便,减少子类的改动
static final class TreeNode<K,V> extends LinkedHashMap.Entry<K,V> {
    TreeNode<K,V> parent;  // red-black tree links
    TreeNode<K,V> left;
    TreeNode<K,V> right;
    TreeNode<K,V> prev;    // needed to unlink next upon deletion 新添加的prev指针是为了删除方便,删除链表的非头节点的节点,都需要知道它的前一个节点才能进行删除,所以直接提供一个prev指针
    boolean red;
    TreeNode(int hash, K key, V val, Node<K,V> next) {
        super(hash, key, val, next);
    }

    // 寻找根节点
    final TreeNode<K,V> root() {
        for (TreeNode<K,V> r = this, p;;) {
            if ((p = r.parent) == null)
                return r;
            r = p;
        }
    }

    // 把根节点移动到前面,确保红黑树的根节点是第一个节点,即 tab[index] = root
    static <K,V> void moveRootToFront(Node<K,V>[] tab, TreeNode<K,V> root) {
        int n;
        if (root != null && tab != null && (n = tab.length) > 0) {
            int index = (n - 1) & root.hash;
            TreeNode<K,V> first = (TreeNode<K,V>)tab[index];
            if (root != first) {
                Node<K,V> rn;
                tab[index] = root; // 设置root为能遍历到的第一个Node
                // 下面几行,用于更改链表中节点的顺序,虽然使用了红黑树,但是迭代操作还是使用链表进行的
                TreeNode<K,V> rp = root.prev;
                if ((rn = root.next) != null)
                    ((TreeNode<K,V>)rn).prev = rp;
                if (rp != null)
                    rp.next = rn;
                if (first != null)
                    first.prev = root;
                root.next = first;
                root.prev = null;
            }
            assert checkInvariants(root);
        }
    }

    // 以当前节点 this 为根节点开始遍历查找
    final TreeNode<K,V> find(int h, Object k, Class<?> kc) {
        TreeNode<K,V> p = this;
        do {
            int ph, dir; K pk; // ph = parent.hash, dir = direction, pk = parent.key
            TreeNode<K,V> pl = p.left, pr = p.right, q;
            if ((ph = p.hash) > h)
                p = pl;
            else if (ph < h)
                p = pr;
            else if ((pk = p.key) == k || (k != null && k.equals(pk)))
                return p;
            else if (pl == null)
                p = pr;
            else if (pr == null)
                p = pl;
            else if ((kc != null || (kc = comparableClassFor(k)) != null) && (dir = compareComparables(kc, k, pk)) != 0)
                p = (dir < 0) ? pl : pr;
            else if ((q = pr.find(h, k, kc)) != null) // 对右子树递归查找
                return q;
            else
                p = pl; // 前面递归查找了右边子树,这里循环时只用一直往左边找
        } while (p != null);
        return null;
    }

    // 以真正的root节点为根节点开始遍历查找
    final TreeNode<K,V> getTreeNode(int h, Object k) {
        return ((parent != null) ? root() : this).find(h, k, null);
    }

    // 最后使用的用于比较节点关键字大小的方法,优先级最低
    // System.identityHashCode:此方法的返回值和Object.hashCode没有被覆盖时的返回值一样,虚拟机尽量会保证这个值不重复
    // 如果不是同一个类就直接认为关键字相等
    static int tieBreakOrder(Object a, Object b) {
        int d;
        if (a == null || b == null || (d = a.getClass().getName().compareTo(b.getClass().getName())) == 0)
            d = (System.identityHashCode(a) <= System.identityHashCode(b) ? -1 : 1);
        return d;
    }

    // 将双向链表转化为红黑树
    // 红黑树是一种特殊的二叉搜索树,要保证二叉搜索树的基本性质:
    //     一个节点的关键字,不小于它的左边的子树上的所有节点的关键字,且不大于右边子树上的所有节点的关键字
    // 这里优先使用hash值当做关键字,hash值相同时,如果实现了Comparable接口,就使用Comparable.compareTo,否则使用 tieBreakOrder 方法进行比较
    final void treeify(Node<K,V>[] tab) {
        TreeNode<K,V> root = null;
        for (TreeNode<K,V> x = this, next; x != null; x = next) {
            next = (TreeNode<K,V>)x.next;
            x.left = x.right = null;
            if (root == null) {
                x.parent = null;
                x.red = false;
                root = x;
            }
            else {
                K k = x.key;
                int h = x.hash;
                Class<?> kc = null;
                for (TreeNode<K,V> p = root;;) { // 循环,遍历找到要插入的节点的parent节点
                    int dir, ph; // dir = direction, ph = parent.hash
                    K pk = p.key;
                    if ((ph = p.hash) > h) // 放在左边
                        dir = -1;
                    else if (ph < h) // 放在右边
                        dir = 1;
                    // 下面的else if 中处理hash相等的情况
                    // 如果实现了Comparable接口,就使用Comparable.compareTo判断方向
                    else if ((kc == null && (kc = comparableClassFor(k)) == null) || (dir = compareComparables(kc, k, pk)) == 0)
                        dir = tieBreakOrder(k, pk); // 没实现Comparable接口调用这个方法

                    TreeNode<K,V> xp = p;
                    if ((p = (dir <= 0) ? p.left : p.right) == null) { // 根据dir的正负确定遍历方向,找到要插入的节点的parent节点
                        x.parent = xp;
                        if (dir <= 0)
                            xp.left = x;
                        else
                            xp.right = x;
                        root = balanceInsertion(root, x); // 插入树节点,根据红黑树性质进行平衡化,保持平衡
                        break;
                    }
                }
            }
        }
        moveRootToFront(tab, root);
    }

    // 当节点数目太少不满足转化为红黑树条件时,转化为普通节点的链表
    final Node<K,V> untreeify(HashMap<K,V> map) {
        Node<K,V> hd = null, tl = null;
        for (Node<K,V> q = this; q != null; q = q.next) {
            Node<K,V> p = map.replacementNode(q, null);
            if (tl == null)
                hd = p;
            else
                tl.next = p;
            tl = p;
        }
        return hd;
    }

    // 用于实现HashMap.putVal
    final TreeNode<K,V> putTreeVal(HashMap<K,V> map, Node<K,V>[] tab, int h, K k, V v) {
        Class<?> kc = null;
        boolean searched = false;
        TreeNode<K,V> root = (parent != null) ? root() : this;
        for (TreeNode<K,V> p = root;;) {
            int dir, ph; K pk;
            if ((ph = p.hash) > h)
                dir = -1;
            else if (ph < h)
                dir = 1;
            else if ((pk = p.key) == k || (k != null && k.equals(pk)))
                return p;
            else if ((kc == null && (kc = comparableClassFor(k)) == null) || (dir = compareComparables(kc, k, pk)) == 0) {
                if (!searched) {
                    TreeNode<K,V> q, ch;
                    searched = true;
                    if (((ch = p.left) != null && (q = ch.find(h, k, kc)) != null) || ((ch = p.right) != null && (q = ch.find(h, k, kc)) != null))
                        return q;
                }
                dir = tieBreakOrder(k, pk);
            }

            TreeNode<K,V> xp = p;
            if ((p = (dir <= 0) ? p.left : p.right) == null) { // 二叉搜索树新insert的节点都是叶子节点
                Node<K,V> xpn = xp.next;
                TreeNode<K,V> x = map.newTreeNode(h, k, v, xpn);
                if (dir <= 0)
                    xp.left = x;
                else
                    xp.right = x;
                xp.next = x;
                x.parent = x.prev = xp;
                if (xpn != null) ((TreeNode<K,V>)xpn).prev = x;
                moveRootToFront(tab, balanceInsertion(root, x)); // insert后红黑树再调整
                return null;
            }
        }
    }

    // 用于实现HashMap.removeNode(Map.remove)
    final void removeTreeNode(HashMap<K,V> map, Node<K,V>[] tab, boolean movable) {
        int n;
        if (tab == null || (n = tab.length) == 0)
            return;
        int index = (n - 1) & hash;
        TreeNode<K,V> first = (TreeNode<K,V>)tab[index], root = first, rl;
        TreeNode<K,V> succ = (TreeNode<K,V>)next, pred = prev;
        // 下面几行是用于在双向链表中删除这个节点
        if (pred == null)
            tab[index] = first = succ;
        else
            pred.next = succ;
        if (succ != null)
            succ.prev = pred;
        if (first == null) // 只有一个节点
            return;
        if (root.parent != null)
            root = root.root();
        if (root == null || root.right == null || (rl = root.left) == null || rl.left == null) {
            tab[index] = first.untreeify(map);  // too small 节点数目太少,恢复为普通的链表,因为已经在双向链表中删除了节点,所以不必再操作了,可以直接返回
            return;
        }
        TreeNode<K,V> p = this, pl = left, pr = right, replacement; // replacement表示以节点为中心进行红黑树再调整,当p不是叶子节点是这也是p的实际继任节点
        // 下面的代码跟普通的二叉搜索树删除操作类似
        // 普通二叉搜索树删除节点有三种情况,画了个图,在后面
        // 1、p没有子树,直接删除就行
        // 2、p只有左子树或者右子树,用p的左子树或者右子树“替换”(p.parent.left/right = p.left/right)它。
        // 3、p 有非空的左右子树,把 p和s进行“内容替换”(互相交换各自的所有属性,然后引用交换),然后退化为情况1或者情况2再处理一次。这跟指针处理是一样的。
        // 先保证二叉搜索树的性质,在进行红黑树平衡调整保证是正确的红黑树
        if (pl != null && pr != null) { // 情况3
            TreeNode<K,V> s = pr, sl;
            while ((sl = s.left) != null) // find successor 根据二叉搜索树的性质在右子树中寻找最“左”边的一个,也是不小于要删除的节点的最小节点,当做当前节点的实际继任节点
                s = sl;
            boolean c = s.red; s.red = p.red; p.red = c; // swap colors 交换颜色,保证其他部分是正确红黑树,不用调整
            TreeNode<K,V> sr = s.right;
            TreeNode<K,V> pp = p.parent;
            if (s == pr) { // p was s's direct parent
                p.parent = s;
                s.right = p;
            }
            else {
                TreeNode<K,V> sp = s.parent;
                if ((p.parent = sp) != null) {
                    if (s == sp.left)
                        sp.left = p;
                    else
                        sp.right = p;
                }
                if ((s.right = pr) != null)
                    pr.parent = s;
            }
            p.left = null;
            if ((p.right = sr) != null)
                sr.parent = p;
            if ((s.left = pl) != null)
                pl.parent = s;
            if ((s.parent = pp) == null)
                root = s;
            else if (p == pp.left)
                pp.left = s;
            else
                pp.right = s;
            if (sr != null)
                replacement = sr; // p和s换位置后,p.left为空,如果这时候的p.right != null,就退化为情况2
            else
                replacement = p; // p和s换位置后,p.left为空,如果这时候的p.right == null,就退化为情况1
        }
        else if (pl != null) // 情况2,p.right为null,可以直接用p.left替换p
            replacement = pl;
        else if (pr != null) // 情况2,p.left为null,可以直接用p.right替换p
            replacement = pr;
        else                 // 情况1,p的左右都为null,后面直接删除p就行
            replacement = p;
        if (replacement != p) { // 情况2 或者 情况3退化为情况2时,删除节点p的操作
            TreeNode<K,V> pp = replacement.parent = p.parent;
            if (pp == null)
                root = replacement;
            else if (p == pp.left)
                pp.left = replacement;
            else
                pp.right = replacement;
            p.left = p.right = p.parent = null;
        }

        TreeNode<K,V> r = p.red ? root : balanceDeletion(root, replacement); // 删除后重新平衡,删除红色节点不影响红黑树性质,可以不用再平衡

        if (replacement == p) {  // detach 情况1 或者 情况3退化为情况1时,删除节点p的操作
            TreeNode<K,V> pp = p.parent;
            p.parent = null;
            if (pp != null) {
                if (p == pp.left)
                    pp.left = null;
                else if (p == pp.right)
                    pp.right = null;
            }
        }
        if (movable)
            moveRootToFront(tab, r);
    }

    // 用于实现resize,跟链表的resize一样,也是使用高低位算法拆分成两个部分
    // 拆分后的部分如果长度小,就存储为普通的链表,长度满足就转化为新的红黑树存储
    final void split(HashMap<K,V> map, Node<K,V>[] tab, int index, int bit) {
        TreeNode<K,V> b = this;
        // Relink into lo and hi lists, preserving order
        TreeNode<K,V> loHead = null, loTail = null;
        TreeNode<K,V> hiHead = null, hiTail = null;
        int lc = 0, hc = 0;
        for (TreeNode<K,V> e = b, next; e != null; e = next) {
            next = (TreeNode<K,V>)e.next;
            e.next = null;
            if ((e.hash & bit) == 0) {
                if ((e.prev = loTail) == null)
                    loHead = e;
                else
                    loTail.next = e;
                loTail = e;
                ++lc;
            }
            else {
                if ((e.prev = hiTail) == null)
                    hiHead = e;
                else
                    hiTail.next = e;
                hiTail = e;
                ++hc;
            }
        }

        if (loHead != null) {
            if (lc <= UNTREEIFY_THRESHOLD)
                tab[index] = loHead.untreeify(map);
            else {
                tab[index] = loHead;
                if (hiHead != null) // (else is already treeified)
                    loHead.treeify(tab);
            }
        }
        if (hiHead != null) {
            if (hc <= UNTREEIFY_THRESHOLD)
                tab[index + bit] = hiHead.untreeify(map);
            else {
                tab[index + bit] = hiHead;
                if (loHead != null)
                    hiHead.treeify(tab);
            }
        }
    }

    /* ------------------------------------------------------------ */
    // 下面四个是经典的红黑树方法,改编自《算法导论》
    static <K,V> TreeNode<K,V> rotateLeft(TreeNode<K,V> root, TreeNode<K,V> p); // 左旋
    static <K,V> TreeNode<K,V> rotateRight(TreeNode<K,V> root, TreeNode<K,V> p); // 右旋
    static <K,V> TreeNode<K,V> balanceInsertion(TreeNode<K,V> root, TreeNode<K,V> x); // insert后保存平衡
    static <K,V> TreeNode<K,V> balanceDeletion(TreeNode<K,V> root, TreeNode<K,V> x); // delete后保存平衡

    // 递归检查一些关系,确保构造的是正确无误的红黑树
    static <K,V> boolean checkInvariants(TreeNode<K,V> t) {
        TreeNode<K,V> tp = t.parent, tl = t.left, tr = t.right, tb = t.prev, tn = (TreeNode<K,V>)t.next;
        if (tb != null && tb.next != t)
            return false;
        if (tn != null && tn.prev != t)
            return false;
        if (tp != null && t != tp.left && t != tp.right)
            return false;
        if (tl != null && (tl.parent != t || tl.hash > t.hash))
            return false;
        if (tr != null && (tr.parent != t || tr.hash < t.hash))
            return false;
        if (t.red && tl != null && tl.red && tr != null && tr.red)
            return false;
        if (tl != null && !checkInvariants(tl))
            return false;
        if (tr != null && !checkInvariants(tr))
            return false;
        return true;
    }
}
下面简单说下二叉搜索树的一些操作,当作是帮助理解上面的一些代码,复习下二叉搜索树,也当是先预习下。红黑树的操作都是在完成二叉搜索树的操作后,再进行一次平衡,因此先理解下那四个方法外的二叉搜索树相关的东西。
put添加还算比较好理解,因为二叉搜索树新添加的节点都成为了新的叶子节点(非NIL的叶子节点),然后就是为了保证红黑树性质,对新添加的节点周围进行颜色检查,必要时更改颜色,保持平衡。
remove要复杂些,分三种情况考虑。为了帮助理解removeTreeNode,画了几张图,理解如何在二叉搜索树中删除一个节点(红左;蓝右;黑代表父节点,不用管左右)。
a、二叉搜索树删除节点中最简单的情况,直接删除,或者说使用 null(NIL节点)替换它 也行。

b、二叉搜索树删除节点中次简单的情况,直接使用非空子树替换它。

c、二叉搜索树删除节点中的一般情况:p和s进行“内容交换”后,退化为上面两种情况,再处理一次。
这种一般用指针描述比较直观,上面的代码中使用“内容交换”的方式反而绕一些,这样主要是为了让人知道,后续该围绕哪个节点来进行红黑树平衡化。一开始还没看懂,不过两者的确是等效的。
最后,红黑树那4个方法,这里就先 // TODO,以后到TreeMap时再补。毕竟,这篇的主要目的还是讲HashMap,不理解红黑树的实现对HashMap也没什么影响。网上有很多现成的红黑树相关的讲解,感兴趣的可以找来看看。