1. 安装Vuex
- npm 安装
- npm install vuex --save
- yran 安装
- yarn add vuex
2. Vuex新建示例模块
-
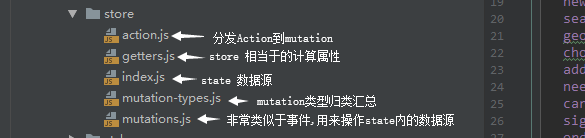
构建如图所示 store 文件夹其中包括以下几个模块
-
index.js 内容部分如下,实例中在 state 中初始化5条数据
	/*
	*	index.js
	*/
	//导入vue,vuex,其他几个使用到的模块
	import Vue from 'vue'
	import Vuex from 'vuex'
	import mutations from './mutations'
	import actions from './action'
	import getters from './getters'

	//使用vuex
	Vue.use(Vuex)

	//配置state数据源
	const state = {
		one: '',
		two: '',
		three:[],
		four:'',
		five:'',
	}
	//实例化Vuex仓库并且导出模块配置到main.js中
	export default new Vuex.Store({
		state,
		getters,
		actions,
		mutations,
	})
- 使用vuex
Vue.use(Vuex)
- 初始化数据状态
3. mutation事件定义
	/*mutation-types.js 统一配置提交方法的名称*/
	export const SET_ONE ='SET_ONE'
	export const SET_TWO ='SET_TWO'
	export const SET_THREE ='SET_THREE'
	export const SET_FOUR ='GET_FOUR'
	export const SET_FIVE ='GET_FIVE'

	/*mutations.js*/
	//导入mutation-types.js
	import {
	  SET_ONE,
	  SET_TWO,
	  SET_THREE,
	  SET_FOUR,
	  SET_FIVE
	} from './mutation-types'

	export default {
	  [SET_ONE](state, one) {
	    state.one = one
	  },
	  [SET_TWO](state, two) {
	    state.two = two
	  },
	  [SET_THREE](state, three) {
	    state.three = three
	  },
	  [SET_FOUR](state, four) {
	    state.four = four
	  },
	  [SET_FIVE](state, five) {
	    state.five = five
	  }
	}
4. commit方法提交实战应用
- 通过 this.$store.commit() 把数据提交
- 计算属性更新数据 return this.$store.state.one
- 为了处理刷新state 数据源丢失问题可以通过本地存储数据 localStorage.setItem(),这样在其他组件或者页面的计算属性中调用 this.$store.state.one 实现数据同步更新
	<template>
	  <div class="class">
	    <div>
	      <button @click="setStateOne">设置store.state.one为:一</button>
	      <p>store.state.one的值为:{{setOne}}</p>
	    </div>
	</template>
	<script>
	  export default {
	    name: "page",
	    data() {},
	    computed: {
	        setOne() {
	          return this.$store.state.one
	        }
	    },
	    mounted(){
	      let storageOne = localStorage.getItem('getOne')
	      console.log(storageOne)
	      if(storageOne){
	        this.$store.commit("SET_ONE", storageOne)
	      }
	    },
	    methods: {
	      setStateOne() {
	        // 服务器拿到stateOne的值
	        let stateOne ='一'
	        //存储到本地数据中
	        localStorage.setItem('getOne',stateOne)
	        //commit提交数据到SET_ONE中
	        this.$store.commit("SET_ONE", stateOne)
	      }
	    }
	  }
	</script>
5.mapState和mapMutation用法详解
	<template>
	  <div class="class">
	      <button @click="setStateTwo">设置store.state.two为:二</button>
	      <p>store.state.two的值为:{{setTwo}}</p>
	  </div>
	</template>

	<script>
	  	//导入 mapState,mapMutations
	  	import {mapState,mapMutations} from 'vuex'

	    export default {
	      name: "page",
	      computed: {
	      	//1. 下面的用法就是映射 this.setTwo 为 store.state.two
	      	//2. 或者把setTwo换成two就可以直接使用字符串 'two' 并且上面使用 {{two}}调用. this.two 为 store.state.two
			...mapState({
				setTwo:state=>state.two //等同于1. setTwo() {return this.$store.state.two}, 2. setTwo:'two' 传入字符串的state数据源 这三种用法一样
			})
			//字符串数组形式传入 示例:如果映射与数据源写法不同就要像上面多个对象形式传入
	       // ...mapState([
	       //  'two',
	       //  'three'
	       // ])
	      },
	      methods: {
	      	//示例1.  ...mapMutations(['SET_TWO','SET_THREE']),   数组写法映射数据写法要与mutation定义的事件名一致
	        ...mapMutations({
	          settwo:'SET_TWO',
	          setthree:'SET_THREE'
	        }),
	        setStateTwo(){
	          let stateTwo = '二'
	          //示例1. this.SET_TWO(stateTwo)   this.SET_THREE(3)
	          this.settwo(stateTwo)

	          this.setthree(3)
	        }
	      }
	    }
	 </script>
6. 使用action和mapMutations 实现异步操作
	//actions.js
	//1. 封装一个Promise 外部调用取值
	import axios from '../axios'
	export default {
	  setthree ({ commit }) {
	    return new Promise((resolve,reject)=>{
	      axios.ajax({
	        url:'www.baidu.com',
	        method:'get',
	        data:{
	          params:{
	            username:'myusername'
	          }
	        }
	      }).then((response)=>{
	        commit('SET_THREE',response)
	        resolve()
	      })
	    })
	  },
	  //2. 利用 async / await获取异步数据
	  async getthree ({ commit }) {
	  		//等待getData方法获取到数据在执行commit赋值  比如使用Promise 返回数据
			let res = await getData();
			commit('SET_THREE', res)
		},
	}
	//调用页面使用page.vue
	<template>
	  <div class="class">
	    <div>
	      <p>这里是服务器获取的list列表:{{listThree}}</p>
	    </div>

	  </div>
	</template>

	<script>
	  import {mapState,mapMutations} from 'vuex'

	    export default {
	      name: "page",
	      data() {
	        return {
	          listThree: [],
	        }
	      },
	      created(){
	      	//示例1 普通dispatch获取数据
			 this.$store.dispatch("setthree").then(()=>{
			 	//里面可以异步获取到数据,这里就给页面全局的状态赋值
				this.listThree=this.three
			 })
			 //示例2 mapActions获取
			 this.setthree().then(()=>{
				this.listThree=this.three
			  })
			 this.getMyThree()
	      },
	      computed:{
				...mapState(['three'])
		  },
		  method:{
 			//使用时候导入mapActions
			 ...mapActions([
				"setthree"// 将 `this.setthree()` 映射为 `this.$store.dispatch('setthree')`
			])
			 ...mapActions({
				getMyThree:"getthree"// 将 `this.getMyThree()` 映射为 `this.$store.dispatch('getthree')`
			})
		  }
	    }
	 </script>
7. getters 和mapGetters
	//getters.js
	// getters 的使用默认参数就是state  对state里面的状态进行处理过滤
	export default {
		fourval (state) {
	      return state.four%2?'奇数':'偶数'
	    },
	}
	//前端实现 page.vue
	<script>
	  import {mapState,mapMutations} from 'vuex'

	    export default {
	      name: "page",
	      data() {
	        return {
	          dataFour:'' ,
	        }
	      },
	      created(){
	      	//直接调用getters的数据this.dataFour=this.$store.getters.fourval
			this.dataFour=this.Objfour
		  },
	      computed:{
		  },
		  method:{
 			//...mapGetters(['fourval'])	 直接this.fourval就是调用four过滤后的数据 映射`this.$store.getters.fourval`
 			...mapGetters({
 				Objfour:'fourval' //this.Objfour 映射  `this.$store.getters.fourval`
 			})
		  }
	    }
	 </script>