Hadoop集群——(一)集群搭建步骤
现在有3台机,现在就利用这3台主机来搭建一个Hadoop集群。它们的IP地址、在Hadoop集群中对应的角色及主机名如下:
	IP                     角色		主机名
172.17.0.2 -- master, namenode, jobstracker -- 540d1f9fc209(主机名)
172.17.0.3 -- slave, dataNode, tasktracker -- 646edbf2b0e8(主机名)
172.17.0.4 -- slave, dataNode, tasktracker -- 56ab96e7e138(主机名)
具体的搭建步骤如下:
主机名设置
在3台机上分别设置/etc/hosts和/etc/hostname:
(1)hosts文件用于定义主机名及IP间的对应关系,3台机的/etc/hosts:
127.0.0.1 localhost
172.17.0.2 540d1f9fc209
172.17.0.3 646edbf2b0e8
172.17.0.4 56ab96e7e138
(2)hostname用于定义Ubuntu的主机名,/etc/hostname:
主机名
master的/etc/hostname:
540d1f9fc209
slave1的/etc/hostname:
646edbf2b0e8
slave2的/etc/hostname:
56ab96e7e138
ssh免密设置
创建公钥并进行相应配置
在3台机上分别执行如下4步操作:
(1)创建密钥文件:
root@540d1f9fc209:~# ssh-keygen
Generating public/private rsa key pair.
Enter file in which to save the key (/root/.ssh/id_rsa):
Created directory '/root/.ssh'.
Enter passphrase (empty for no passphrase):
Enter same passphrase again:
Your identification has been saved in /root/.ssh/id_rsa.
Your public key has been saved in /root/.ssh/id_rsa.pub.
The key fingerprint is:
SHA256:dxqbt5mrIHOrq8gbyz0R9FeqlLVAoIp/zQHfD7RyPs4 root@540d1f9fc209
The key's randomart image is:
+---[RSA 2048]----+
|    .o.          |
|   .. . . .      |
|  .... +.+       |
|..  .o+o+.       |
|o    o+oS o .    |
| .  .o.= + *     |
|  o ..= = = .    |
| o *.  * + . +   |
|  *.ooooE ..=.   |
+----[SHA256]-----+
root@540d1f9fc209:~# ll
total 108
drwx------ 1 root root  4096 Nov  7 09:16 ./
drwxr-xr-x 1 root root  4096 Nov  7 07:18 ../
-rw------- 1 root root 54424 Nov  5 08:47 .bash_history
-rw-r--r-- 1 root root  3560 Sep 21 12:44 .bashrc
drwx------ 2 root root  4096 Sep 21 07:22 .cache/
drwxr-xr-x 2 root root  4096 Sep 21 12:10 .oracle_jre_usage/
-rw-r--r-- 1 root root   148 Aug 17  2015 .profile
drwx------ 2 root root  4096 Nov  7 09:16 .ssh/
-rw------- 1 root root 18886 Nov  7 09:00 .viminfo
-rw-r--r-- 1 root root   170 Oct 13 06:59 .wget-hsts
root@540d1f9fc209:~# cd .ssh/
root@540d1f9fc209:~/.ssh# ll
total 16
drwx------ 2 root root 4096 Nov  7 09:16 ./
drwx------ 1 root root 4096 Nov  7 09:16 ../
-rw------- 1 root root 1675 Nov  7 09:16 id_rsa
-rw-r--r-- 1 root root  399 Nov  7 09:16 id_rsa.pub
(2)修改master下的/etc/ssh/ssh_config文件,添加下面两行:
StrictHostKeyChecking no
UserKnownHostsFile /dev/null
(3)运行如下命令重启ssh服务:
service ssh restart
(4)在~/.ssh目录下,创建autorized_keys文件,并将id_rsa.pub追加到authorized_keys中:
root@540d1f9fc209:~/.ssh# touch authorized_keys
root@540d1f9fc209:~/.ssh# chmod 600 authorized_keys
root@540d1f9fc209:~/.ssh# cat id_rsa.pub >> authorized_keys
拷贝公钥
(1)将master的id_rsa.pub分别拷贝到slave1和slave2上,并将其分别追加到slave1和slave2的~/.ssh/authorized_keys上;
(2)将slave1的id_rsa.pub分别拷贝到master和slave2上,并将其分别追加到master和slave2的~/.ssh/authorized_keys上;
(3)将slave2的id_rsa.pub分别拷贝到master和slave1上,并将其分别追加到master和slave1的~/.ssh/authorized_keys上。
重启ssh服务
在每台机上重启ssh服务:
service ssh restart
测试
简单测试一下,从master免密登陆slave2:
root@540d1f9fc209:~/.ssh# ssh 172.17.0.4
Warning: Permanently added '172.17.0.4' (ECDSA) to the list of known hosts.
Welcome to Ubuntu 16.04.5 LTS (GNU/Linux 4.4.0-133-generic x86_64)

 * Documentation:  https://help.ubuntu.com
 * Management:     https://landscape.canonical.com
 * Support:        https://ubuntu.com/advantage
Last login: Wed Nov  7 10:28:29 2018 from 172.17.0.2
root@56ab96e7e138:~#
Hadoop配置
在我的3台机上,Hadoop的目录是/hadoop/hadoop-2.9.1/,因此接下来在3台机上都进行以下操作:
1.创建文件夹
创建如下文件夹:
/hadoop/hadoop-2.9.1/tmp
/hadoop/hadoop-2.9.1/tmp/dfs/name
/hadoop/hadoop-2.9.1/tmp/dfs/data
2.进行Hadoop文件配置
对/hadoop/hadoop-2.9.1/etc/hadoop下的core-site.xml、hdfs-site.xml、mapred-site.xml、yarn-site.xml文件进行如下配置:
(1)core-site.xml
<?xml version="1.0" encoding="UTF-8"?>
<?xml-stylesheet type="text/xsl" href="configuration.xsl"?>
<!--
  Licensed under the Apache License, Version 2.0 (the "License");
  you may not use this file except in compliance with the License.
  You may obtain a copy of the License at
    http://www.apache.org/licenses/LICENSE-2.0
  Unless required by applicable law or agreed to in writing, software
  distributed under the License is distributed on an "AS IS" BASIS,
  WITHOUT WARRANTIES OR CONDITIONS OF ANY KIND, either express or implied.
  See the License for the specific language governing permissions and
  limitations under the License. See accompanying LICENSE file.
-->
<!-- Put site-specific property overrides in this file. -->
<configuration>
    <property>
        <name>fs.default.name</name>
        <value>hdfs://172.17.0.2:9000</value>
    </property>
   <property>
        <name>hadoop.tmp.dir</name>
        <value>file:/hadoop/hadoop-2.9.1/tmp</value>
    </property>
</configuration>
(2)hdfs-site.xml
<?xml version="1.0" encoding="UTF-8"?>
<?xml-stylesheet type="text/xsl" href="configuration.xsl"?>
<configuration>
    <property>
        <name>dfs.replication</name>
        <value>2</value>
    </property>
    <property>
		<name>dfs.namenode.name.dir</name>
		<value>file:/hadoop/hadoop-2.9.1/tmp/dfs/name</value>
</property>
<property>
	<name>dfs.datanode.data.dir</name>
	<value>file:/hadoop/hadoop-2.9.1/tmp/dfs/data</value>
</property>
</configuration>
(3)mapred-site.xml
<?xml version="1.0"?>
<?xml-stylesheet type="text/xsl" href="configuration.xsl"?>
<!--
  Licensed under the Apache License, Version 2.0 (the "License");
  you may not use this file except in compliance with the License.
  You may obtain a copy of the License at
    http://www.apache.org/licenses/LICENSE-2.0
  Unless required by applicable law or agreed to in writing, software
  distributed under the License is distributed on an "AS IS" BASIS,
  WITHOUT WARRANTIES OR CONDITIONS OF ANY KIND, either express or implied.
  See the License for the specific language governing permissions and
  limitations under the License. See accompanying LICENSE file.
-->
<!-- Put site-specific property overrides in this file. -->
<configuration>
<property>
	<name>mapred.job.tracker</name>
	<value>172.17.0.2:9001</value>
</property>
<property>
	<name>mapred.child.java.opts</name>
	<value>-Xmx512m</value>
</property>
<property>
	<name>mapred.tasktracker.map.tasks.maximum</name>
	<value>6</value>
</property>
<property>
	<name>mapred.tasktracker.reduce.tasks.maximum</name>
	<value>2</value>
</property>
<property>
	<name>mapreduce.framework.name</name>
	<value>yarn</value>
</property>
</configuration>
(4)yarn-site.xml
<?xml version="1.0"?>
<!--
  Licensed under the Apache License, Version 2.0 (the "License");
  you may not use this file except in compliance with the License.
  You may obtain a copy of the License at
    http://www.apache.org/licenses/LICENSE-2.0
  Unless required by applicable law or agreed to in writing, software
  distributed under the License is distributed on an "AS IS" BASIS,
  WITHOUT WARRANTIES OR CONDITIONS OF ANY KIND, either express or implied.
  See the License for the specific language governing permissions and
  limitations under the License. See accompanying LICENSE file.
-->
<configuration>
<property>
	<name>yarn.resourcemanager.hostname</name>
	<value>540d1f9fc209</value>
</property>
<property>
	<name>yarn.nodemanager.aux-services</name>
	<value>mapreduce_shuffle</value>
</property>
<property>
	<name>yarn.log-aggregation-enable</name>
	<value>true</value>
</property>
<property>
	<name>yarn.log-aggregation.retain-seconds</name>
	<value>604800</value>
</property>
<property>
	  <name>yarn.nodemanager.vmem-pmem-ratio</name>
	  <value>5</value>
</property>
</configuration>
在目录/hadoop/hadoop-2.9.1/etc/hadoop下创建masters文件和slaves文件,内容如下:
masters:
172.17.0.2
slaves:
172.17.0.3
172.17.0.4
环境变量配置
修改~/.bashrc,添加以下几行:
export HADOOP_INSTALL=$HADOOP_HOME
export HADOOP_MAPRED_HOME=$HADOOP_HOME
export HADOOP_COMMON_HOME=$HADOOP_HOME
export HADOOP_HDFS_HOME=$HADOOP_HOME
export YARN_HOME=$HADOOP_HOME
export CLASSPATH=.:${JAVA_HOME}/lib:${JRE_HOME}/lib
export PATH=${JAVA_HOME}/bin:$PATH
export HADOOP_HOME=/hadoop/hadoop-2.9.1
export CLASSPATH=$($HADOOP_HOME/bin/hadoop classpath):$CLASSPATH
export HADOOP_COMMON_LIB_NATIVE_DIR=$HADOOP_HOME/lib/native
export PATH=$PATH:$HADOOP_HOME/sbin:$HADOOP_HOME/bin
export LD_LIBRARY_PATH=$HADOOP_HOME/lib/native
export HADOOP_OPTS="-Djava.library.path=$HADOOP_INSTALL/lib:$HADOOP_COMMON_LIB_NATIVE_DIR"
export HADOOP_ROOT_LOGGER=console
#export HADOOP_ROOT_LOGGER=DEBUG,console
执行如下命令让环境变量生效:
$source ~/.bashrc
修改目录/hadoop/hadoop-2.9.1/etc/hadoop/下的hadoop-env.sh文件,添加以下几行:
export JAVA_HOME=/usr/lib/java/jdk1.8.0_181
export HADOOP_COMMON_LIB_NATIVE_DIR="/usr/local/hadoop/lib/native/"
export HADOOP_OPTS="$HADOOP_OPTS -Djava.library.path=${HADOOP_HOME}/lib/native/"
export HADOOP_CONF_DIR=${HADOOP_CONF_DIR:-"/etc/hadoop"}
export LD_LIBRARY_PATH=$HADOOP_HOME/lib/native
启动Hadoop
在master节点上,格式化namenode:
root@540d1f9fc209:/hadoop/hadoop-2.9.1/etc/hadoop# hadoop namenode -format
DEPRECATED: Use of this script to execute hdfs command is deprecated.
Instead use the hdfs command for it.

Formatting using clusterid: CID-d6e1d19e-bfb1-4259-86b0-a1fb1f2ef9b6
Re-format filesystem in Storage Directory /hadoop/hadoop-2.9.1/tmp/dfs/name ? (Y or N) y
在master上,启动Hadoop:
root@540d1f9fc209:/hadoop/hadoop-2.9.1/etc/hadoop# start-all.sh
This script is Deprecated. Instead use start-dfs.sh and start-yarn.sh
Starting namenodes on [540d1f9fc209]
540d1f9fc209: Warning: Permanently added '540d1f9fc209,172.17.0.2' (ECDSA) to the list of known hosts.
540d1f9fc209: starting namenode, logging to /hadoop/hadoop-2.9.1/logs/hadoop-root-namenode-540d1f9fc209.out
172.17.0.4: Warning: Permanently added '172.17.0.4' (ECDSA) to the list of known hosts.
172.17.0.3: Warning: Permanently added '172.17.0.3' (ECDSA) to the list of known hosts.
172.17.0.3: starting datanode, logging to /hadoop/hadoop-2.9.1/logs/hadoop-root-datanode-646edbf2b0e8.out
172.17.0.4: starting datanode, logging to /hadoop/hadoop-2.9.1/logs/hadoop-root-datanode-56ab96e7e138.out
Starting secondary namenodes [0.0.0.0]
0.0.0.0: Warning: Permanently added '0.0.0.0' (ECDSA) to the list of known hosts.
0.0.0.0: starting secondarynamenode, logging to /hadoop/hadoop-2.9.1/logs/hadoop-root-secondarynamenode-540d1f9fc209.out
starting yarn daemons
starting resourcemanager, logging to /hadoop/hadoop-2.9.1/logs/yarn-root-resourcemanager-540d1f9fc209.out
172.17.0.3: Warning: Permanently added '172.17.0.3' (ECDSA) to the list of known hosts.
172.17.0.4: Warning: Permanently added '172.17.0.4' (ECDSA) to the list of known hosts.
172.17.0.4: starting nodemanager, logging to /hadoop/hadoop-2.9.1/logs/yarn-root-nodemanager-56ab96e7e138.out
172.17.0.3: starting nodemanager, logging to /hadoop/hadoop-2.9.1/logs/yarn-root-nodemanager-646edbf2b0e8.out
在master上看启动情况:
root@540d1f9fc209:/hadoop/hadoop-2.9.1/tmp/dfs# jps
28963 SecondaryNameNode
28755 NameNode
29403 Jps
29134 ResourceManager
在slave1上看执行情况:
root@646edbf2b0e8:/hadoop/hadoop-2.9.1/tmp/dfs# jps
7841 Jps
7691 NodeManager
7566 DataNode
在slave2上看执行情况:
root@56ab96e7e138:/hadoop/hadoop-2.9.1# jps
7364 DataNode
7637 Jps
7487 NodeManager
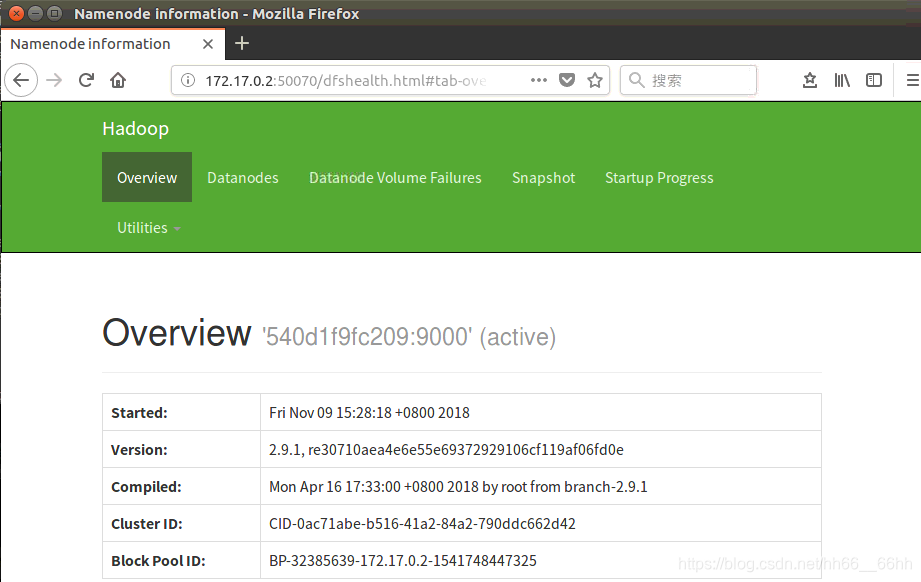
在Web浏览器上输入http://172.17.0.2:50070 ,可以查看到Hadoop集群的管理界面:
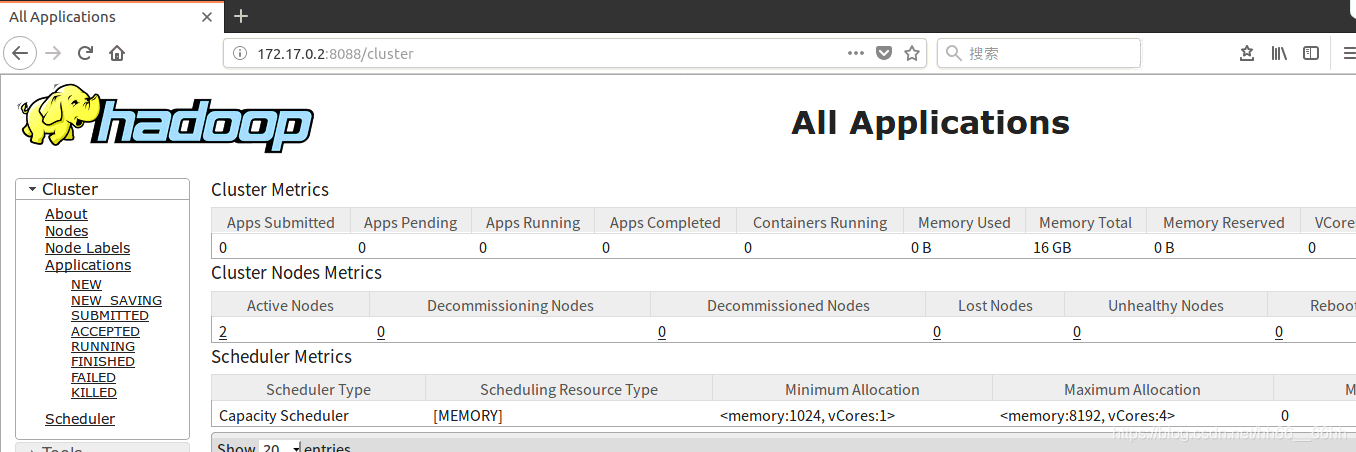
在Web浏览器上输入http://172.17.0.2:8088/,可以看到Hadoop集群的MapReduce的Web界面: