一、总概
昨天写完一篇基于深度学习的oepncv人脸识别和一篇基于颜色阈值的皮肤检测,昨晚回宿舍也没有闲着,听说yolov3嵌入opencv,并且仅用CPU跑,就比Darknet + OpenMP组合快九倍,听着就很令人兴奋。马不停蹄看文章 ,马上配置环境测试一下,效果还行。想看详细的代码解析的朋友,建议直接看上面的文章,歪果仁写的东西,确实是不错。我作为六级刚过425的英语渣渣,也能看懂。
二、正文
(1)环境:yolov3要求的opencv版本是3.4.2以上,在环境内打开python,输入
import cv2
print(cv2.__version__)
- 1
- 2
查看opencv的版本,如果是3.4.1的版本,会因为找不到模型而报错,务必注意。
安装opencv,个人建议使用anaconda , 新建一个环境使用,网络上有很多教程。使用pip下载,如果很慢,可以尝试切换国内源,参考我的一篇文章,只需要在命令行输入:
pip install -i https://pypi.tuna.tsinghua.edu.cn/simple opencv-contrib-python
- 1
安装完opencv , 再测试一下版本是不是3.4.2的
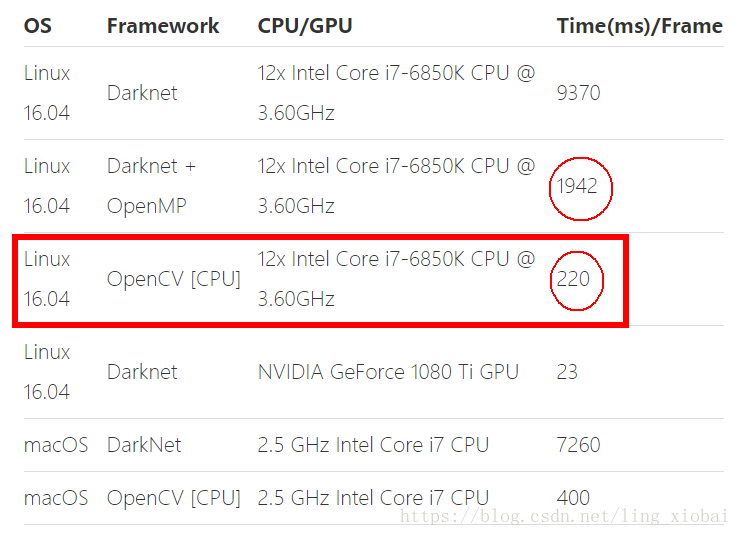
(2)关于为什么用opencv去跑YOLO?
- 很容易和opencv的应用整合,不需要担心编译构建额外的Darknet代码
- 支持Python.现在搞机器学习,应该都是使用python的吧?
- 比Darknet + OpenMP 还要快9倍
(图片来源网络)
(3)代码准备:
需要下载yolov3.weights权重文件和yolov3.cfg网络构建文件,还有python代码,这些都可以去我的github下载,非常感谢CVer公众号提供的文件。
(4)完整代码:
# This code is written at BigVision LLC. It is based on the OpenCV project. It is subject to the license terms in the LICENSE file found in this distribution and at http://opencv.org/license.html

# Usage example:  python3 object_detection_yolo.py --video=run.mp4
#                 python3 object_detection_yolo.py --image=bird.jpg

import cv2 as cv
import argparse
import sys
import numpy as np
import os.path

# Initialize the parameters
confThreshold = 0.5  #Confidence threshold
nmsThreshold = 0.4   #Non-maximum suppression threshold置信度阈值
inpWidth = 320       #Width of network's input image,改为320*320更快
inpHeight = 320      #Height of network's input image,改为608*608更准

parser = argparse.ArgumentParser(description='Object Detection using YOLO in OPENCV')
parser.add_argument('--image', help='Path to image file.')
parser.add_argument('--video', help='Path to video file.')
args = parser.parse_args()

# Load names of classes
classesFile = "coco.names";
classes = None
with open(classesFile, 'rt') as f:
    classes = f.read().rstrip('\n').split('\n')

# Give the configuration and weight files for the model and load the network using them.
modelConfiguration = "yolov3.cfg";
modelWeights = "yolov3.weights";

net = cv.dnn.readNetFromDarknet(modelConfiguration, modelWeights)
net.setPreferableBackend(cv.dnn.DNN_BACKEND_OPENCV)
net.setPreferableTarget(cv.dnn.DNN_TARGET_CPU) #可切换到GPU,cv.dnn.DNN_TARGET_OPENCL,
# 只支持Intel的GPU,没有则自动切换到cpu

# Get the names of the output layers
def getOutputsNames(net):
    # Get the names of all the layers in the network
    layersNames = net.getLayerNames()
    # Get the names of the output layers, i.e. the layers with unconnected outputs
    return [layersNames[i[0] - 1] for i in net.getUnconnectedOutLayers()]

# Draw the predicted bounding box
def drawPred(classId, conf, left, top, right, bottom):
    # Draw a bounding box.
    cv.rectangle(frame, (left, top), (right, bottom), (255, 178, 50), 3)

    label = '%.2f' % conf

    # Get the label for the class name and its confidence
    if classes:
        assert(classId < len(classes))
        label = '%s:%s' % (classes[classId], label)

    #Display the label at the top of the bounding box
    labelSize, baseLine = cv.getTextSize(label, cv.FONT_HERSHEY_SIMPLEX, 0.5, 1)
    top = max(top, labelSize[1])
    cv.rectangle(frame, (left, top - round(1.5*labelSize[1])), (left + round(1.5*labelSize[0]), top + baseLine), (255, 255, 255), cv.FILLED)
    cv.putText(frame, label, (left, top), cv.FONT_HERSHEY_SIMPLEX, 0.75, (0,0,0), 1)

# Remove the bounding boxes with low confidence using non-maxima suppression
def postprocess(frame, outs):
    frameHeight = frame.shape[0]
    frameWidth = frame.shape[1]

    classIds = []
    confidences = []
    boxes = []
    # Scan through all the bounding boxes output from the network and keep only the
    # ones with high confidence scores. Assign the box's class label as the class with the highest score.
    classIds = []
    confidences = []
    boxes = []
    for out in outs:
        for detection in out:
            scores = detection[5:]
            classId = np.argmax(scores)
            confidence = scores[classId]
            if confidence > confThreshold:
                center_x = int(detection[0] * frameWidth)
                center_y = int(detection[1] * frameHeight)
                width = int(detection[2] * frameWidth)
                height = int(detection[3] * frameHeight)
                left = int(center_x - width / 2)
                top = int(center_y - height / 2)
                classIds.append(classId)
                confidences.append(float(confidence))
                boxes.append([left, top, width, height])

    # Perform non maximum suppression to eliminate redundant overlapping boxes with
    # lower confidences.
    indices = cv.dnn.NMSBoxes(boxes, confidences, confThreshold, nmsThreshold)
    for i in indices:
        i = i[0]
        box = boxes[i]
        left = box[0]
        top = box[1]
        width = box[2]
        height = box[3]
        drawPred(classIds[i], confidences[i], left, top, left + width, top + height)

# Process inputs
winName = 'Deep learning object detection in OpenCV'
cv.namedWindow(winName, cv.WINDOW_NORMAL)

outputFile = "yolo_out_py.avi"
if (args.image):
    # Open the image file
    if not os.path.isfile(args.image):
        print("Input image file ", args.image, " doesn't exist")
        sys.exit(1)
    cap = cv.VideoCapture(args.image)
    outputFile = args.image[:-4]+'_yolo_out_py.jpg'
elif (args.video):
    # Open the video file
    if not os.path.isfile(args.video):
        print("Input video file ", args.video, " doesn't exist")
        sys.exit(1)
    cap = cv.VideoCapture(args.video)
    outputFile = args.video[:-4]+'_yolo_out_py.avi'
else:
    # Webcam input
    cap = cv.VideoCapture(1)

# Get the video writer initialized to save the output video
if (not args.image):
    vid_writer = cv.VideoWriter(outputFile, cv.VideoWriter_fourcc('M','J','P','G'), 30, (round(cap.get(cv.CAP_PROP_FRAME_WIDTH)),round(cap.get(cv.CAP_PROP_FRAME_HEIGHT))))

while cv.waitKey(1) < 0:

    # get frame from the video
    hasFrame, frame = cap.read()

    # Stop the program if reached end of video
    if not hasFrame:
        print("Done processing !!!")
        print("Output file is stored as ", outputFile)
        cv.waitKey(3000)
        break

    # Create a 4D blob from a frame.
    blob = cv.dnn.blobFromImage(frame, 1/255, (inpWidth, inpHeight), [0,0,0], 1, crop=False)

    # Sets the input to the network
    net.setInput(blob)

    # Runs the forward pass to get output of the output layers
    outs = net.forward(getOutputsNames(net))

    # Remove the bounding boxes with low confidence
    postprocess(frame, outs)

    # Put efficiency information. The function getPerfProfile returns the overall time for inference(t) and the timings for each of the layers(in layersTimes)
    t, _ = net.getPerfProfile()
    label = 'Inference time: %.2f ms' % (t * 1000.0 / cv.getTickFrequency())
    cv.putText(frame, label, (0, 15), cv.FONT_HERSHEY_SIMPLEX, 0.5, (0, 0, 255))

    # Write the frame with the detection boxes
    if (args.image):
        cv.imwrite(outputFile, frame.astype(np.uint8));
    else:
        vid_writer.write(frame.astype(np.uint8))

    cv.imshow(winName, frame)
- 1
- 2
- 3
- 4
- 5
- 6
- 7
- 8
- 9
- 10
- 11
- 12
- 13
- 14
- 15
- 16
- 17
- 18
- 19
- 20
- 21
- 22
- 23
- 24
- 25
- 26
- 27
- 28
- 29
- 30
- 31
- 32
- 33
- 34
- 35
- 36
- 37
- 38
- 39
- 40
- 41
- 42
- 43
- 44
- 45
- 46
- 47
- 48
- 49
- 50
- 51
- 52
- 53
- 54
- 55
- 56
- 57
- 58
- 59
- 60
- 61
- 62
- 63
- 64
- 65
- 66
- 67
- 68
- 69
- 70
- 71
- 72
- 73
- 74
- 75
- 76
- 77
- 78
- 79
- 80
- 81
- 82
- 83
- 84
- 85
- 86
- 87
- 88
- 89
- 90
- 91
- 92
- 93
- 94
- 95
- 96
- 97
- 98
- 99
- 100
- 101
- 102
- 103
- 104
- 105
- 106
- 107
- 108
- 109
- 110
- 111
- 112
- 113
- 114
- 115
- 116
- 117
- 118
- 119
- 120
- 121
- 122
- 123
- 124
- 125
- 126
- 127
- 128
- 129
- 130
- 131
- 132
- 133
- 134
- 135
- 136
- 137
- 138
- 139
- 140
- 141
- 142
- 143
- 144
- 145
- 146
- 147
- 148
- 149
- 150
- 151
- 152
- 153
- 154
- 155
- 156
- 157
- 158
- 159
- 160
- 161
- 162
- 163
- 164
- 165
- 166
- 167
- 168
代码里面的注释已经写得很清楚了,可以去这个博客看更详细的解释,也可以留言交流。
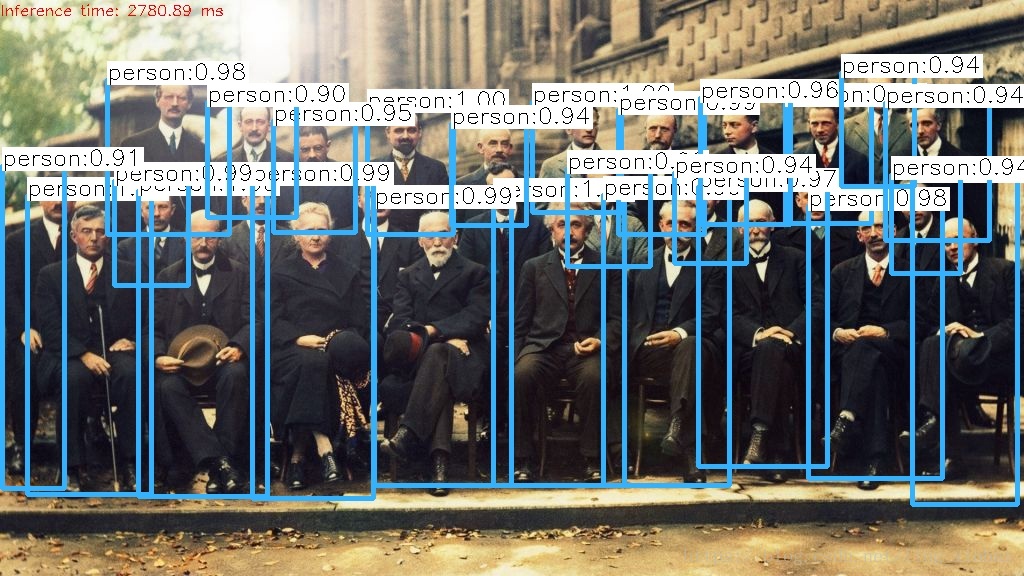
三、自测效果
整体效果还是不错的,
单张图片:
基于CPU的小视频:

不是很快,因为我的笔记本是i5双核的,不是很好的硬件。我接着又切换到GPU,但是代码只支持Intel的GPU,效果没快多少。
基于Intel的GPU小视频:
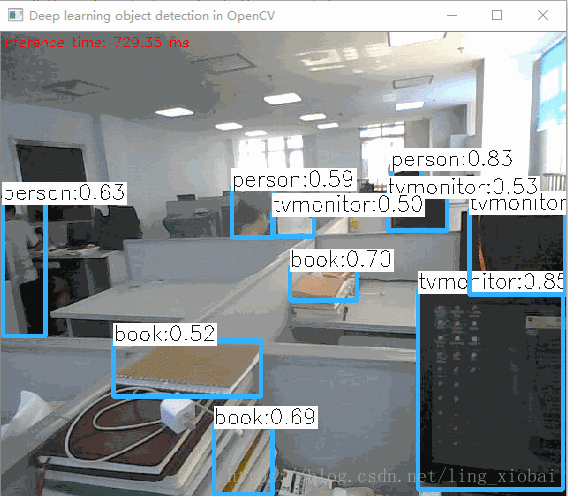
虽然不快,但是效果还是不错的,使用的是coco.name的标签,里面只有80个标签。但是能用CPU跑出效果已经不错了,我觉得opencv社区的大神们如果能应用到英伟达的GPU,那就更棒了。好了,这次对于opencv的yolov3测试,就写到这里。想下载所有的代码,可以去我的github,由于权重文件太大,我也放了一份在百度云盘,密码:gfg1
欢迎留言交流。