简介
在前面已经介绍了很多目标检测算法,特别是R-CNN为代表两阶段算法系列。但是两阶段算法的速度太慢是一个不容忽视的问题,对于实时性要求很高的场景非常致命。而YOLO——you only look one的诞生就是为了解决识别速度的问题,它直接在输出层回归bounding box的位置和bounding box所属类别,从而实现one-stage。
原论文地址:https://arxiv.org/pdf/1804.02767.pdf
YOLOv3的前世今生
- YOLOv1 (2015,CVPR):
主干网络结构借鉴了GoogleNet,直接将输入图片划分成7×7=49个网格,每个网格预测两个边界框。由于网格设置比较稀疏,所以总体预测精度不高,且对小物体的检测效果较差。
缺陷:输入图像必须是固定尺寸,因为输出层是全连接层;每个网格只输出一个类别;在损失函数中,对小物体变化的置信度和大物体变化的置信度惩罚相同,实际小物体变化应该加大惩罚。 - YOLOv2 (2016):
主干网络采用DarkNet-19;取消了Dropout,全采用BN层;去掉全连接层,通过Anchor boxes回归位置,k-means聚类来确定anchor的尺寸;多尺度训练,因为网络为全卷积层,所以同样的网络可以预测不同分辨率的输入。 - YOLOv3 (2018):
主干网络DrakNet-53,引入了残差块;引入了多尺度预测(FPN);预测对象类别时不使用softmax,改成使用logistic的输出进行预测。
一、YOLOv3网络结构


由图可以看出:输入416×416×3的图像,通过darknet网络得到三种不同尺度的预测结果,每个尺度都对应N个通道,包含着预测的信息;
yolov1,有7×7×2个预测;
yolov2,有13×13×5个预测;
yolov3共有13×13×3 + 26×26×3 + 52×52×3个预测 。
每个pre的组成分别是 4(坐标xyxy) + 1(置信度conf) + 80(类别cls) = 85。
二、YOLOv3的训练
这里可以直接下载大佬的pytorch版本代码:https://github.com/ultralytics/yolov3
- 数据集的准备:
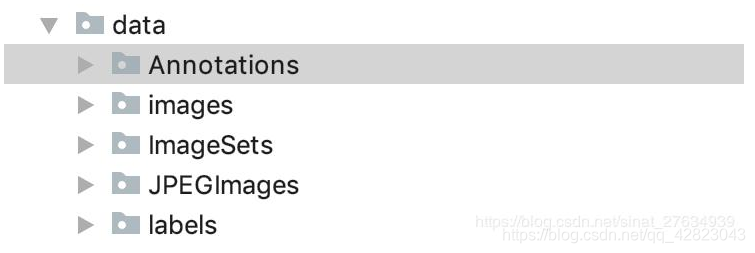
将图像放在JPEGImages文件夹中,标签放在Annotations文件夹中,并新建文件ImageSets、labels,复制JPEGImages,重命名images。 - makeTxt.py——划分训练集、验证集、测试集:
运行根目录下的makeTxt.py,设置比例划分数据集,代码如下:
import os
import random

trainval_percent = 0.1
train_percent = 0.9
xmlfilepath = 'data/Annotations'
txtsavepath = 'data/ImageSets'
total_xml = os.listdir(xmlfilepath)

num = len(total_xml)
list = range(num)
tv = int(num * trainval_percent)
tr = int(tv * train_percent)
trainval = random.sample(list, tv)
train = random.sample(trainval, tr)

ftrainval = open('data/ImageSets/trainval.txt', 'w')
ftest = open('data/ImageSets/test.txt', 'w')
ftrain = open('data/ImageSets/train.txt', 'w')
fval = open('data/ImageSets/val.txt', 'w')

for i in list:
    name = total_xml[i][:-4] + '\n'
    if i in trainval:
        ftrainval.write(name)
        if i in train:
            ftest.write(name)
        else:
            fval.write(name)
    else:
        ftrain.write(name)

ftrainval.close()
ftrain.close()
fval.close()
ftest.close()
运行完成后,会在ImageSets得到——train.txt、val.txt、test.txt几个文件,文件里主要存储图片名称。
3. voc_label.py——获取路径
运行根目录下voc_label.py,得到labels的具体内容以及data目录下的train.txt、val.txt、test.txt,这里的train.txt与之前的区别在于,不仅仅得到文件名,还有文件的具体路径,代码如下:
import xml.etree.ElementTree as ET
import pickle
import os
from os import listdir, getcwd
from os.path import join

sets = ['train', 'test','val']

classes = ["RBC"]#我们只是检测细胞,因此只有一个类别


def convert(size, box):
    dw = 1. / size[0]
    dh = 1. / size[1]
    x = (box[0] + box[1]) / 2.0
    y = (box[2] + box[3]) / 2.0
    w = box[1] - box[0]
    h = box[3] - box[2]
    x = x * dw
    w = w * dw
    y = y * dh
    h = h * dh
    return (x, y, w, h)


def convert_annotation(image_id):
    in_file = open('data/Annotations/%s.xml' % (image_id))
    out_file = open('data/labels/%s.txt' % (image_id), 'w')
    tree = ET.parse(in_file)
    root = tree.getroot()
    size = root.find('size')
    w = int(size.find('width').text)
    h = int(size.find('height').text)

    for obj in root.iter('object'):
        difficult = obj.find('difficult').text
        cls = obj.find('name').text
        if cls not in classes or int(difficult) == 1:
            continue
        cls_id = classes.index(cls)
        xmlbox = obj.find('bndbox')
        b = (float(xmlbox.find('xmin').text), float(xmlbox.find('xmax').text), float(xmlbox.find('ymin').text),
             float(xmlbox.find('ymax').text))
        bb = convert((w, h), b)
        out_file.write(str(cls_id) + " " + " ".join([str(a) for a in bb]) + '\n')


wd = getcwd()
print(wd)
for image_set in sets:
    if not os.path.exists('data/labels/'):
        os.makedirs('data/labels/')
    image_ids = open('data/ImageSets/%s.txt' % (image_set)).read().strip().split()
    list_file = open('data/%s.txt' % (image_set), 'w')
    for image_id in image_ids:
        list_file.write('data/images/%s.jpg\n' % (image_id))
        convert_annotation(image_id)
    list_file.close()
- kmeans.py——决定自己的anchors大小:
使用K-means算法聚类出9个anchors的尺寸,代码如下:
# -*- coding=utf-8 -*-
import glob
import os
import sys
import numpy as np

# 根文件夹
ROOT_PATH = './data/'
# 聚类的数目
CLUSTERS = 9
# 模型中图像的输入尺寸,默认是一样的
SIZE = 416

# 加载YOLO格式的标注数据
def load_dataset(path):
    jpegimages = os.path.join(path, 'images')
    if not os.path.exists(jpegimages):
        print('no JPEGImages folders, program abort')
        sys.exit(0)
    labels_txt = os.path.join(path, 'labels')
    if not os.path.exists(labels_txt):
        print('no labels folders, program abort')
        sys.exit(0)
    label_file = os.listdir(labels_txt)
    print('label count: {}'.format(len(label_file)))
    dataset = []
    for label in label_file:
        with open(os.path.join(labels_txt, label), 'r') as f:
            txt_content = f.readlines()
        for line in txt_content:
            line_split = line.split(' ')
            roi_with = float(line_split[len(line_split)-2])
            roi_height = float(line_split[len(line_split)-1])
            if roi_with == 0 or roi_height == 0:
                continue
            dataset.append([roi_with, roi_height])
            # print([roi_with, roi_height])
    return np.array(dataset)

def iou(box, clusters):
    x = np.minimum(clusters[:, 0], box[0])
    y = np.minimum(clusters[:, 1], box[1])
    if np.count_nonzero(x == 0) > 0 or np.count_nonzero(y == 0) > 0:
        raise ValueError("Box has no area")
    intersection = x * y
    box_area = box[0] * box[1]
    cluster_area = clusters[:, 0] * clusters[:, 1]
    iou_ = intersection / (box_area + cluster_area - intersection)
    return iou_

def avg_iou(boxes, clusters):
    return np.mean([np.max(iou(boxes[i], clusters)) for i in range(boxes.shape[0])])

def translate_boxes(boxes):
    new_boxes = boxes.copy()
    for row in range(new_boxes.shape[0]):
        new_boxes[row][2] = np.abs(new_boxes[row][2] - new_boxes[row][0])
        new_boxes[row][3] = np.abs(new_boxes[row][3] - new_boxes[row][1])
    return np.delete(new_boxes, [0, 1], axis=1)

def kmeans(boxes, k, dist=np.median):
    rows = boxes.shape[0]
    distances = np.empty((rows, k))
    last_clusters = np.zeros((rows,))
    np.random.seed()
    # the Forgy method will fail if the whole array contains the same rows
    clusters = boxes[np.random.choice(rows, k, replace=False)]
    while True:
        for row in range(rows):
            distances[row] = 1 - iou(boxes[row], clusters)
        nearest_clusters = np.argmin(distances, axis=1)
        if (last_clusters == nearest_clusters).all():
            break
        for cluster in range(k):
            clusters[cluster] = dist(boxes[nearest_clusters == cluster], axis=0)
        last_clusters = nearest_clusters
    return clusters

data = load_dataset(ROOT_PATH)
out = kmeans(data, k=CLUSTERS)
print(out)
print("Accuracy: {:.2f}%".format(avg_iou(data, out) * 100))
print("Boxes:\n {}-{}".format(out[:, 0] * SIZE, out[:, 1] * SIZE))
ratios = np.around(out[:, 0] / out[:, 1], decimals=2).tolist()
print("Ratios:\n {}".format(sorted(ratios)))
- 配置coco.data、coco.names文件
coco.names里是自己类别的名称;coco.data配置如下:
classes=1 #类别数
train=data/train.txt
valid=data/val.txt
names=data/coco.names
backup=backup/
eval=coco
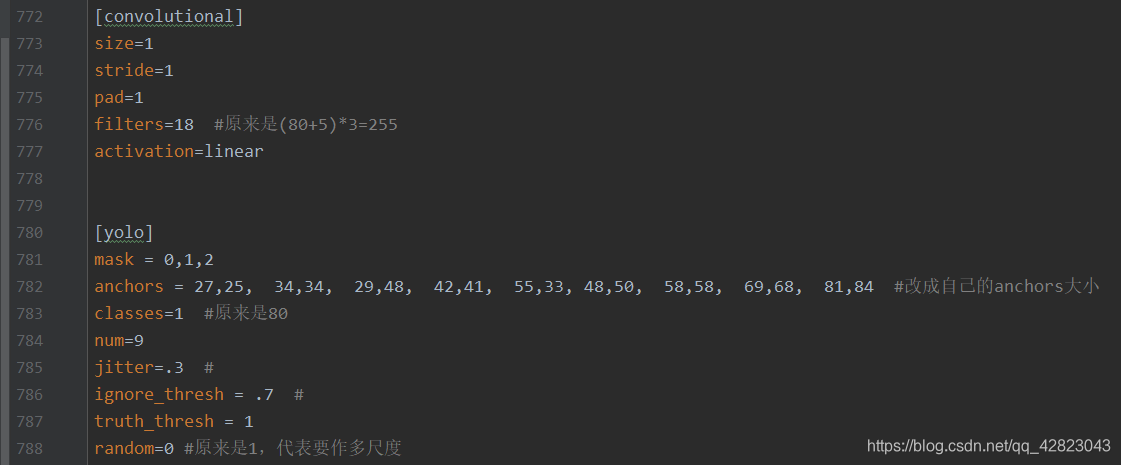
- 下载yolov3.weights预训练权重、修改yolov3.cfg配置文件
下载地址:yolov3.weights
打开yolov3.cfg文件,Ctrl+F 搜索 yolo,有3处[yolo]需要修改下面这4个参数:
三、YOLOv3的细节:
- 损失函数的计算:
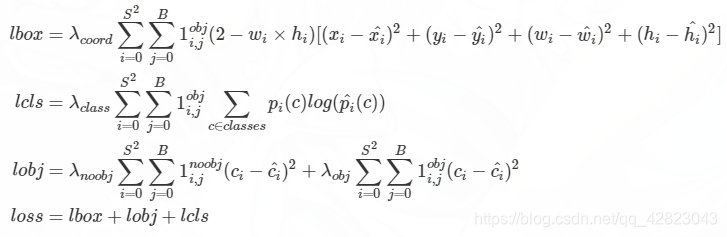
YOLOv3的Loss分为三个部分:
1、xywh部分带来的误差,也就是bbox带来的loss
2、置信度带来的误差,也就是obj带来的loss
2、类别带来的误差,也就是class带来的loss
在代码中分别对应lbox, lobj, lcls,论文的公式如下:
而在github上pytorch版本的代码中,有一些改动:
- lbox部分:
yolov3中提供了IoU、GIoU、DIoU和CIoU等计算方式,我们使用GIOU:
if GIoU:  # Generalized IoU https://arxiv.org/pdf/1902.09630.pdf
    c_area = cw * ch + 1e-16  # convex area
    return iou - (c_area - union) / c_area  # GIoU
giou = bbox_iou(pbox.t(), tbox[i], x1y1x2y2=False, GIoU=True)  # giou computation
lbox += (1.0 - giou).sum() if red == 'sum' else (1.0 - giou).mean()  # giou loss
- lobj部分:
lobj代表置信度,即该bounding box中是否含有物体的概率。
BCEobj = nn.BCEWithLogitsLoss(pos_weight=ft([h['obj_pw']]), reduction=red)
lobj += BCEobj(pi[..., 4], tobj)  # obj loss
- lcls部分:
BCEcls = nn.BCEWithLogitsLoss(pos_weight=ft([h['cls_pw']]), reduction=red)
if model.nc > 1:  # cls loss (only if multiple classes)
	t = torch.full_like(ps[:, 5:], cn)  # targets
	t[range(nb), tcls[i]] = cp
	lcls += BCEcls(ps[:, 5:], t)  # BCE
有个大佬画的图一目了然:
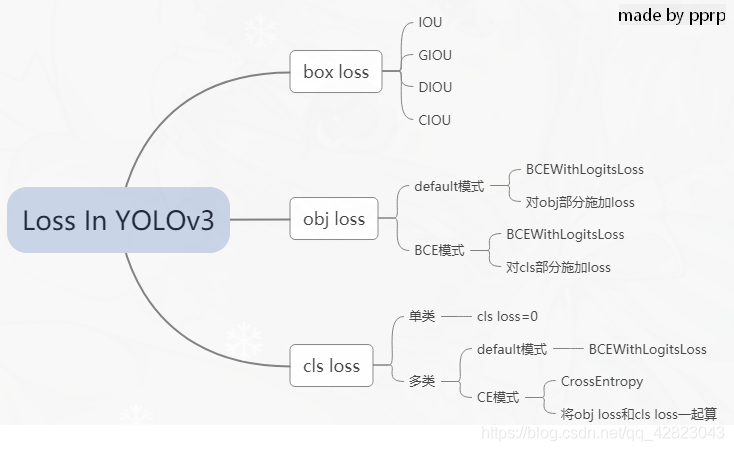
torch.nn.BCELoss的功能是二分类任务是的交叉熵计算函数,可以认为是CrossEntropy的特例。
torch.nn.BCEWithLogitsLoss 相当于Sigmoid+BCELoss, 即input会经过Sigmoid激活函数,将input变为概率分布的形式。
- NMS算法改进:
根据应用场景的不同,预测框会出现不同的误差,看情况改进non_max_suppression函数:
def non_max_suppression(prediction, conf_thres=0.3, iou_thres=0.5, multi_label=True, classes=None, agnostic=False):
    """
    Performs  Non-Maximum Suppression on inference results
    Returns detections with shape:
        nx6 (x1, y1, x2, y2, conf, cls)
    """

    # Box constraints
    min_wh, max_wh = 10, 100  # (pixels) minimum and maximum box width and height

    method = 'merge'
    nc = prediction[0].shape[1] - 5  # number of classes
    multi_label &= nc > 1  # multiple labels per box
    output = [None] * len(prediction)

    for xi, x in enumerate(prediction):  # image index, image inference
        # Apply conf constraint
        x = x[x[:, 4] > conf_thres]

        # Apply width-height constraint
        x = x[((x[:, 2:4] > min_wh) & (x[:, 2:4] < max_wh)).all(1)]

        areas=((x[:, 2:3]*x[:, 3:4]>225)&(x[:, 2:3]*x[:, 3:4]<10000)).all(1)
        x=x[areas]

        r = ((x[:, 2:3]/x[:, 3:4] > 0.4) & (x[:, 2:3]/x[:, 3:4] < 2.5)).all(1) # remove narrow box
        if len(r) !=0:
            x = x[r]

        # If none remain process next image
        if not x.shape[0]:
            continue
        # Compute conf
        x[..., 5:] *= x[..., 4:5]  # conf = obj_conf * cls_conf

        x = x[x[:, 5] > 0.20]
        cc=((x[:, 5:] *x[:,2:3]*x[:,3:4] > 360)&(x[:, 5:] *x[:,2:3]*x[:,3:4] < 10000)).all(1)
        x = x[cc]
        if not x.shape[0]:
            continue

        # Box (center x, center y, width, height) to (x1, y1, x2, y2)
        box = xywh2xyxy(x[:, :4])

        # Detections matrix nx6 (xyxy, conf, cls)
        if multi_label:
            i, j = (x[:, 5:] > conf_thres).nonzero().t()
            x = torch.cat((box[i], x[i, j + 5].unsqueeze(1), j.float().unsqueeze(1)), 1)
        else:  # best class only
            conf, j = x[:, 5:].max(1)
            x = torch.cat((box, conf.unsqueeze(1), j.float().unsqueeze(1)), 1)

        # Filter by class
        if classes:
            x = x[(j.view(-1, 1) == torch.tensor(classes, device=j.device)).any(1)]

        # Apply finite constraint
        if not torch.isfinite(x).all():
            x = x[torch.isfinite(x).all(1)]

        # If none remain process next image
        n = x.shape[0]  # number of boxes
        if not n:
            continue

        # Sort by confidence
        # if method == 'fast_batch':
        #    x = x[x[:, 4].argsort(descending=True)]

        # Batched NMS
        c = x[:, 5] * 0 if agnostic else x[:, 5]  # classes
        boxes, scores = x[:, :4].clone() + c.view(-1, 1) * max_wh, x[:, 4]  # boxes (offset by class), scores
        if method == 'merge':  # Merge NMS (boxes merged using weighted mean)
            i = torchvision.ops.boxes.nms(boxes, scores, iou_thres)
            if 1 < n < 3E3:  # update boxes as boxes(i,4) = weights(i,n) * boxes(n,4)
                try:
                    # weights = (box_iou(boxes, boxes).tril_() > iou_thres) * scores.view(-1, 1)  # box weights
                    # weights /= weights.sum(0)  # normalize
                    # x[:, :4] = torch.mm(weights.T, x[:, :4])
                    weights = (box_iou(boxes[i], boxes) > iou_thres) * scores[None]  # box weights
                    x[i, :4] = torch.mm(weights, x[:, :4]).float() / weights.sum(1, keepdim=True)  # merged boxes
                except:  # possible CUDA error https://github.com/ultralytics/yolov3/issues/1139
                    pass
        elif method == 'vision':
            i = torchvision.ops.boxes.nms(boxes, scores, iou_thres)
        elif method == 'fast':  # FastNMS from https://github.com/dbolya/yolact
            iou = box_iou(boxes, boxes).triu_(diagonal=1)  # upper triangular iou matrix
            i = iou.max(0)[0] < iou_thres

        output[xi] = x[i]
    return output
系列传送门:
目标检测——R-CNN(一)
目标检测——Fast R-CNN(二)
目标检测——Faster R-CNN(三)
目标检测——Mask R-CNN(四)
目标检测——R-FCN(五)
目标检测——YOLOv4(七)