- 以前开发web项目时,只需将静态的"html”页面后缀名修改为“jsp”,然后在文件中加入jsp页面标识即可做jsp开发
- 然而如下所示的Spring Boot 开发的web项目采用打jar包的方式,且使用的是内置的Tomcat,所以默认是不支持jsp的,但可以使用其它的模板引擎

- Thymeleaf 官网:https://www.thymeleaf.org/
- Thymeleaf 在Github 的主页:https://github.com/thymeleaf/thymeleaf
引入 Thymeleaf
- 使用Thymeleaf同样只需要在pom.xml引入此模块即可
- 官方文档:“https://docs.spring.io/spring-boot/docs/2.0.3.RELEASE/reference/htmlsingle/#using-boot-starter”
![]()
        <dependency>
            <groupId>org.springframework.boot</groupId>
            <artifactId>spring-boot-starter-thymeleaf</artifactId>
        </dependency>
使用入门
渲染流程规则
- 使用非常简单,可以找到它的自动配置文件即可查看它的使用规则
- ctrl+shift+R 打开资源搜索器

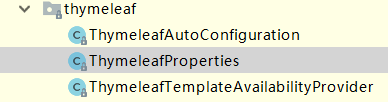

- 其中规则内容如下,其中有默认的前缀:DEFAULT_PREFIX = "classpath:/templates/",以及后缀:DEFAULT_SUFFIX = ".html",这完全可以类比Spring MVC 的映射规则。如果想修改这些配置只需要在全局配置文件中修改即可。
- 所以默认只要把HTML页面放在classpath:/templates/下,thymeleaf就能自动渲染;当然自己在全局配置文件中也是可以修改这些规则的,修改的选项即可以从这个“ThymeleafProperties”文件中找到,也可以参 考官方文档配置。配置项如下所示:
# THYMELEAF (ThymeleafAutoConfiguration)
spring.thymeleaf.cache=true # Whether to enable template caching.
spring.thymeleaf.check-template=true # Whether to check that the template exists before rendering it.
spring.thymeleaf.check-template-location=true # Whether to check that the templates location exists.
spring.thymeleaf.enabled=true # Whether to enable Thymeleaf view resolution for Web frameworks.
spring.thymeleaf.enable-spring-el-compiler=false # Enable the SpringEL compiler in SpringEL expressions.
spring.thymeleaf.encoding=UTF-8 # Template files encoding.
spring.thymeleaf.excluded-view-names= # Comma-separated list of view names (patterns allowed) that should be excluded from resolution.
spring.thymeleaf.mode=HTML # Template mode to be applied to templates. See also Thymeleaf's TemplateMode enum.
spring.thymeleaf.prefix=classpath:/templates/ # Prefix that gets prepended to view names when building a URL.
spring.thymeleaf.reactive.chunked-mode-view-names= # Comma-separated list of view names (patterns allowed) that should be the only ones executed in CHUNKED mode when a max chunk size is set.
spring.thymeleaf.reactive.full-mode-view-names= # Comma-separated list of view names (patterns allowed) that should be executed in FULL mode even if a max chunk size is set.
spring.thymeleaf.reactive.max-chunk-size=0 # Maximum size of data buffers used for writing to the response, in bytes.
spring.thymeleaf.reactive.media-types= # Media types supported by the view technology.
spring.thymeleaf.servlet.content-type=text/html # Content-Type value written to HTTP responses.
spring.thymeleaf.suffix=.html # Suffix that gets appended to view names when building a URL.
spring.thymeleaf.template-resolver-order= # Order of the template resolver in the chain.
spring.thymeleaf.view-names= # Comma-separated list of view names (patterns allowed) that can be resolved.
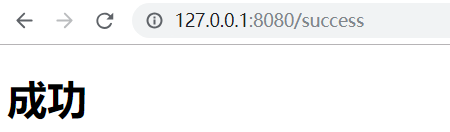
编写success.html页面放在classpath:/templates/下

使用方式
1导入thymeleaf的名称空间
<html lang="en" xmlns:th="http://www.thymeleaf.org">作用是让IDEA编辑器有Thymeleaf语法提示,不写不影响运行
2使用thymeleaf语法;
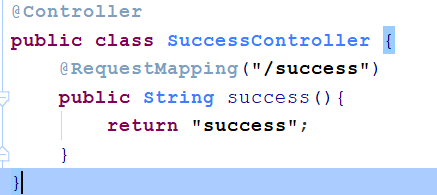
后台返回数据
@Controller
public class SuccessController {
    @RequestMapping("/success")
    public String success(Map<String,Object> map){
        /** 默认Map的内容会放大请求域中,页面可以直接取值*/
        map.put("hello","你好");
        /** 会自动跳转到默认的 classpath:/templates/success.html 页面*/
        return "success";
    }
}
<!DOCTYPE html>
<html lang="en" xmlns:th="http://www.thymeleaf.org">
<head>
<meta charset="UTF-8">
<title>成功页面</title>
</head>
<body>
<h1>成功</h1>
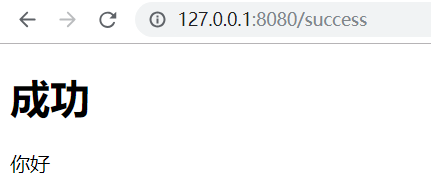
<!--th:text 将div中的文本内容设置为-->
<div th:text="${hello}">这是前端自己写的数据,会被后台数据替换</div>
</body>
</html>前端用thymeleaf语法接收 会覆盖掉原本内容
th:任意html属性;来替换原生属性的值
