Unity的GUI这东西如果学过C#的话,应该很好理解的,可以认为是.net的用户交互控件,实际上应该也就是这个样子,类似于Button,Label,Textbox….的这些东西在GUI里面都有。使用的时候也可以随时添加删除。所以还是很简单的。
但是UnityGUI控制是利用一类被称为OnGUI()的函数,只要在控制脚本激活的状态下,OnGUI()函数会在每帧调用,就像Update( )函数一样。所以我感觉一般还是直接拖拽添加,而不是使用这个函数。
脚本如下:
using UnityEngine;using System.Collections;public class Gui : MonoBehaviour { public GUIStyle buttonstyle; string text=""; bool result; float hsliderVale; // Use this for initialization void Start () { } // Update is called once per frame void Update () { } void OnGUI(){ hsliderVale = GUI.HorizontalScrollbar (new Rect(80, 100, 100, 30),hsliderVale,2,0,10); result = GUI.Toggle(new Rect(10 * hsliderVale, 170, 100, 30),result,"Toggle"); text = GUI.TextField(new Rect (310, 330, 100, 40),text); GUI.Button(new Rect(180,120,100,150),"这是一个button按钮","button"); GUI.Button(new Rect(110,120,200,210),"这是一个button按钮","toggle"); GUI.Label(new Rect(0,0,200,50),"box类型的lable","box"); GUI.Label (new Rect (150, 110, 200, 100), "buttonstyle"); if (GUI.RepeatButton(new Rect (310, 220, 200, 100),text) ) { print("用户单击了重复按钮"); } }}
- 1
- 2
- 3
- 4
- 5
- 6
- 7
- 8
- 9
- 10
- 11
- 12
- 13
- 14
- 15
- 16
- 17
- 18
- 19
- 20
- 21
- 22
- 23
- 24
- 25
- 26
- 27
- 28
- 29
- 30
- 31
- 32
效果如图: 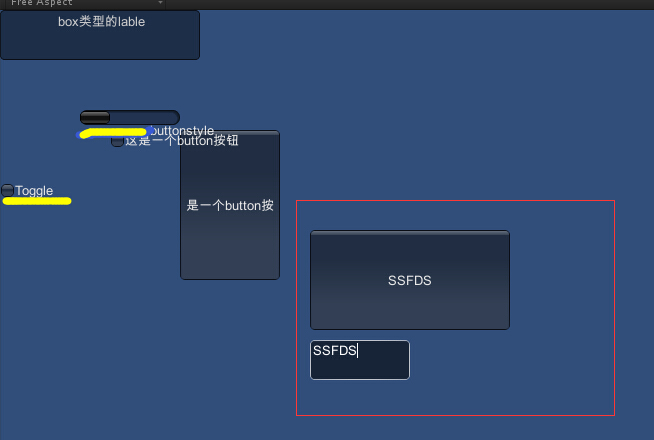
注意Rect()这个定位函数被多次用到,其具体的定义如下:
Rect(x,y,w,h)x表示水平距离,即以左上角为0,0点,距离左边的距离y表示垂直距离,距离顶部的距离w表示这个矩形的宽度h表示这个矩形的高度
- 1
- 2
- 3
- 4
- 5
以下是多种组件的脚本中的具体使用方式
一、Label
四个角定位
GUI.Label(new Rect(30, 10, 100, 200), "zzzzzz"); GUI.Label(new Rect(30, Screen.height - 50, 100, 200), "zzzzzz"); GUI.Label(new Rect(Screen.width - 50, Screen.height - 50, 100, 200), "zzzzzz"); GUI.Label(new Rect(Screen.width - 50, 10, 100, 200), "zzzzzz"); #endregion
- 1
- 2
- 3
- 4
- 5
二、Button
GUI.Label(new Rect(30, 30, 100, 200), "Button"); GUI.Button(new Rect(30, 50, 50, 50), "这个是一个按钮"); GUI.Button(new Rect(90, 50, 50, 50), text); //带图片带文字的按钮 GUIContent guic = new GUIContent("按钮", text); GUI.Button(new Rect(150, 50, 50, 50), guic); //按键从上往下排 自动排序 if (GUILayout.Button("1")) Debug.Log("1"); if (GUILayout.Button("2")) Debug.Log("2"); if (GUILayout.Button("3")) Debug.Log("3"); if (GUILayout.Button("4")) Debug.Log("4"); if (GUILayout.Button("5")) Debug.Log("5"); if (GUILayout.Button("6")) Debug.Log("6"); if (GUILayout.Button("7")) Debug.Log("7"); if (GUILayout.Button("8")) Debug.Log("8");
- 1
- 2
- 3
- 4
- 5
- 6
- 7
- 8
- 9
- 10
- 11
- 12
- 13
- 14
- 15
- 16
- 17
- 18
- 19
- 20
- 21
- 22
- 23
三、Toggle控件
GUI.Label(new Rect(30, 100, 100, 200), "Toggle"); toggle1 = GUI.Toggle(new Rect(30, 120, 100, 30), toggle1, "Toggle"); toggle2 = GUI.Toggle(new Rect(30, 150, 100, 30), toggle2, text);
- 1
- 2
- 3
四、滑动条
GUI.Label(new Rect(30, 180, 100, 200), "滑动条"); hSliderValue = GUI.HorizontalSlider(new Rect(30, 200, 100, 30), hSliderValue, 0, 10); Show("水平滑动条:" + hSliderValue); vSliderVaule = GUI.VerticalSlider(new Rect(0, 200, 30, 100), vSliderVaule, 0, 10);
- 1
- 2
- 3
- 4
五、Toolbar
toolbarInt = GUI.Toolbar(new Rect(30, 250, 250, 30), toolbarInt, new string[] { "功能一", "功能二", "功能三" }); if (lastValue != toolbarInt) { if (toolbarInt == 0) Debug.Log(1111); if (toolbarInt == 1) Debug.Log(2222); if (toolbarInt == 2) Debug.Log(3333); lastValue = toolbarInt; }
- 1
- 2
- 3
- 4
- 5
- 6
- 7
- 8
- 9
- 10
- 11
- 12
六、Scrollbar
GUI.Label(new Rect(30, 300, 100, 200), "Scrollbar"); hSbarValue, 1.0f, 0.0f, 10.0f); vSbarValue = GUI.VerticalScrollbar(new Rect(0, 320, 30, 100), vSbarValue, 1.0f, 0.0f, 10.0f);
- 1
- 2
- 3
- 4
七、菜单
GUI.Box(new Rect(30, 350, 100, 100), "Menu"); if (GUI.Button(new Rect(40, 370, 80, 20), "1"))
- 1
- 2
八、TextField
useNmae = GUI.TextField(new Rect(Screen.width / 2, Screen.height / 2 - 200, 150, 30), useNmae); //*****密码字符的掩码字符 passWord = GUI.PasswordField(new Rect(Screen.width / 2, Screen.height / 2 - 150, 150, 30), passWord, '*', 25); if (GUI.Button(new Rect(Screen.width / 2, Screen.height / 2 - 50, 150, 30), "登录")) { isBntLogin = true; Debug.Log(isBntLogin+ "isBntLogin"); if (useNmae.Equals("admin") && passWord.Equals("123")) { isSuccess = true; GUI.Label(new Rect(500, 350, 150, 30), "登录成功"); } else { isSuccess = false; GUI.Label(new Rect(500, 350, 150, 30), "登录失败"); } } if (isBntLogin) { if (isSuccess) GUI.Label(new Rect(Screen.width / 2, Screen.height / 2 + 50, 150, 30), "登录成功"); else { GUI.Label(new Rect(Screen.width / 2, Screen.height / 2 + 50, 150, 30), "登录失败"); } }
- 1
- 2
- 3
- 4
- 5
- 6
- 7
- 8
- 9
- 10
- 11
- 12
- 13
- 14
- 15
- 16
- 17
- 18
- 19
- 20
- 21
- 22
- 23
- 24
- 25
- 26
- 27
- 28
- 29
再分享一下我老师大神的人工智能教程吧。零基础!通俗易懂!风趣幽默!还带黄段子!希望你也加入到我们人工智能的队伍中来!https://blog.csdn.net/jiangjunshow