版权声明:本文为博主原创文章,未经博主允许不得转载,博客地址:https://blog.csdn.net/Mr_FLM 。 https://blog.csdn.net/Mr_FLM/article/details/86499487
开发环境
- 开发工具:Eclipse + STS插件
- JDK版本:9.0.4
- MySQL版本:8.0.12
- Spring Boot版本:2.1.2
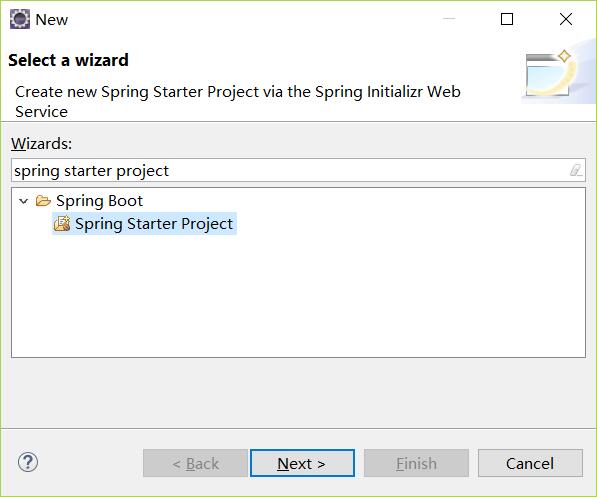
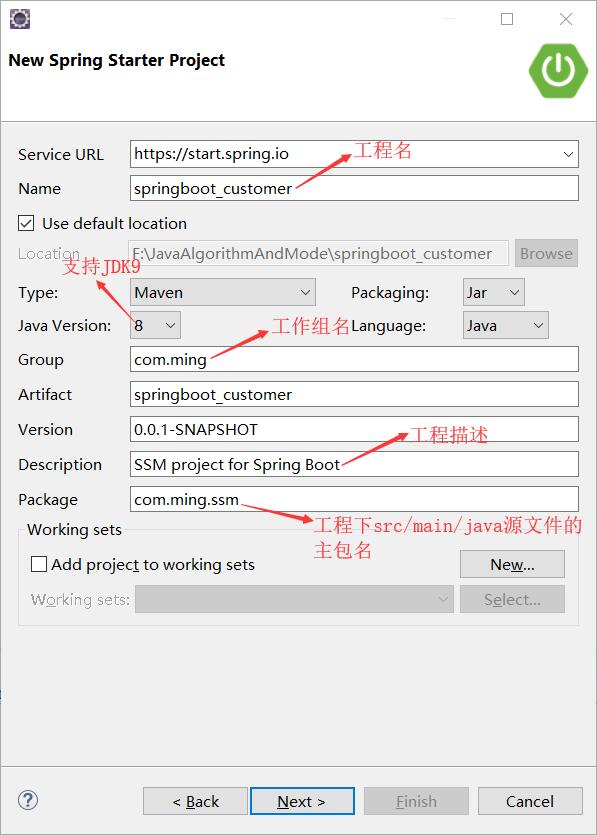
1、创建Spring Boot工程
(1)工程创建过程
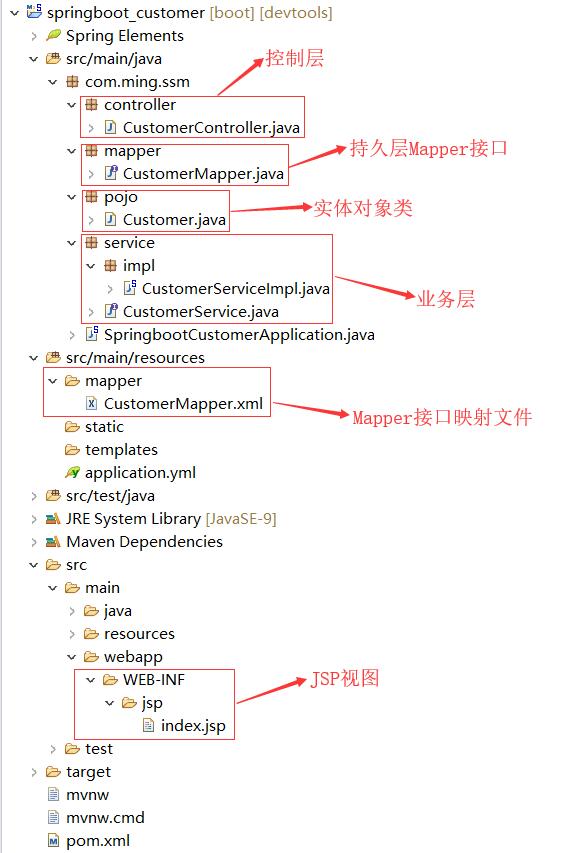
(2)工程目录结构
注:工程创建完成后,缺少的文件夹需手动补全。
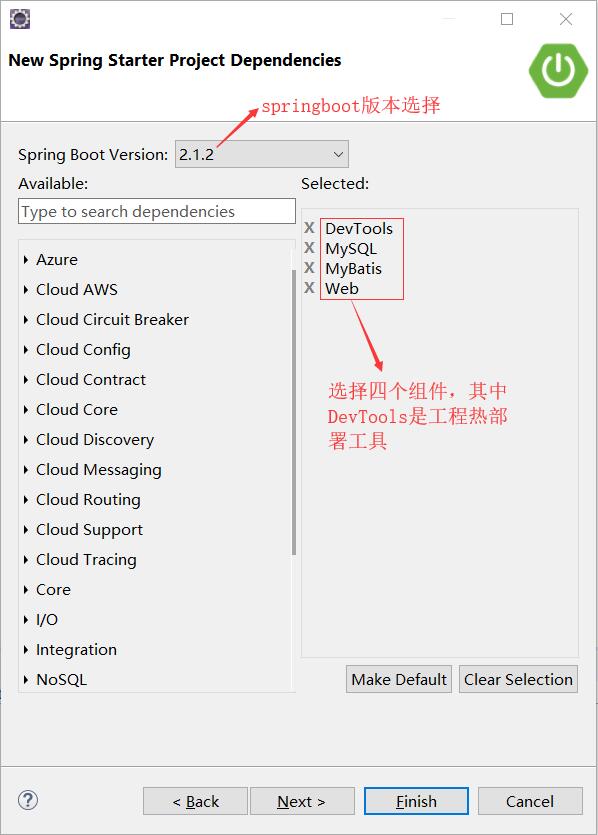
(3)添加额外依赖工程
所依赖的jar包和插件由工程创建过程中所选的组件自动生成。由于本工程需要用到JSP视图,需要在pom.xml中手动添加额外依赖:
<!-- 设置tomcat支持jsp -->
<dependency>
	<groupId>org.apache.tomcat.embed</groupId>
	<artifactId>tomcat-embed-jasper</artifactId>
</dependency>
<!-- 定义jsp标准标签库包  -->
<dependency>
	<groupId>javax.servlet</groupId>
	<artifactId>jstl</artifactId>
</dependency>
(4)配置application.yml文件
注:Spring Boot工程默认的配置文件为application.properties,可选中配置文件,单击鼠标右键,选中Convert .properties to .yaml后,转为application.yml文件。
application.yml:
#服务器配置
server:
  port: 8090
#spring配置
spring:
  #数据源配置
  datasource:
    #配置mysql数据库
    driver-class-name: com.mysql.cj.jdbc.Driver
    url: jdbc:mysql://localhost/customer_manager?serverTimezone=CTT
    username: root
    password: 1314
    #配置dbcp连接池
    dbcp2:
      connection-init-sqls: characterEncoding=utf-8
      initial-size: 5
      max-idle: 100
      max-wait-millis: 10000
      min-idle: 5
      test-on-borrow: true
      test-while-idle: true
      time-between-eviction-runs-millis: 27800
  #配置JSP视图
  mvc:
    view:
      prefix: /WEB-INF/jsp/
      suffix: .jsp
#配置mybatis框架
mybatis:
  #定义Mapper接口映射文件位置
  mapper-locations: classpath:mapper/*.xml
  #定义实体类位置
  type-aliases-package: com.ming.ssm.pojo
#控制台打印sql语句
logging:
  level:
    com.ming.ssm.mapper: debug
2、持久层实现
customer_manager数据库中customer表的构建:

Customer:
package com.ming.ssm.pojo;
import java.io.Serializable;
/**
 * 数据库(customer_manager)中表(customer)所对应的实体类(Customer)
 * @author Mr.F
 *
 */
public class Customer implements Serializable{
	private static final long serialVersionUID = 1L;
	private Long c_id;
	private String c_name;
	private String c_password;
	private String c_address;
	private String c_phone;
	private String c_email;
	public Long getC_id() {
		return c_id;
	}
	public void setC_id(Long c_id) {
		this.c_id = c_id;
	}
	public String getC_name() {
		return c_name;
	}
	public void setC_name(String c_name) {
		this.c_name = c_name;
	}
	public String getC_password() {
		return c_password;
	}
	public void setC_password(String c_password) {
		this.c_password = c_password;
	}
	public String getC_address() {
		return c_address;
	}
	public void setC_address(String c_address) {
		this.c_address = c_address;
	}
	public String getC_phone() {
		return c_phone;
	}
	public void setC_phone(String c_phone) {
		this.c_phone = c_phone;
	}
	public String getC_email() {
		return c_email;
	}
	public void setC_email(String c_email) {
		this.c_email = c_email;
	}
}
CustomerMapper:
package com.ming.ssm.mapper;
import java.util.List;
import org.apache.ibatis.annotations.Mapper;
import com.ming.ssm.pojo.Customer;
/**
 * 持久层实现Mybatis框架中的Mapper接口,声名对数据库的操作方法
 * @author Mr.F
 *
 */
@Mapper
public interface CustomerMapper {
	List<Customer> findAllCustomer(); //查询所有客户信息
}
CustomerMapper.xml:
<?xml version="1.0" encoding="UTF-8"?>
<!DOCTYPE mapper
	PUBLIC "-//mybatis.org//DTD Mapper 3.0//EN"
	"http://mybatis.org/dtd/mybatis-3-mapper.dtd">
<!--
	实现Mapper接口对应的映射文件
	@author Mr.F
	 -->
<!--nameapce:名称空间,用于隔离sql语句,必须是所对应Mapper接口的全路径名(包名.接口名)-->
<mapper namespace="com.ming.ssm.mapper.CustomerMapper">
	<!-- id:必须是所对应接口中相应的方法名;
		 resultType:方法返回的结果数据类型。
		 -->
	<select id="findAllCustomer" resultType="Customer">
		SELECT * FROM `customer`
	</select>
</mapper>
3、业务层实现
CustomerService:
package com.ming.ssm.service;
import java.util.List;
import com.ming.ssm.pojo.Customer;
/**
 * 定义业务层接口
 * @author Mr.F
 *
 */
public interface CustomerService {
	List<Customer> findAllCustomer(); //查询所有客户信息
}
CustomerServiceImpl:
package com.ming.ssm.service.impl;
import java.util.List;
import org.springframework.beans.factory.annotation.Autowired;
import org.springframework.stereotype.Service;
import com.ming.ssm.mapper.CustomerMapper;
import com.ming.ssm.pojo.Customer;
import com.ming.ssm.service.CustomerService;
/**
 * 实现业务层的CustomerService接口
 * @author Mr.F
 *
 */
@Service
public class CustomerServiceImpl implements CustomerService{
	@Autowired
	private CustomerMapper customerMapper;
	@Override
	public List<Customer> findAllCustomer() {
		return customerMapper.findAllCustomer();
	}
}
4、控制层实现
CustomerController:
package com.ming.ssm.controller;
import java.util.List;
import org.springframework.beans.factory.annotation.Autowired;
import org.springframework.stereotype.Controller;
import org.springframework.ui.Model;
import org.springframework.web.bind.annotation.RequestMapping;
import com.ming.ssm.pojo.Customer;
import com.ming.ssm.service.CustomerService;
/**
 * 定义控制层类
 * @author Mr.F
 *
 */
@Controller
public class CustomerController {
	@Autowired
	private CustomerService customerService;
	@RequestMapping("findAll")
	public String findAll(Model model) {
		List<Customer> list = customerService.findAllCustomer();
		model.addAttribute("list", list);
		return "index";
	}
}
index.jsp:
<%@ page language="java" contentType="text/html; charset=UTF-8"
    pageEncoding="UTF-8"%>
<%@ taglib uri="http://java.sun.com/jsp/jstl/core" prefix="c"%>
<!DOCTYPE html PUBLIC "-//W3C//DTD HTML 4.01 Transitional//EN" "http://www.w3.org/TR/html4/loose.dtd">
<html>
<head>
<meta http-equiv="Content-Type" content="text/html; charset=UTF-8"/>
<title>客户管理页面</title>
</head>
<body>
	<h2 align="center">客户管理系统</h2>
		<table border="1px" align="center" width="700px">
			<tr align="center">
				<td>客户ID</td>
				<td>客户姓名</td>
				<td>客户密码</td>
				<td>客户地址</td>
				<td>客户手机</td>
				<td>客户邮箱</td>
			</tr>
			<c:forEach items="${list}" var="c">
				<tr align="center">
					<td>${c.c_id}</td>
	                <td>${c.c_name}</td>
	                <td>${c.c_password}</td>
		            <td>${c.c_address }</td>
		            <td>${c.c_phone }</td>
		            <td>${c.c_email }</td>
				</tr>
			</c:forEach>
		</table>
</body>
</html>
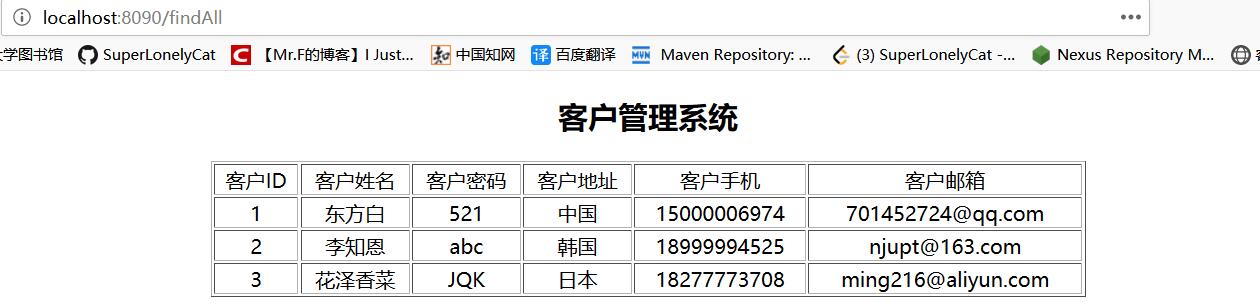
5、工程测试
在该工程下找到Spring Boot入口类:SpringbootCustomerApplication.java,单击鼠标右键,选中Run As -->Spring Boot App运行。在浏览器地址栏访问http://localhost:8090/findAll,其结果如下: