**
前言
**
加油啊!现在是学习core组件的时候了,虽然不知道有些什么内容,但是根据《Opencv3编程入门》看总共就只剩下,imgproc组件和feature2d组件了。真想快点入门,好有水平深入学习。

**
Mat类
**
Mat类由两个数据部分组成:矩阵头-----包括矩阵尺寸、存储方法、存储地址等信息。还有一个指向所有像素值的矩阵------根据所选存储方法的不同,矩阵可以是不同的维度----的指针。另外注意,一般情况下所有像素值的矩阵的元素在内存上是连续存储的,即无论几个维度,都会转换成1维存储----有时候则不是连续的。
矩阵头的尺寸是常数,但是矩阵本身的尺寸会改变,通常比矩阵头大数个数量级。因此,当程序中传递图像并创建副本时,大开销是由矩阵造成的。那么,除非万不得已,不应该进行大图像的复制,那会降低程序的运行速度。
- 为了解决此问题,Opencv使用了引用计数机制------与智能指针相关------思路是让每个Mat对象有自己的信息头,但共享一个矩阵。这通过让矩阵指针指向同一地址实现。而拷贝构造函数只负责复制信息头和矩阵指针,不复制矩阵。
#include<opencv2/opencv.hpp>
#include<iostream>
#include<iomanip>
using namespace std;
using namespace cv;


int main() {

	//仅创建信息头部分
	Mat A,C;
	cout <<"A size is "<< A.size() <<setw(5)<<"\tA info header address is "<< &A<<setw(5)<<"\tA matrix address is "<<A.ptr<double>(0)<< endl;
	cout << "C size is " << C.size() << setw(5) << "\tC info header address is " << &C << setw(5) << "\tC matrix address is " <<C.ptr<double>(0) << endl;

	//为矩阵开辟内存
	A = imread("E:/File/002.jpg");
	cout << "A size is " << A.size() << setw(5) << "\tA info header address is " << &A << setw(5) << "\tA matrix address is " << A.ptr<double>(0) << endl;

	//拷贝构造
	Mat B(A);
	cout << "B size is " << B.size() << setw(5) << "\tB info header address is " << &B <<setw(5) << "\tB matrix address is " <<B.ptr<double>(0) << endl;

	//赋值运算
	C = A;
	cout << "C size is " << C.size() << setw(5) << "\tC info header address is " << &C << setw(5) << "\tC matrix address is " << A.ptr<double>(0) << endl;


	//使用矩阵界定
	Mat D(A, Rect(0, 0, 100, 100));
	cout << "D size is " << D.size() << setw(5) << "\tD info header address is " << &D << setw(5) << "\tD matrix address is " <<D.ptr<double>(0) << endl;


	//使用行、列来界定
	Mat E = A(Range::all(), Range(0,3));
	cout << "E size is " << E.size() << setw(5) << "\tE info header address is " << &E << setw(5) << "\tE matrix address is " << E.ptr<double>(0) << endl;


	system("pause");
}
虽然这样的确节约了空间,但是有时确实需要复制矩阵本身,可以使用.clone()或者copyTo()。
Mat F=A.clone();
Mat G;
A.copyTo(G);
像素值的存储方法和颜色空间

上面这个是BGR色彩空间在内存上的示意图,这个矩阵里每一个元素都是由三个块(blue、green、red)组成的。
下面是BGR色彩空间的逻辑示意图,了解色彩空间对OpenGL学习也有帮助。

颜色系统有很多:
- RGB是最常见的,因为人眼采用相似的工作机制
- HSV和HLS把颜色分为色调、饱和度和亮度(明度)。这是描述颜色更自然的方式,比如可以通过抛弃最后一个元素,使算法对输入图像的光照条件不敏感
- YCrCb在JPEG图像格式中广泛使用
- CIE Lab*是一种在感知上均匀的颜色空间,适合度量两个颜色之间的距离
图像每个元素有自己的定义域,而定义域取决于其数据类型,如何存储一个元素决定了我们在其定义域上能控制的精度。最小的数据类型是char,占1Byte(8-bit),可以是有符号型,0~255之间。
或者无符号型, -127~+127之间。
尽管使用3个char,已经可以表示1600万种可能的颜色(RGB色彩空间),但若使用float(4-Byte)或double(8-Byte),则能给出更加精细的颜色分辨能力。
- 可是,增加元素的尺寸也会增加图像所占的内存空间
**
创建Mat对象
**
#include<opencv2/opencv.hpp>
#include<iostream>
#include<cmath>
using namespace std;
using namespace cv;

int main() {

	Mat img1 = Mat(4, 6, CV_8UC1);//创建一个4行6列,8位单通道矩阵
	/*
	Scalar::all(n) ---> 将Scalar结构体中的4个元素全部初始化为n
	randu()  ---> 用颜色类Scalar设定随机数范围,再把随机数放到矩阵中
	*/
	randu(img1, Scalar::all(0), Scalar::all(10));//从0-9产生随机数填充矩阵
	cout << "img1=" << endl << img1 << endl << endl;


	cout << "img1's rows = " << img1.rows << endl
		<< "img1's cols = " << img1.cols << endl
		<< endl << "img1's 2 row to 3 row are " <<endl<< img1.rowRange(1, 3)    //这个取前不取后 rowRange(x,y) --->  坐标(x,y-1)
		<< endl << endl << "img1's 1 col to 4 col are " <<endl<< img1.colRange(0, 4)
		<< endl << endl;


	//img1's 3 col equal to the number of img1's 6 col multiply 2
	img1.col(2)= img1.col(5) * 2;
	cout << "原始img1第三列元素变换成img1第六列元素乘2 = " << endl<<img1 << endl;

	//只能用()不能用[]
	Mat img2 = img1.row(2);
	cout << "img1's 3 row = " << endl << img2 << endl;

	img1.col(1).copyTo(img2);
	cout << "img1's 2 col = " << endl << img2 << endl;


	//创建3*3复数矩阵 1+5*j
	Mat img3(3, 3, CV_32FC2, Scalar(1, 5));
	cout << "img3 = " << img3 << endl;

	//重新创建5*5的8位无符号3通道矩阵
	img3.create(5, 5, CV_8UC(3));
	cout << "img3's channels : " << img3.channels() << endl;
	cout << "img3 = " << img3 << endl;

	//转换矩阵类型
	img3.convertTo(img3, CV_32F);
	cout << "img3's depth is " << img3.depth() << endl;
	cout << "img3 = " << img3 << endl;


	//创建全为0的矩阵
	Mat img4 = Mat::zeros(img3.rows, img3.cols, CV_8UC(1));
	cout << "img4 = " << endl << img4 << endl << endl;


	system("pause");
}
或者是对小矩阵,用逗号分割式初始化
Mat C = (Mat_<double>(3, 3) << 0, -1, 0, -1, 5, -1, 0, -1, 0);
cout << "C = \n" << C << endl << endl;
对已经存在的Mat对象,创建新的信息头
Mat RowClone = C.row(1).clone();
cout << "RowClone = \n" << RowClone << endl << endl;
Mat矩阵的创建
Mat E=Mat::eye(4,4,CV_64F);//4X4单位矩阵
Mat O=Mat::ones(2,2,CV_32F);//2X2全为1矩阵
Mat Z=Mat::zeros(3,3,CV_8UC(3));//3X3,3通道全为0矩阵
**
Opencv中的格式化输出方法
**
先初始化一个矩阵
(在使用格式化输出时,在第二个开始出现枚举常量未定义的情况(VS2017中出现红色波浪线),但是复制前一个,再把常量改成需要的枚举常量就没错了,我想这可能是编译器的Profile相关的问题)
Mat R = Mat(3, 2, CV_8UC3);
randu(R, Scalar::all(0), Scalar::all(255));
cout << "R = \n" << R << endl << endl;
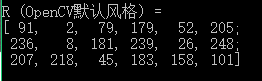
Opencv默认风格:
cout << "R (OpenCV默认风格) = \n" << R << "\n\n";
cout << "R (OpenCV默认风格) = \n" << format(R,Formatted::FMT_DEFAULT)<< "\n\n";
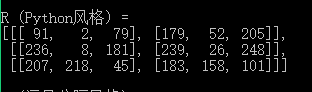
Python风格
cout << "R (Python风格) = \n" << format(R, Formatter::FMT_PYTHON) << "\n\n";
逗号分隔风格
comma separated values,CSV
cout << "R (逗号分隔风格) = \n" << format(R, Formatter::FMT_CSV) << "\n\n";

Numpy风格
cout << "R (Numpy风格) = \n" << format(R, Formatter::FMT_NUMPY) << "\n\n";

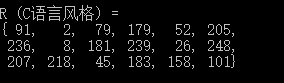
C语言风格
cout << "R (C语言风格) = \n" << format(R, Formatter::FMT_C) << "\n\n";
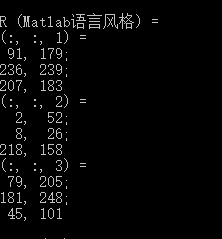
Matlab风格
cout << "R (Matlab语言风格) = \n" << format(R, Formatter::FMT_MATLAB) << "\n\n";
**
常用数据结构
**
	//2D Point
	Point2f p(5, 1);
	cout <<"Point(2D) = \n" << p << "\n\n";

	//3D Point
	Point3f p3f(2, 6, 7);
	cout<< "Point(3D) = \n" << p3f << "\n\n";


	//std::vector via cv::Mat
	vector<float> v;
	v.push_back((float)CV_PI);
	v.push_back(2);
	v.push_back(3.01f);
	cout << "Vector of float via Mat = \n" << Mat(v) << "\n\n";


	//std::vector of points
	vector<Point2f> vPoints(20);
	for (size_t E = 0; E < vPoints.size(); ++E) {
		vPoints[E] = Point2f((float)(5 * E), (float)(E % 7));
	}
	cout << "A vector of 2D points = \n" << vPoints<<"\n\n";
点是表示:Point类
Point类数据结构表示二维坐标系下的点,用法如下:
Point p;
p.x=10;
p.y=8;
//或者
Point p=Point(10,8);
//或者
Point p(10,8);
因为Opencv中有如下的定义:
typedef Point_<int> Point2i;
typedef Point_<int64> Point2l;
typedef Point_<float> Point2f;
typedef Point_<double> Point2d;
typedef Point2i Point;
所以,
- Point_、Point2i、Point等价。
- Point_、Point2f等价等等。
颜色的表示:Scalar类
Scalar表示具有4个元素的数组,在Opencv中被大量用于传递像素值,如BGR颜色值。Opencv毕竟是C++写的,参数个数的使用很随意。
Scalar(blue,green,red)
Scalar类的源头是Scalar_类,这是Vec4x的变种,常用的Scalar是Scalar_。这就是为什么很多函数的参数可以是Mat,也可以是Scalar。
尺寸的表示:Size类
typedef Size_<int> Size2i;
typedef Size_<int64> Size2l;
typedef Size_<float> Size2f;
typedef Size_<double> Size2d;
typedef Size2i Size;
和Point类类似。Size_是个模板类,上面的意思是
- Size_、Size2i、Size等价。
- Size_ 、Size2f等价等等。
template<typename _Tp> class Size_
{
public:
    typedef _Tp value_type;

    //! default constructor
    Size_();
    Size_(_Tp _width, _Tp _height);
    Size_(const Size_& sz);
    Size_(Size_&& sz) CV_NOEXCEPT;
    Size_(const Point_<_Tp>& pt);

    Size_& operator = (const Size_& sz);
    Size_& operator = (Size_&& sz) CV_NOEXCEPT;
    //! the area (width*height)
    _Tp area() const;
    //! aspect ratio (width/height)
    double aspectRatio() const;
    //! true if empty
    bool empty() const;

    //! conversion of another data type.
    template<typename _Tp2> operator Size_<_Tp2>() const;

    _Tp width; //!< the width
    _Tp height; //!< the height
};
上面是Size_模板类的定义,内部重载了一些构造函数,使用频率最高的是:Size_(_Tp _width, _Tp _height);
可以看到代码末尾定义了模板类型的宽高:
  _Tp width; //!< the width
  _Tp height; //!< the height
下面是最后一个常用数据结构
矩阵的表示:Rect类
Rect成员有x,y,width,height,分别左上角坐标和矩形宽高。常用成员函数有:
- .size()返回size
- .area()返回面积
- .contains(Point)判断点是否在矩形内
- .empty()判断矩形是否为空
- .tl()返回左上角坐标
- .br()返回右下角坐标
求两个矩形交集:Rect rect = rect1 & rect2 ;
并集:Rect rect = rect1 | rect2 ;
让矩形平移:Rect rectShift = rect + point ;
缩放:Rect rectScale = rect + size ;
参考:《Opencv3编程入门》